|
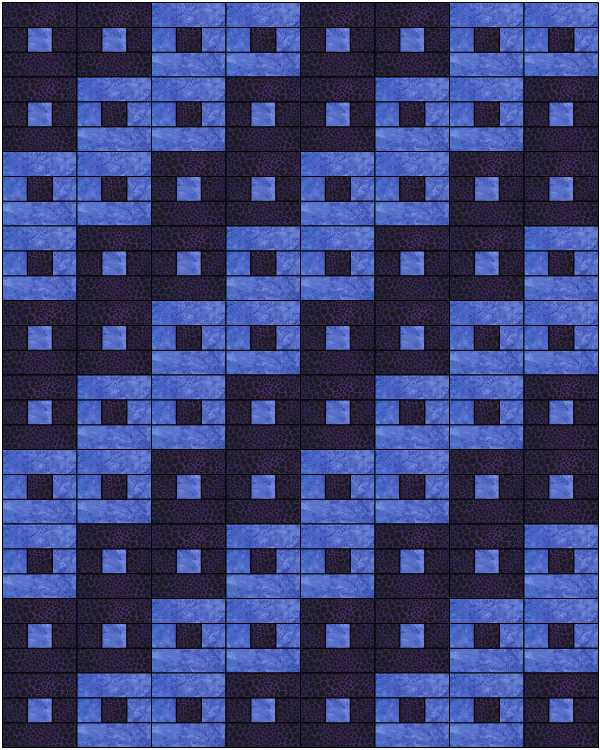
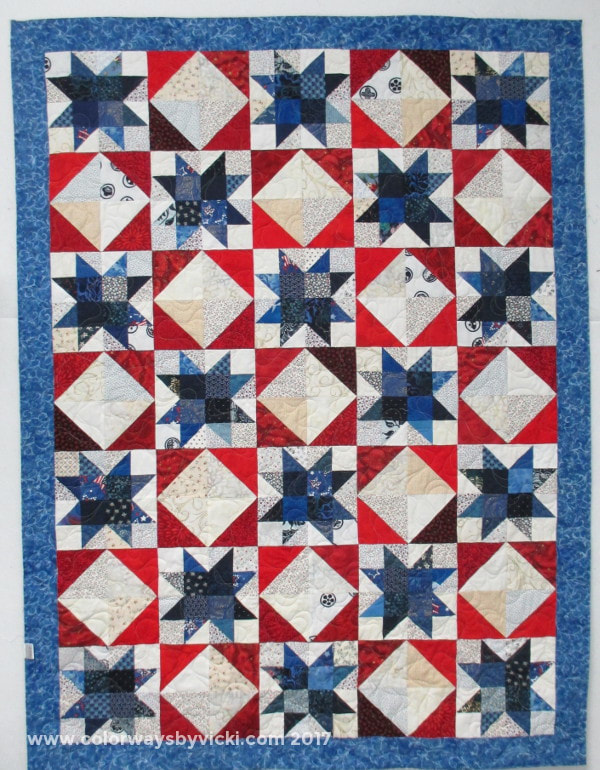
Everyone should do some level of kitchen remodel every 20 years or so. I unpacked the cabinets this weekend while I was watching the football games and I can't believe some of the old stuff that I found. I've been gluten free at least 8 years and we still had wheat pasta in the cabinet. I thought I had been keeping the spice cabinet pretty cleaned out but I discovered that I was pretty wrong on that front too. We got a lot of good laughs out of the things we found. We got it all done and today the work has started and given the Eagles win last night, there's nothing he could do today that would dampen my mood. He could play rap music and I'd be OK with it today. 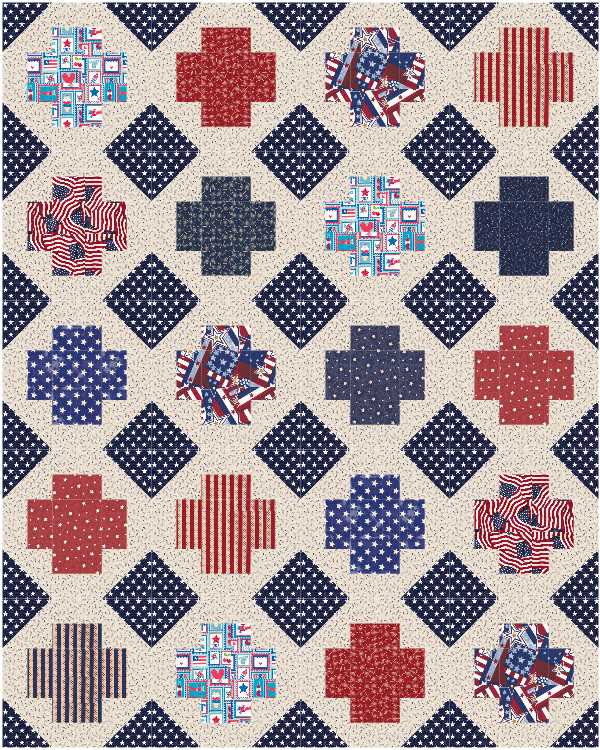 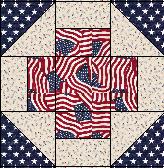 Regiment is the 4th veterans quilt that I designed for my program tomorrow. the perfect block size for these 48" x 60" quilts is 12" so I decided that for this one I would do straight blocks with no sashing or borders. I don't know what this block is called but it's really just a variation of the Churn Dash, one of my favorite blocks. This is another one that's good for scraps. You could even do both backgrounds as scrappy tonals.  Regiment 48 x 60 I have a pretty sizable stash of black on white and white on white fabrics. I bought all of them with plans to overdye them. Like the 10 year old pasta in the kitchen, these fabrics have been around at least that long. I'm trying to get them all dyed up this year to use in veterans quilts. The light blue background in this quilt was a black on white fabric. The dark blue was a flawed fabric that I couldn't sell. I dyed it and cut around the flawed areas. The centers are one Midnight Stash Pack of fat eighths. I would have used dark blue for the binding but I didn't have any if that left so I used the extra print.
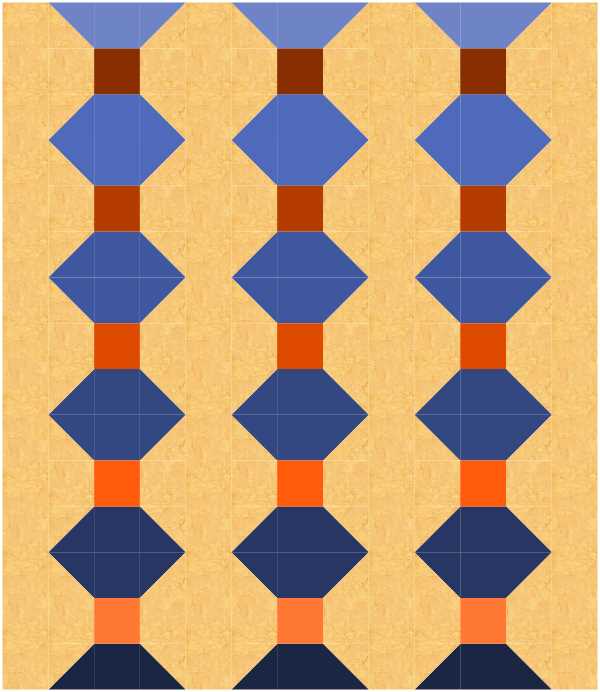
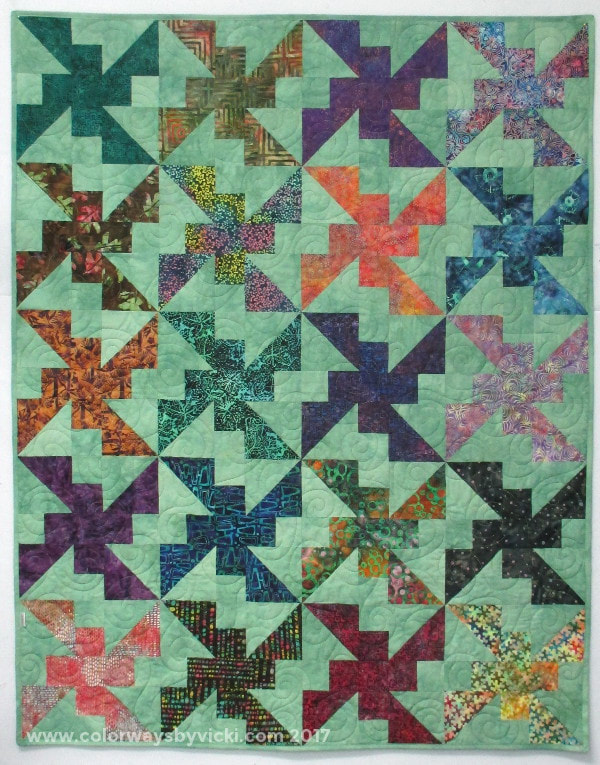
So I'm all ready for my program tomorrow and I have 10 kits cut out for anyone who wants them. Now it's time to get back to some of my project, like the beaded mosaic wall and Lost My Marbles quilt. I've also got to come up with a project for the monthly Country School sewing days...unless I come home Tuesday night with a bunch of veterans quilt kits. Well,, I survived the day of countertop shopping. I'm not planning to share photos of any of the work. It's just a kitchen and there's nothing particularly special about it. It's just that it's 20 years old and needs a little refreshing. While the contractor is here he's also doing a laundry list of things that have needed attention for a while. None of it is really photo worthy. One of the things that we are doing in the kitchen is removing the over-the-stove microwave/vent combo. Doing that in the original design was a giant mistake. If you are considering doing something like that in your own kitchen remodel, you might want to reconsider. The vent part doesn't work all that well and it gets absolutely disgusting. I can't wait to get that thing taken out and replaced with just a vent. We will be packing up most of the kitchen this weekend and getting ready for work to start Monday so sewing/quilting might be slow. 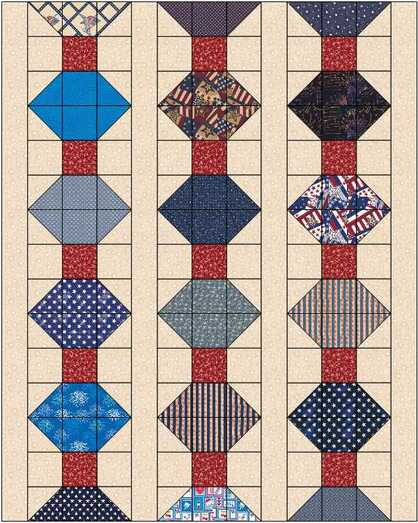 For now, though, I still have 2 more veterans quilts to share. Before I talk about today's quilt I want to answer a question from yesterday. The veterans quilts that we make are 48 x 60 so that's the size of these patterns. But any of them would be really easy to make larger. The size we make was recommended by the hospital. This size is goof for hospital beds because they don't get caught in the bed mechanism and for people using them while receive treatments, these are perfect for use in a chair. I called today's quilt Redoubt. When I started working on this one I was looking at a 12" block as the foundation for the quilt. 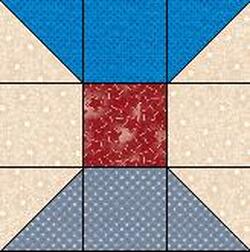 The foundation of this quilt is this simple spool block. The lantern motif comes from placement of the colors and columns of blocks are separated by 3" sashing. 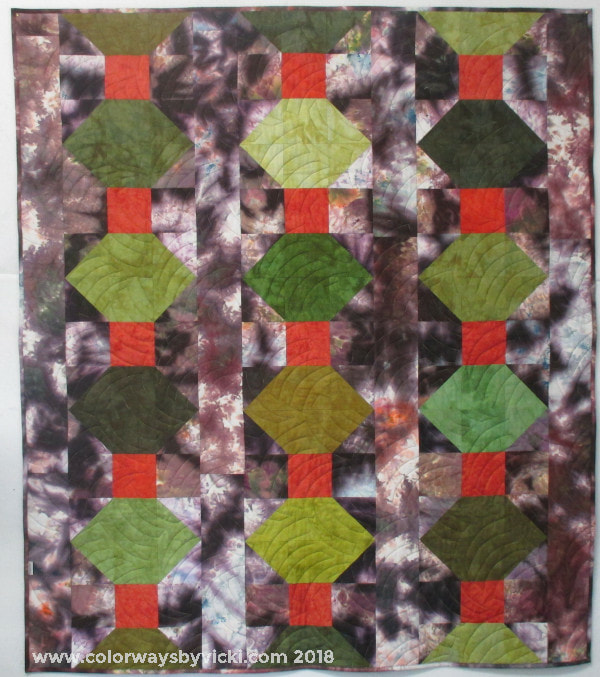 Now, I know that my version isn't going to appeal to everyone, but I love it. It's a lot brighter in real life and has more purple in it. I wanted to use one of my Galaxy fabrics as a background and I paired it up with lots of different greens.
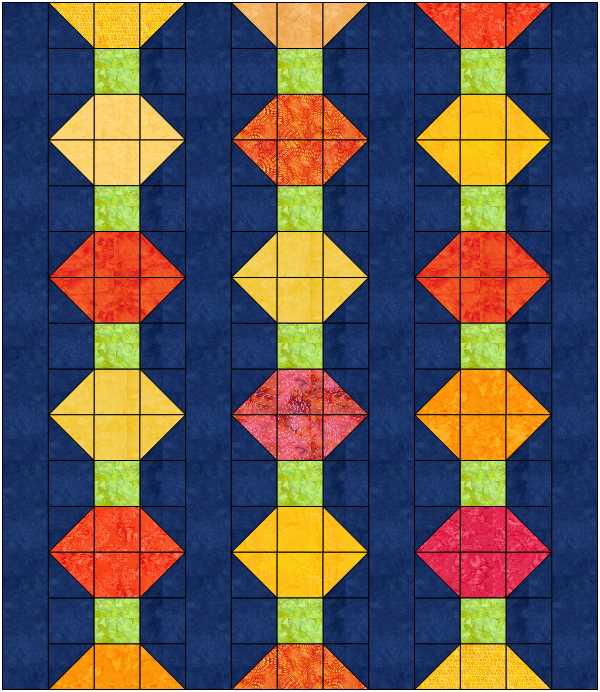
Here are a couple of other colorways that you might like better. If you want to make one of these you can get the tutorial here.
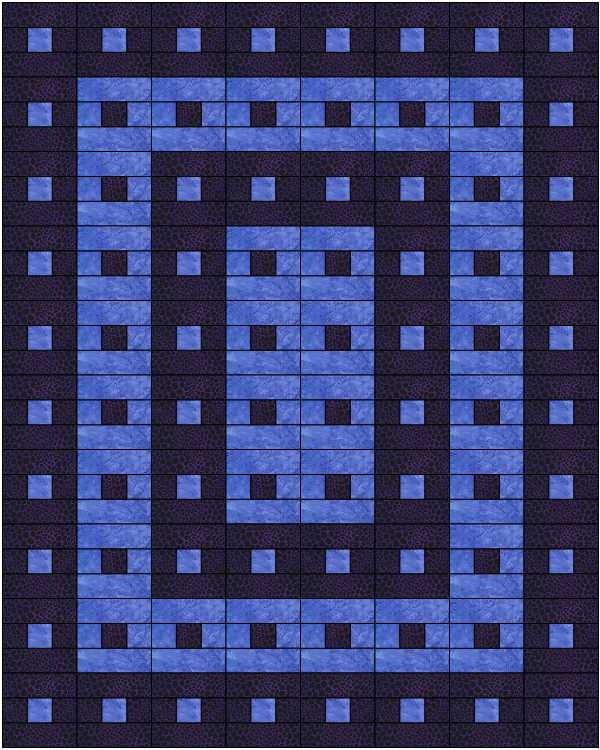
Well, things are about to get pretty "exciting" around here. We are finally starting a mini kitchen remodel. The best part about it is that the husband of one of my best friends is doing the work. We've waited a long time to have this done because we specifically wanted him. His work is meticulous! So, I'm excited about that part. The allergy-girl half of me is anxious but hoping for the best. Fortunately we can block off that room really well so, at this point, I'm remaining positive. But if I disappear for a day or few over the next month or so, you will know why. Today I'm doing counter top shopping after my shooting lesson. It seems like a natural transition, doesn't it? I just hope I get to end the day with some quilting or sewing. 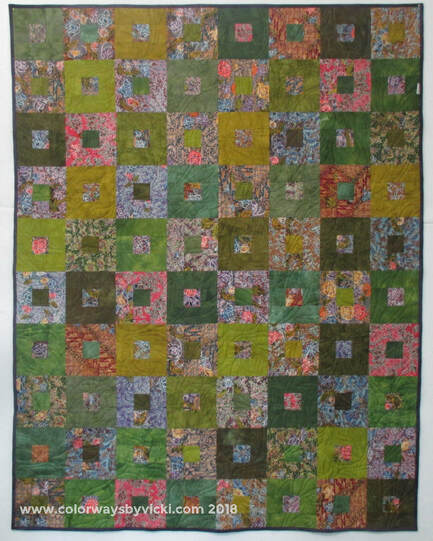 But let's get back to quilting. Today's veterans quilt is one that I'm calling Blockade. I think this name actually makes sense since it's a square surrounded by a square. This quilt is great for scraps and jelly rolls because it's all based on 2.5" squares and strips. The finished block size is 6". This particular one is made with the scraps from my Indonesian batik quilt. I pulled a variety of green hand dyed fabrics to go with it. The color in this photo is actually pretty bad. I promise that the real quilt looks a lot better in real life. The quilt top went together really quickly and I was about to do a lot of string piecing. Then I had fun in EQ designing some alternative layouts.
I think it would be cool to divide a huge variety of scraps into light and dark to make one of these quilts. If you haven't already figured out how to make it you can get the tutorial here.
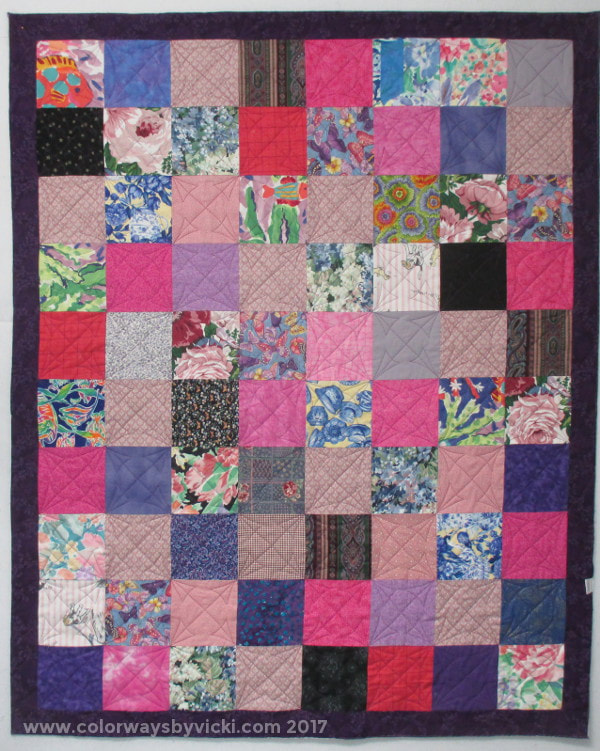
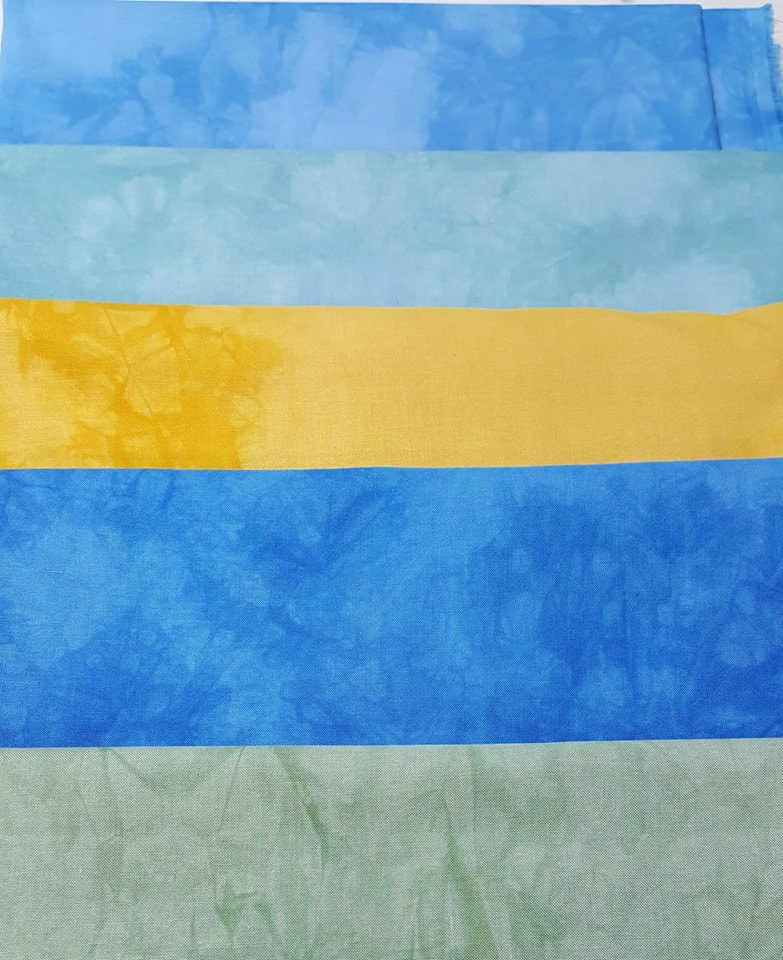 I was going to wait until I did my program next week before I shared these quilts but this is pretty much all I've been working on so it's all that I have to share! I've gotten motivated to focus more on the veterans quilts because we have such a wonderful group of nurses at the veterans hospital that make sure these quilts are given to people who appreciate and love them. The nurses are so grateful to have these to give to their patients that really need a boost. I just want to make sure that they always have a supply. We also have a great set-up at Country School Quilters to make these. We use our dues money and other fundraising money to purchase backing and batting. I used to get printed backing but now I only buy white so that I can dye the backs. Here are a few that I dyed in November and December that are all ready for some quilts. I used to do all of the quilting but now we have 4 longarmers in our group and we share the work. I decided to do a program for January with 4 new quilt ideas and that's what I have been working on. I wanted projects that were easy and I'm even cutting a couple of kits out of each one for members who don't like to do the cutting step. 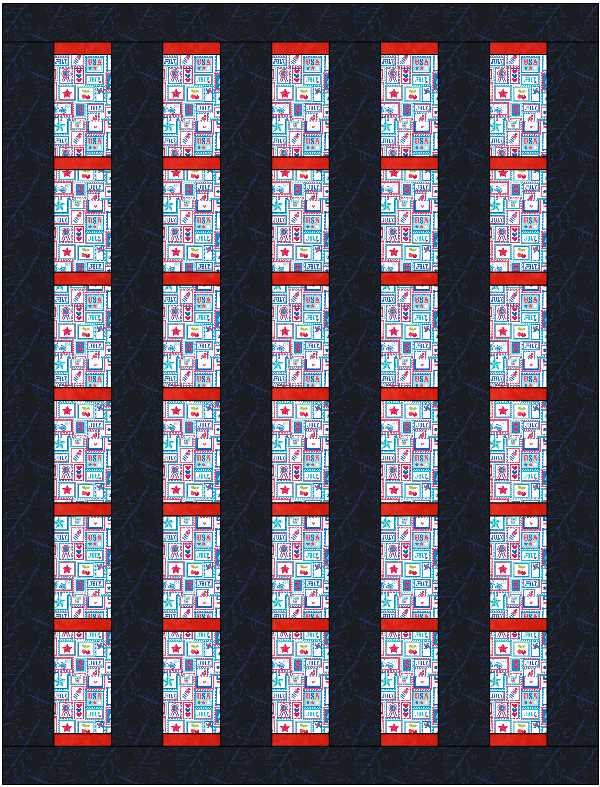 This first one is SOOOOOO easy. I decided to call it "Strength" because it's pieced in columns, or pillars....get it? I know, it's a reach, but it was late and that was the best I could do. The real point of this design was to make a quilt that would make great use of large scale prints or other "special" fabrics that just need a little framing to show them off. 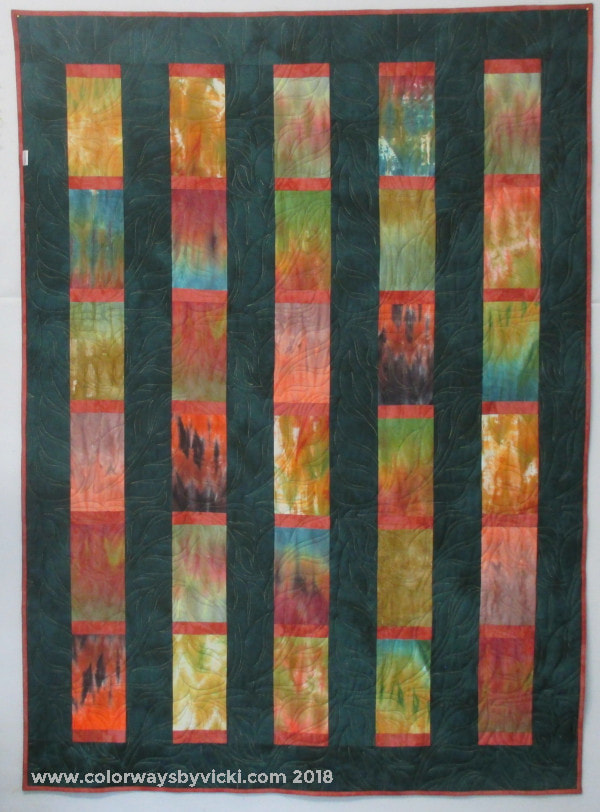 For my version I used my "waste" fabrics and I think it created kind of a stained glass look. This could be easily adjusted to make a QOV or bed quilt size. I'm thinking about doing one using all of the Paula Nadelstern fabrics that I've collected with a black background. I think that could look pretty awesome. The kits I made have blue background, red bars and patriotic plaids as the feature fabrics. I think they will make a couple of really cute quilts. I could probably make about 30 kits just with my collection of waste fabrics!
The pattern, such as it is, is here. 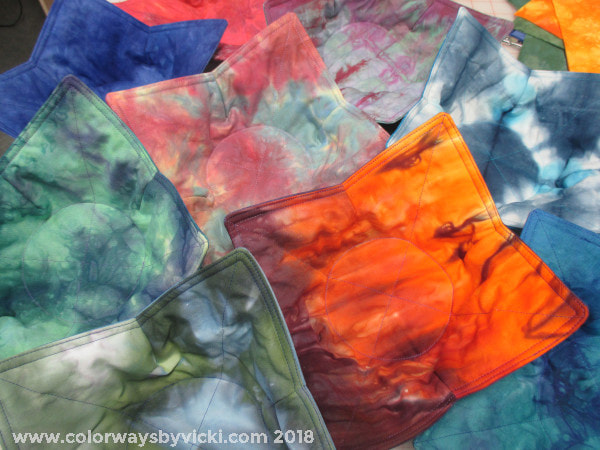 They are done! All 11 sets (22 bowls) are done and ready for gifting....except for the 2 I'm keeping for myself.
I wrote a tutorial for the way I made mine. I was really disappointed with all of the other tutorials that I saw online. They looked very pretty in their styled photos but once I read through the steps I knew that none of them would hold up through one trip through the washing machine. I don't know about you, but when I microwave soup or oatmeal there's almost always overspill. These hot pad are going to get washed a lot so I added some steps to make them last. Get the tutorial here.  For my booth at the AQS Virginia Beach show, I am displaying several quilts but I wanted another way to display the fabrics. After lot of research I discovered Martha Stewart's giant fabric flower. Fabric flowers would be perfect! But I needed mine to hang on a wall instead of filling a vase. So I set out to modify her instructions for my needs. My new tutorial, Big Fabric Flowers, is the result. I'm going to make several flowers in different sizes and designs but this prototype was designed specifically to show off my Color Wheel fabrics that come in a set of 10. 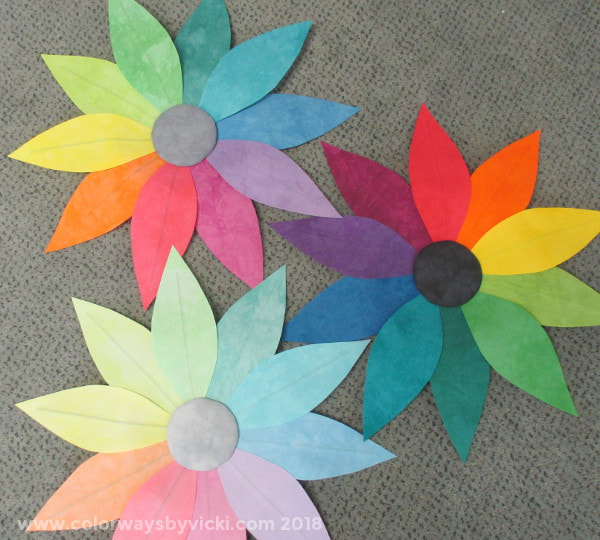 Here are the 3 flowers for the Color Wheel fabrics and I love them! Color Wheel fabrics come in dark, medium and light shades so there's one flower for each pack. They will be shaped before they are hung but I'm keeping them flat for travel. I used 3 shades of gray/black for the centers.
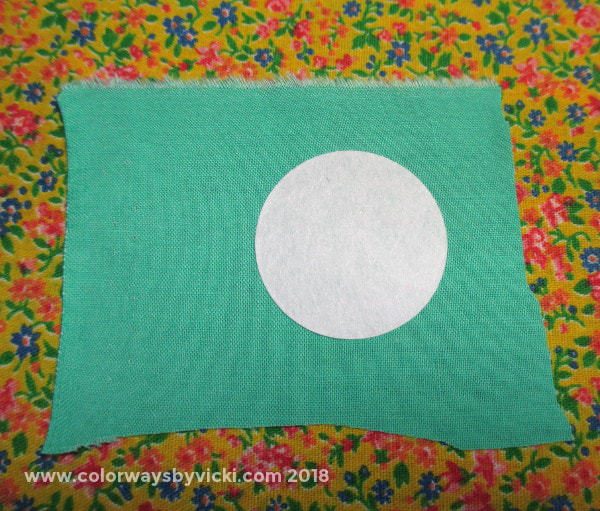
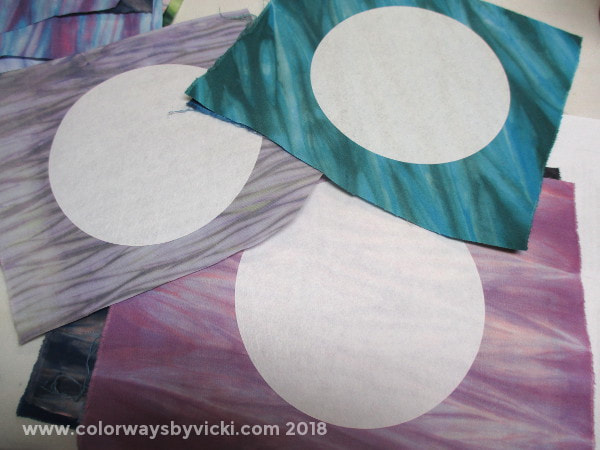
I have more planned including a bigger one made with a Crystal and flowers of Shibori and Shades Packs. 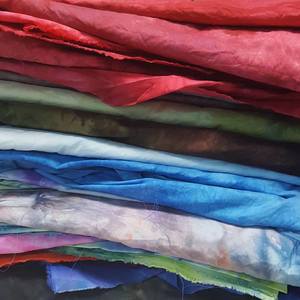 My weekend was solely an ironing marathon. I had gotten very behind because of my arm. But it's getting better now and I couldn't take the pile of fabric anymore. I ironed, ironed and ironed over 115 yards and I'm much happier. In between ironing sessions I would sit down for a break and make circles for my 2 applique projects. So since I don't have anything except this stack of unironed fabric to share, today seems a good day to share how I'm doing the applique circles. 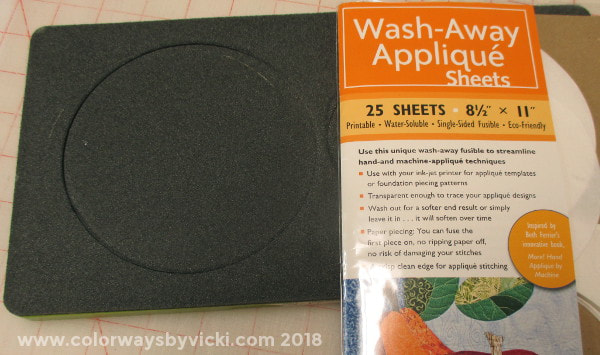 For starters, I basically use this process from Leah Day. Her video is very clear and it works great! So start by watching that. My first step was to decide on the size of circles and cut the Wash-Away Applique sheets and freezer paper in those sizes. I based the size on the size of Go! dies that I have. I used 5" for the shibori and 1" for the centers of my flower applique circles. Leah doesn't use the Wash_Away Applique sheets but I like them because they stay inside the applique and they prevent anything under that applique from showing through.
I fuse the applique sheets to the back of my fabrics. The biggest thing I learned from Leah was to leave large margins around the applique. I used to trim the fabric to about 1/4" but watching the video I learned how much easier it was to work with them with wider margins.That tip was genius! 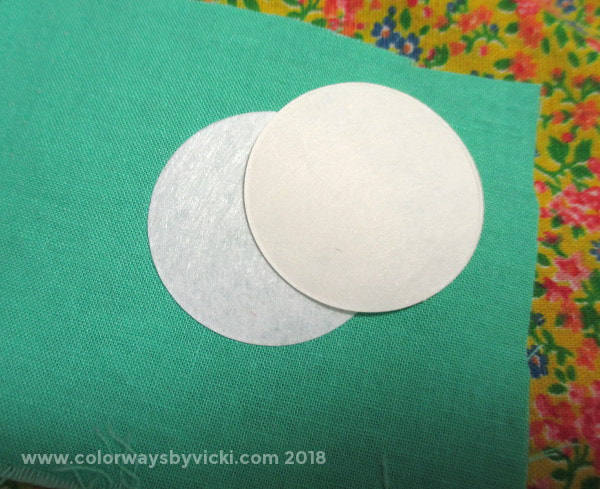 Next I fused 2 layers of freezer paper together like Leah recommends and ironed that over the applique sheet.  Then it was time to make some starch. I use this recipe. I don't use much but it's cheap to make. I put a little into a small cup and found a small paintbrush. 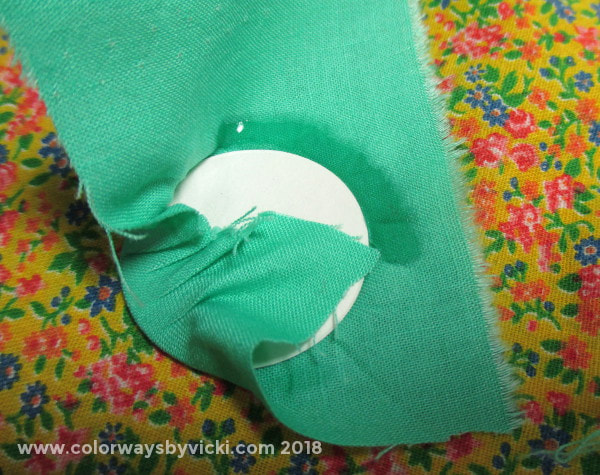 With the paintbrush I add some starch just around the edge of the applique shape. 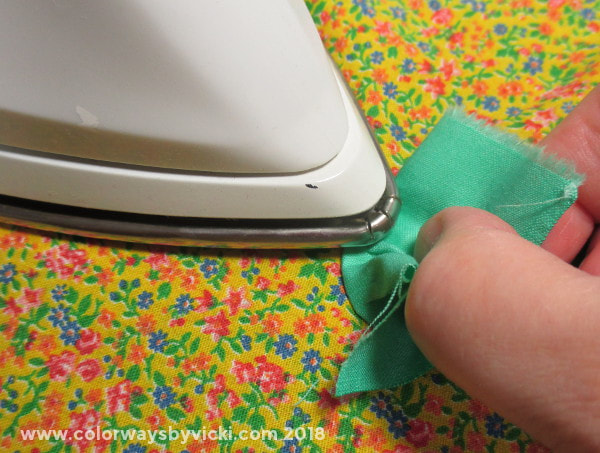 Leah's video give more detail about the process but you can see here how much easier it is to get a great sharp edge when you have more fabric to work with. I just carefully work around the applique painting and pressing with the tip or edge of the iron. 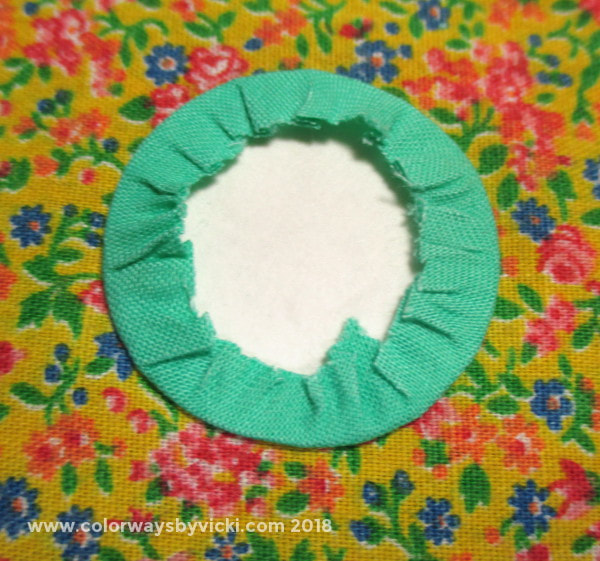 After it's all pressed I'll trim the excess fabric, peel out the freezer paper and press it one more time. 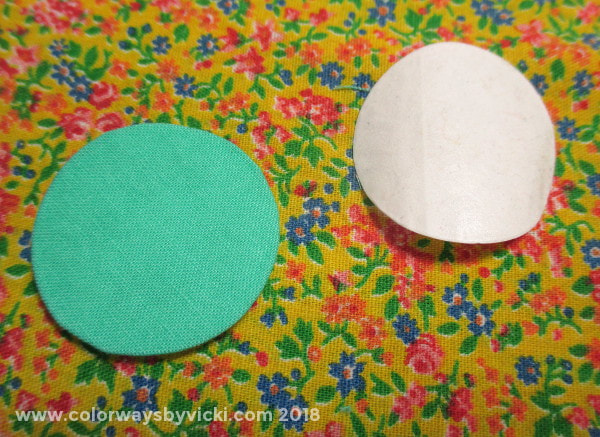 That's a pretty cgood circle! 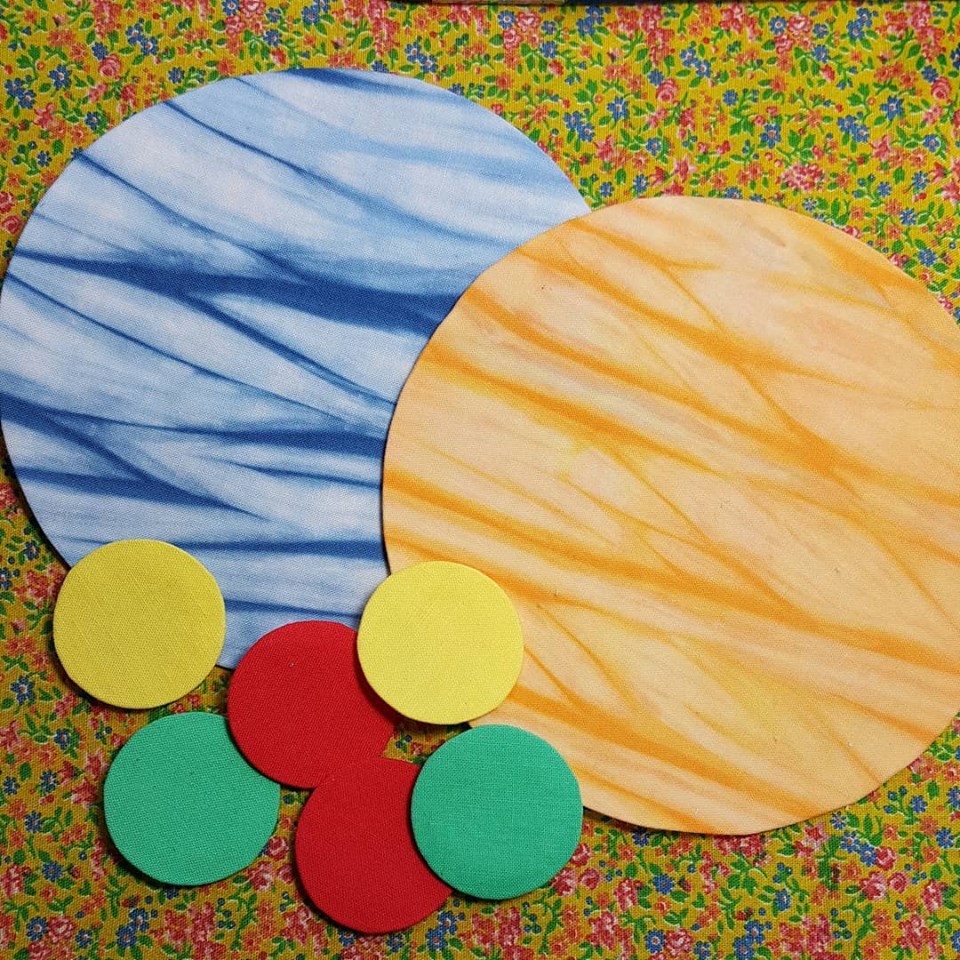 Here are a set of circles ready to applique.
That hideous background fabric is just something I use to cover the ironing board to protect it from getting a lot of starch on it. That gem is from my Aunt's fabric stash that she gifted to me over 10 years ago. Marcy is back doing more quilting today so we'll have a post soon to show how to fix a major quilting faux pas. 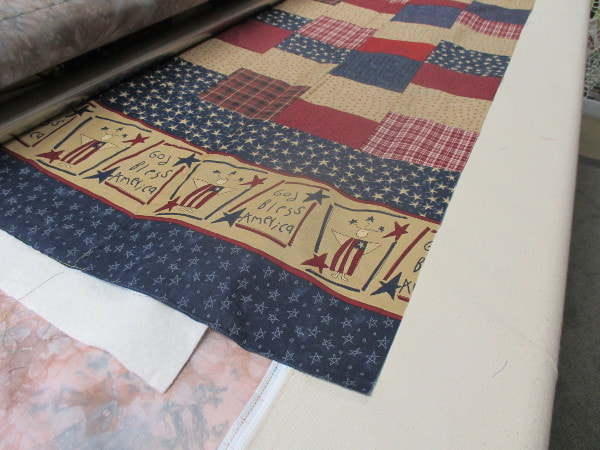 I shared this with you yesterday. I still remember the first time this happened to me and the level of panic that ensued. Fortunately, at the time, I was a member of an online quilting board and someone walked me through the basic steps to fix a short backing....without having to remove the quilt from teh machine. 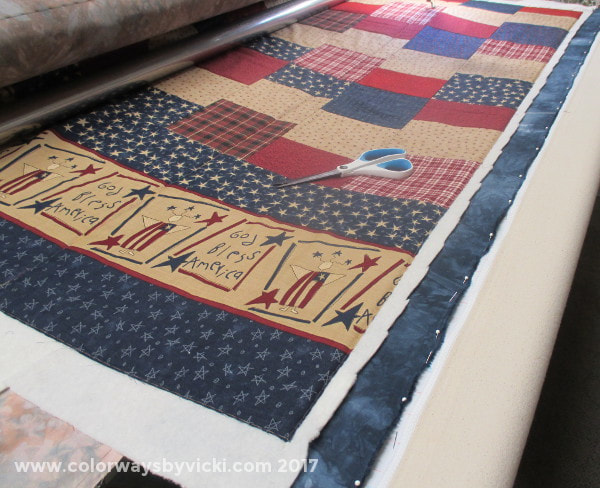 When it happened again earlier this week I decided to document the process and put together a tutorial so that anyone can find it whenever it's needed.
You can find the tutorial here. I'm now done with veterans quilts for a while so I'm going to load a quilt of my own and work on some new postcards this weekend. What are your plans? I'm going to finish up this series talking about the ultimate blankets: charity quilts. When I bought my first longarm it arrived the week before Hurricane Katrina hit Louisiana and Alabama. You may remember that there was a huge quilt drive for Katrina quilts. I think that actually got really out of hand but I saw a great opportunity to practice on my new longarm and jumped right in. I bought a couple of quilt tops off eBay and got a few from my guild members. I'm happy to tell you that I don't have any photos of those quilts. The quilting was pretty awful but they got done and I got practice! New longarm owners often seek out charity quilts for practice and that's a great thing but you have to be careful that your charity quilting doesn't start to overwhelm you. Set some rules around your charity quilting.I quilt a lot of charity quilts for my quilt club. We donate lap size quilts to the local VA hospital. We've been doing it for several years and finish about 60 quilts each year. I decided that quilting them would be my contribution to charity quilting in addition to making 2 QOV quilts each year. I quilt up to 40 of the veterans quilts each year and I'm able to do that because I set some rules. Before you accept your first charity quilt you need to set some rules too or else you will be set up for burn out. Here are my rules for the quilters:
Here are my rules for myself:
I don't have any problems with people trying to guilt me into quilting. Several of our members make quilts for other organizations. I don't quilt those quilts. Occasionally we make a large raffle quilt and I don't quilt those either. I've set the veterans quilts as my contribution. You cannot do everything. Maybe your contribution will be baby quilts for the local hospital or the one raffle quilt that your guild makes every year or pet pads for the local shelter. Find the cause that is meaningful for you and doable with your schedule and focus on that. Here's what you say to everyone else: "I'm sorry, I have quilts to fill my charity quota for the year. Do you want me to put you on the list for next year? I can call you when I'm ready to take another if you still have it them." "I'm sorry, I can't commit to that deadline. I do charity quilts when I have time between my customer/personal quilts. It could be as long as 6 months before I can get to it." "No, I'm sorry, I don't custom quilt charity quilts. I select the design and thread. If you need a specific design you will likely have to pay someone to quilt it for you." It's also perfectly OK for you to decline to do any charity quilting. Do not let anyone guilt you into doing any quilt that you don't want to do. Be firm about your rules to maintain your sanity. Remember that you are doing someone a favor. No one has any right to use your time for free without your full willingness.I hope you've enjoyed the series this week. As I said Monday, this is a series that I've been wanting to writes for a long time. It's all the information that I wish someone has told me when I bought my first longarm in 2005.
In a couple of weeks I'll move all of these posts over to the tutorial section of the web so that they will be easier to find. On Monday we will be back to regular programming! One of the cool things about getting into longarm quilting is that you are open to a whole new world of classes and tools to buy. I've been to Machine Quilter's Expo, Machine Quilter's Showcase (now defunct) and Birds of a Feather. I've bought dozens of quilting DVD's and watched hours of YouTube videos. I love the shows because there are so many classes to take in one weekend and so many kindred spirits to meet. But if you sign up for 3 full days of classes you can get very overwhelmed. Be wary when you hear "this is the ONLY way to do this".Listen to what the teachers have to say but remember that what they are teaching is what they figured out worked for them. That might or might not work for you but you have just learned another option to try. Pick one thing from each class you take to practice.Classes are only good if you practice what you learn. To get the most out of classes pick one thing from each class that you want to practice. WRITE IT DOWN at the class on a "NEXT PRACTICE" list. Then go home and load up some blankets and try them out. I can't tell you how many classes I've taken that I never practiced. That's nothing but wasted money. Now I often prefer to buy one video, watch it a couple of times and then practice right away. I still go to shows because I love to network with other longarm quilters and I do take a few classes to learn specific things. I have even taken classes specifically to get the opportunity to try different brands of quilt machines. When you go to shows and classes set some goals for yourself ahead of time so you pick smart classes and set aside some practice time right after the show. Find your own groove. You can't be great at everything.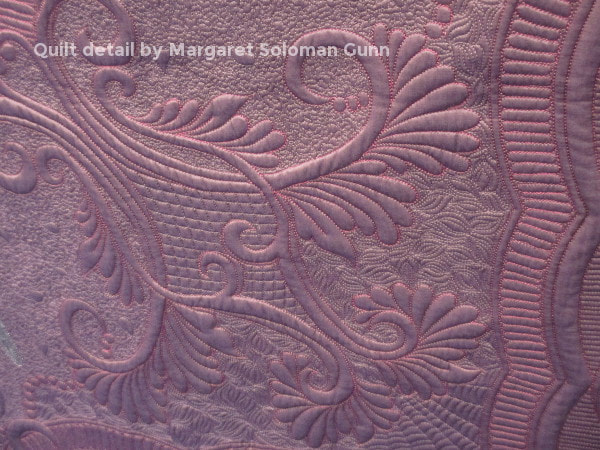 As you go to quilt shows and study quilts online start paying attention to collections of quilts by different quilters. This is a photo of a quilt by Margaret Soloman Gunn that I took at Mid-Atlantic Quilt Show in 2016. Margaret has a very distinctive style. Bethanne Nemesch has a very distinctive style. So does Marilyn Badger, Jamie Wallen and Judi Madsen. They all have individual and identifiable styles. The problem is that we take classes from all of them and then expect that we should be able to quilt like all of them. That's impossible! This came to a head for me over leaves. Jamie Wallen's leaves to be specific. I love Jamie. He's a great teacher and I have several of his DVD's. He appropriately calls his style of quilting "mystical" and that perfectly describes it. I have tried over and over and over to quilt his leaves and his style of quilting. I can't do it. It's just now how I think. I'm a better quilter because of what I've learned from him but you can't really see his influence in my quilting. That's OK.  I can't do Jamie's leaf but I can do MY leaf. This is my leaf. All of my leaves look like this. 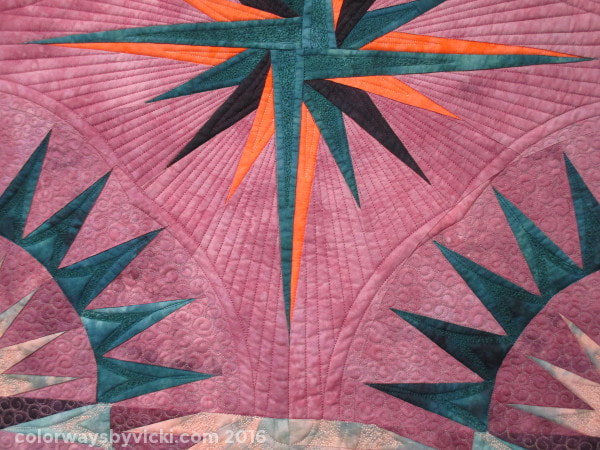 While I love the fantastical quilting of Jamie and Bethanne and the formal feathers of Margaret, my true love is ruler work and fills. That's the kind of quilting that is joyful for me so that's pretty much all I do on my "quilts". I still experiment on blankets and I'll occasionally add some feathers but I stay pretty well set in my groove.
Take classes from teachers with all kinds of expertise. You will pick up nuggets of helpful information from all of them. But if what they are doing seems torturous for you then that's not for you and you just learned something!. It's also OK if your groove is wavy lines. You can quilt every quilt forever with wavy lines. I know a quilter who basically does that. Her quilts are about the color, value and pattern of her quilts. The quilting is utilitarian. She still has a longarm and it does for her exactly what she wants it to. Don't pressure yourself. It's a tool and you need to make it work for you. |
FeedsTo subscribe click the RSS Feed button and copy the URL of that page into your blog reader.
In Bloglovin you need to search "Colorways By Vicki Welsh" to find the blog. About Vicki
I'm Vicki Welsh and I've been making things as long as I can remember. I used to be a garment maker but transitioned to quilts about 20 years ago. Currently I'm into fabric dyeing, quilting, Zentangle, fabric postcards, fused glass and mosaic. I document my adventures here. Categories
All
Archives
April 2024
|


 RSS Feed