|
In between this rabbit hole of the cat postcards, there have been some football games so I've been steadily making progress on my applique blocks. I seem to have a routine where I alternate 4 flower blocks and 4 moon blocks. That seems to keep both projects moving along and keeps the boredom down. Last night while watching my Hokies choke, I finished the 4th of the latest Loony Moony blocks. 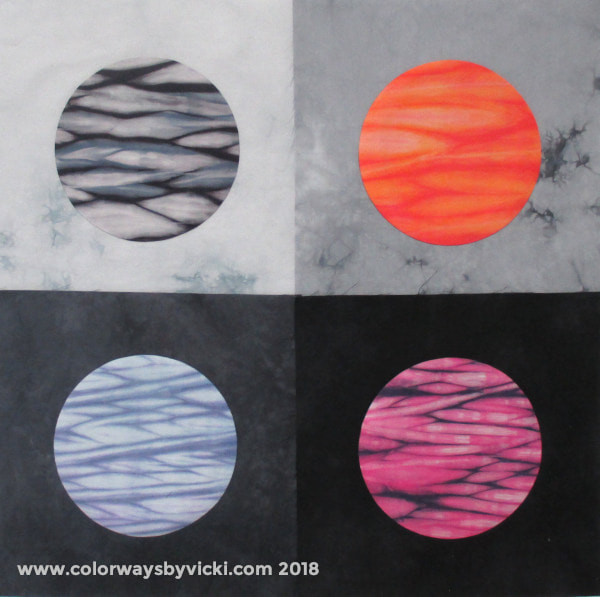 It will be a long time before I get bored with this project. 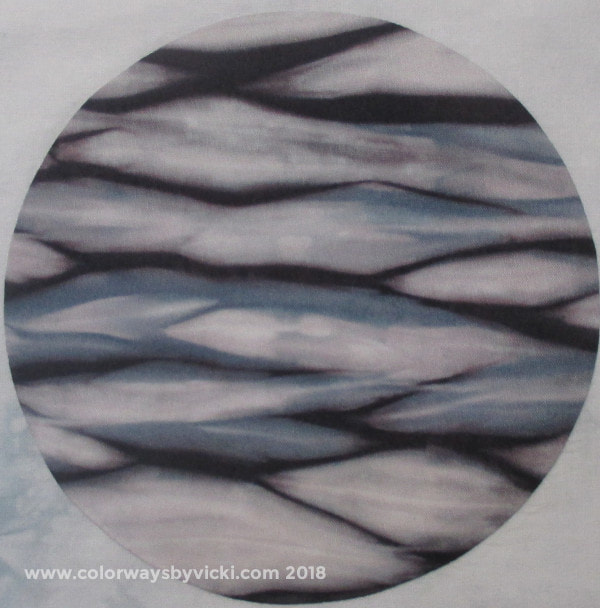 This is my favorite fabric of this group. I just love how the gray-blue weaves across the middle of the moon. If you want to do a moon project yourself, I've added tons of new Shibori fabrics in the shop, including a Stash Pack of fat eighths. 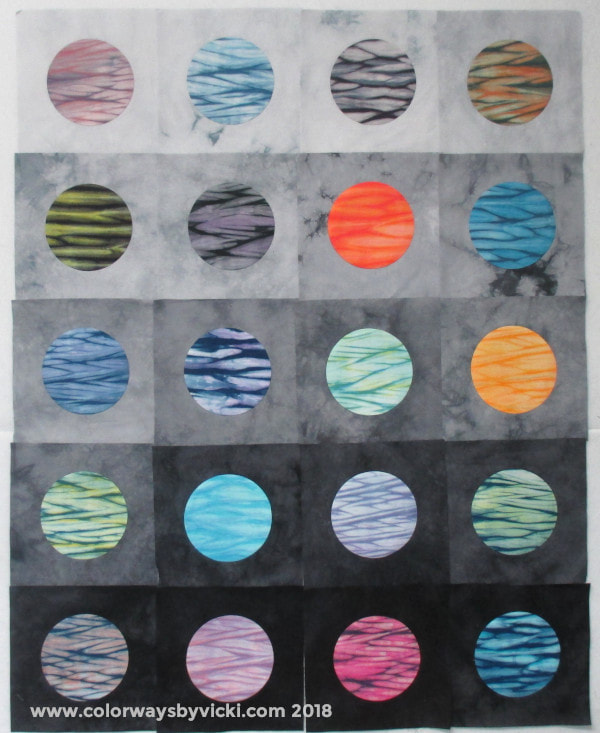 I just had to lay out the blocks that I've finished so far. This is about a third of the total number of blocks that I have prepared.
Love. Footballs season this year is only going OK for my teams so far but as it's also applique season, that part is going great! 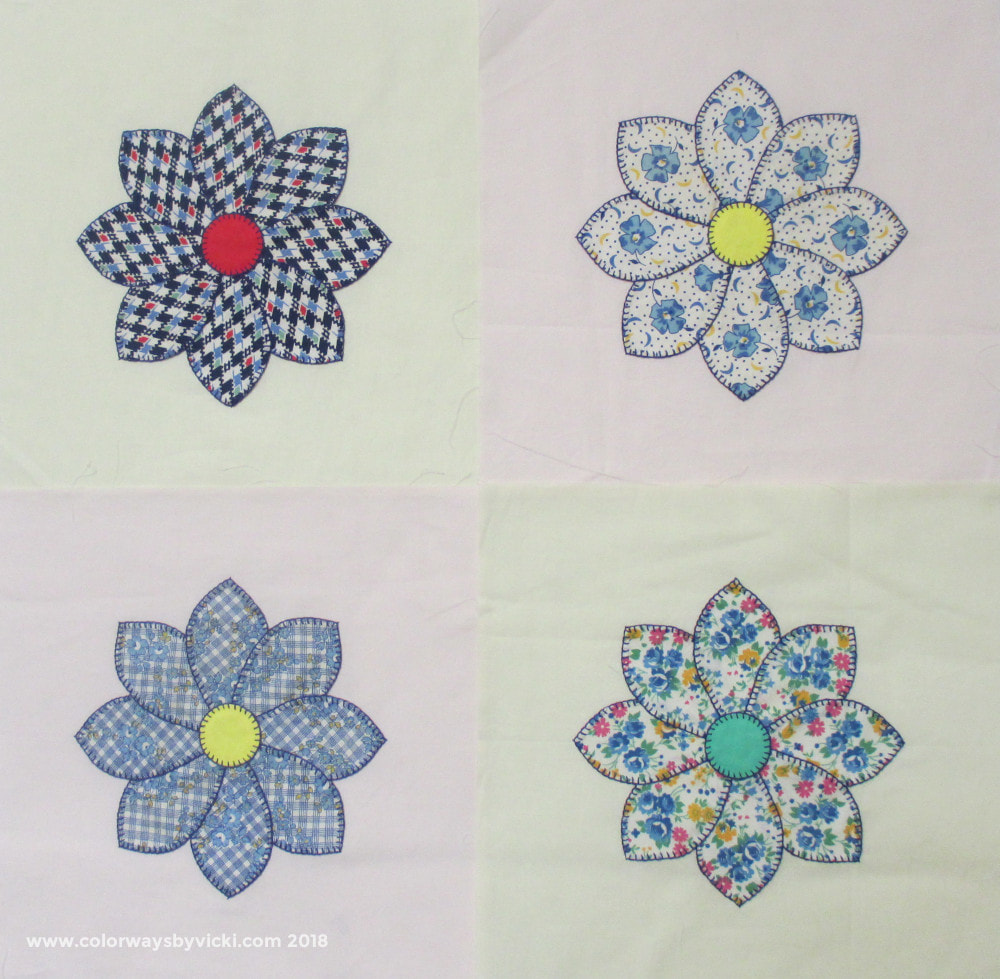 Here are the 4 most recent flowers that I finished. Look at the 2 on the right. Didn't the lady who made these do a great job of fussy cutting petals? I hope she is happy somewhere that I'm doing something with all of her love petals.They sure do make me happy when I'm stitching them.
Tonight is another session of applique and I've switched over to moons for a bit. I hope I'll have another update soon. Yay, it's Country School sewing weekend! Today and tomorrow I'll be sewing with my friends and working on my Indonesian Batik quilt. I might even have the top together by Monday. I also hope to get my Antelope Canyon quilt loaded and basted and read for some easy overall quilting. Meanwhile, I've made more Loony Moony blocks! These are so much fun to stitch. 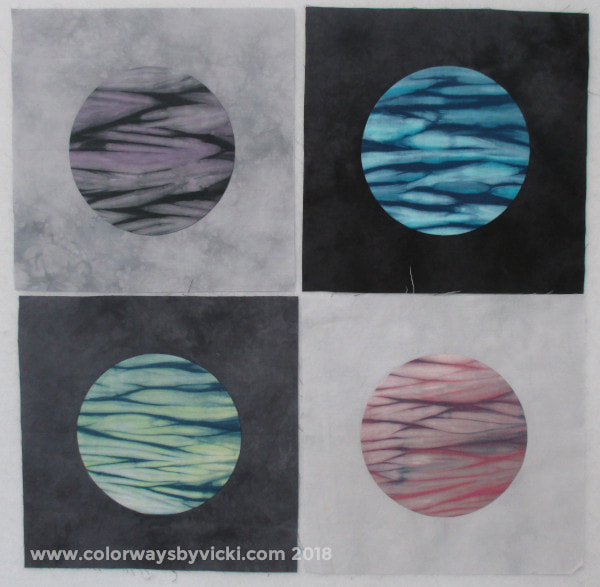 My cold is clearing up and I plan to have a fun weekend. I hope you have a great weekend too!
I'm still rolling my eyes at myself for starting TWO hand applique projects. Part of me wonders what I was thinking. But the other part of me is happy to have some variety. I tend to do 2 or 3 vintage flowers and then switch and do 2 or 3 moons. Here's where I am on the moons. 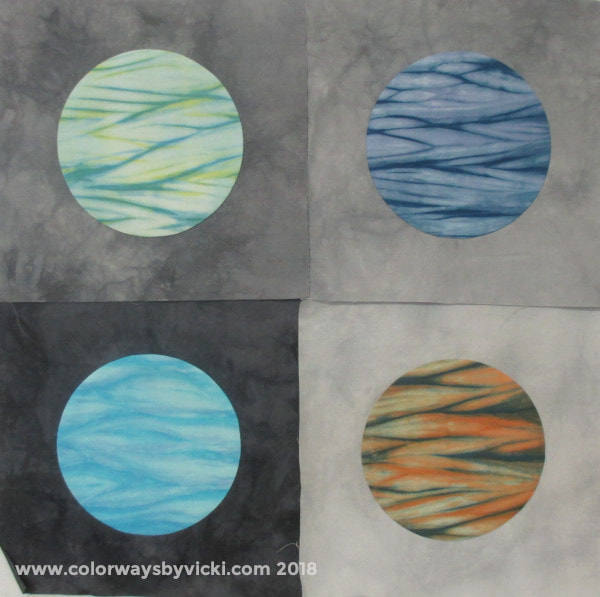 Here are the 4 most recent ones. 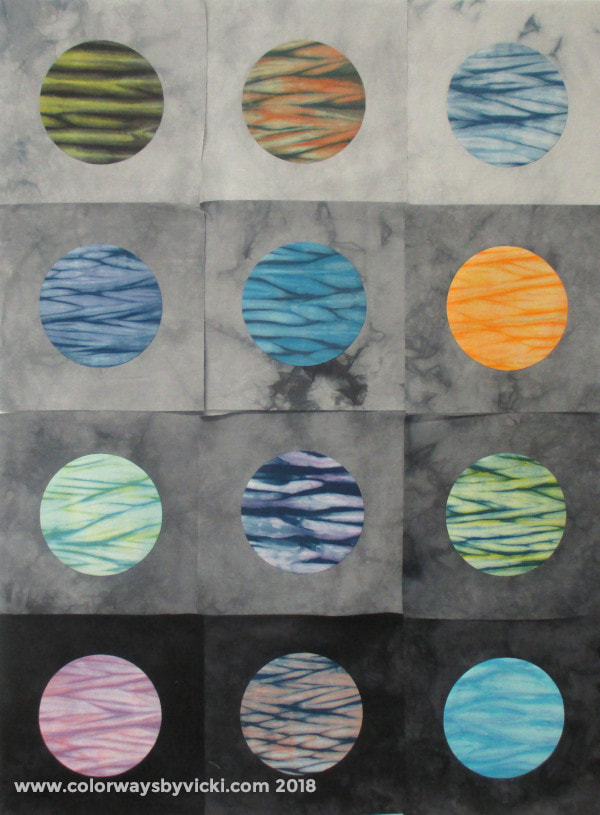 I finally have enough of them done that you can get an idea of how they will looks with a gradient background effect.
I'm in love! Lots more to do. 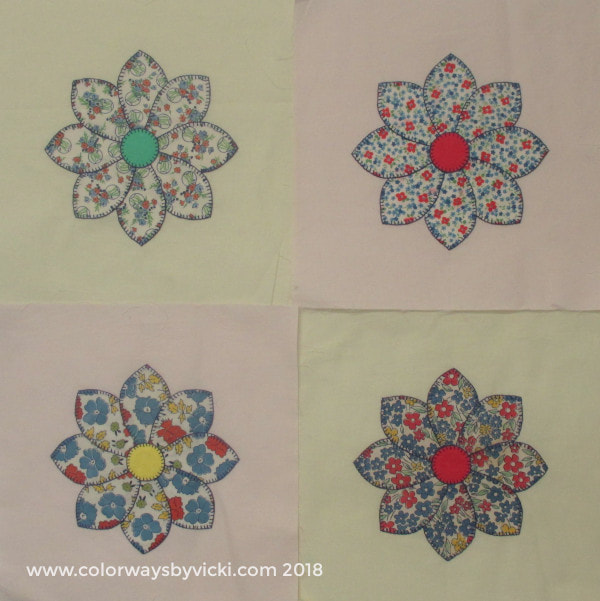 It's football season so you know that I'm spending more time in front of the TV so my handwork projects might see some significant progress. I had 2 of these done before vacation, finished one on vacation and finished the other during football Sunday night. 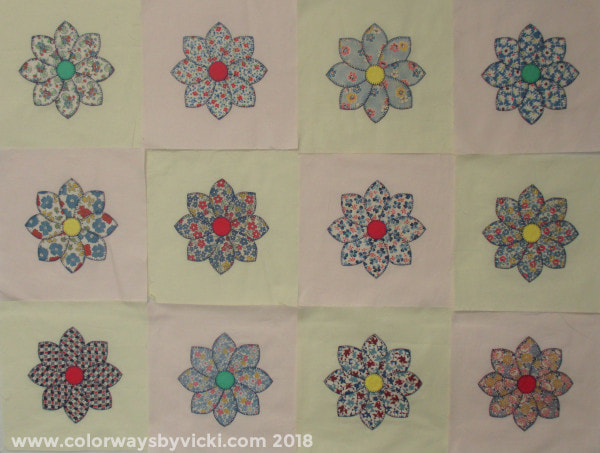 I have 12 blocks finished so far. Look at all that quilting space that I'm going to have in this quilt.
But I'm no where near quilting time on this one. 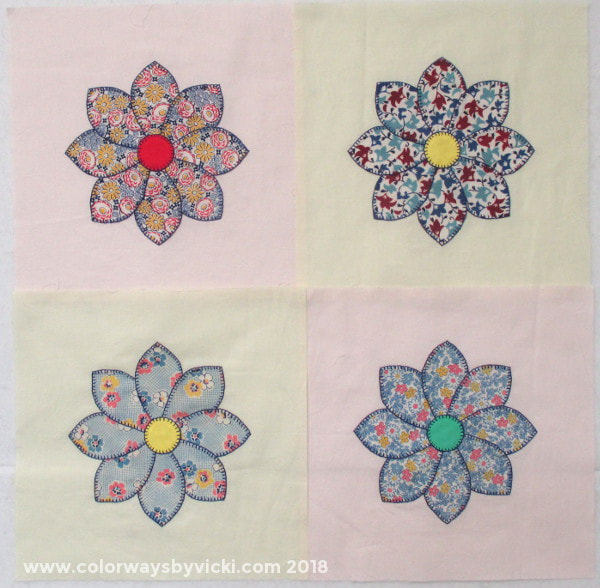 Just like with the moons, I work on the flowers in groups of 4. I've been able to do a little stitching almost every evening and these are the 4 newest blocks.  Without sashing I'm going to have some good space for quilting whenever these get done. I think this is 8 out of about 52 total blocks.
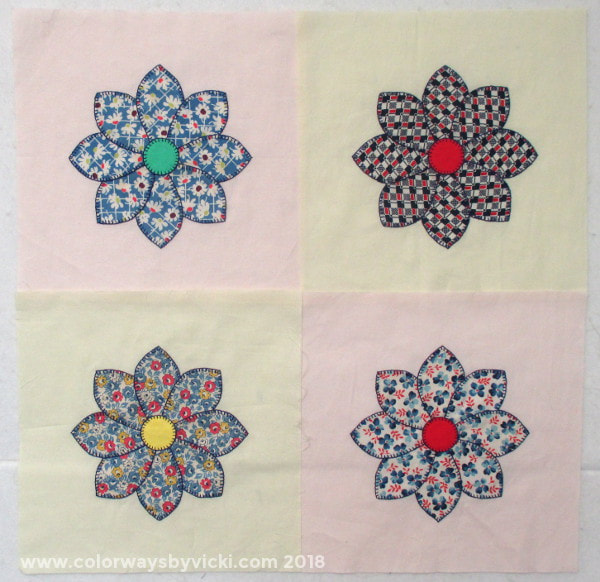 As I mentioned yesterday my stitching time these days is mostly limited to an hour or so in the evenings while we watch TV. My two new hand stitching projects have been great to have around. I usually alternate between them: a flower block, a moon block, flower block, moon block...... For June I have 4 flower blocks to show for my efforts. I didn't want to prepare any other blocks until I saw how these would look with the 2 background colors and blue thread. I'm really pleased! I plan to piece then in checkerboard fashion like this. Quilting will make it even more subtle and it looks like I'll actually have some quilting space on this quilt. 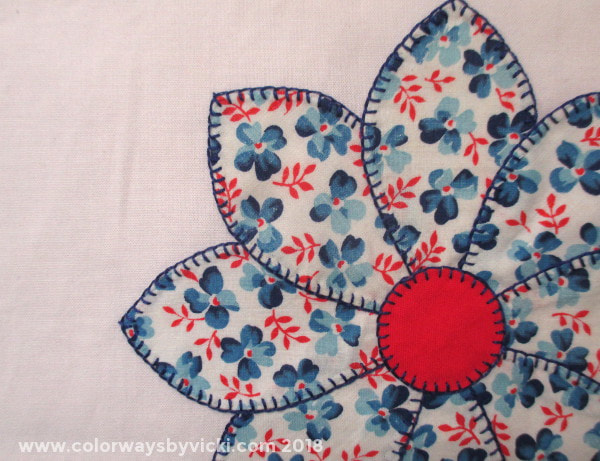 Here's a close up of the stitching. I love the blue floss and I think the red, yellow and green are going to work fine for the centers too. 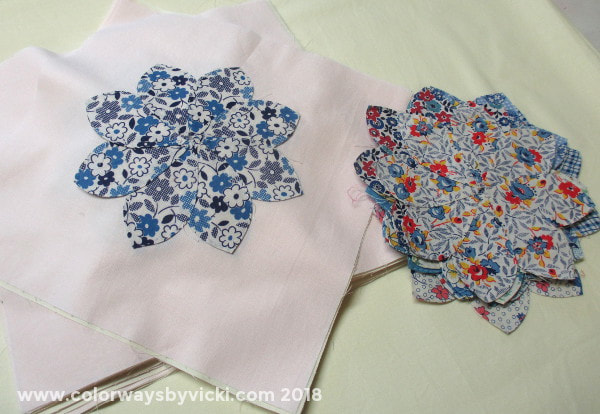 This week my goal is to get the rest of the blocks fused (with Mistyfuse) to the backgrounds.
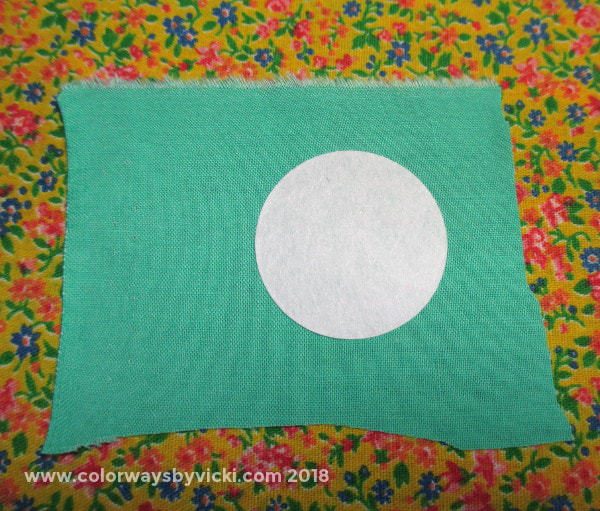
 My weekend was solely an ironing marathon. I had gotten very behind because of my arm. But it's getting better now and I couldn't take the pile of fabric anymore. I ironed, ironed and ironed over 115 yards and I'm much happier. In between ironing sessions I would sit down for a break and make circles for my 2 applique projects. So since I don't have anything except this stack of unironed fabric to share, today seems a good day to share how I'm doing the applique circles. 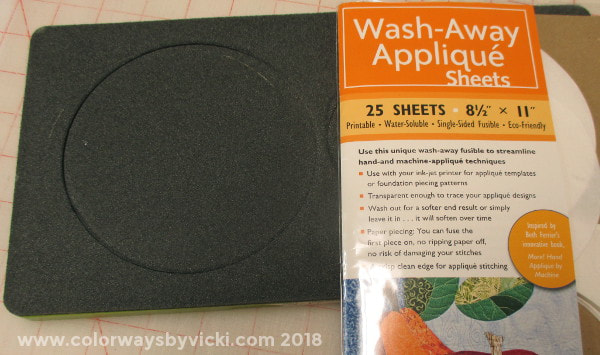 For starters, I basically use this process from Leah Day. Her video is very clear and it works great! So start by watching that. My first step was to decide on the size of circles and cut the Wash-Away Applique sheets and freezer paper in those sizes. I based the size on the size of Go! dies that I have. I used 5" for the shibori and 1" for the centers of my flower applique circles. Leah doesn't use the Wash_Away Applique sheets but I like them because they stay inside the applique and they prevent anything under that applique from showing through.
I fuse the applique sheets to the back of my fabrics. The biggest thing I learned from Leah was to leave large margins around the applique. I used to trim the fabric to about 1/4" but watching the video I learned how much easier it was to work with them with wider margins.That tip was genius! 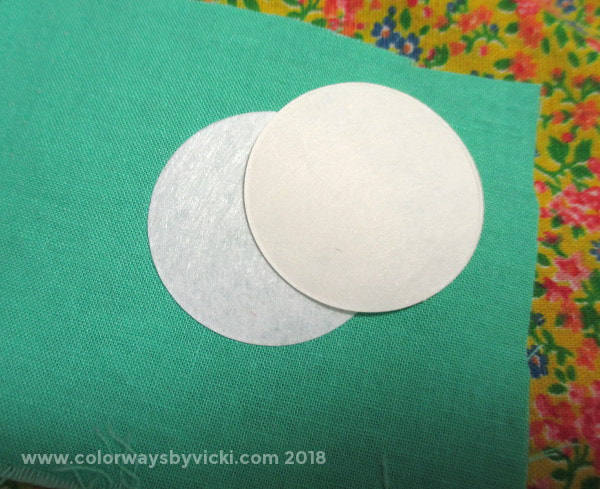 Next I fused 2 layers of freezer paper together like Leah recommends and ironed that over the applique sheet.  Then it was time to make some starch. I use this recipe. I don't use much but it's cheap to make. I put a little into a small cup and found a small paintbrush. 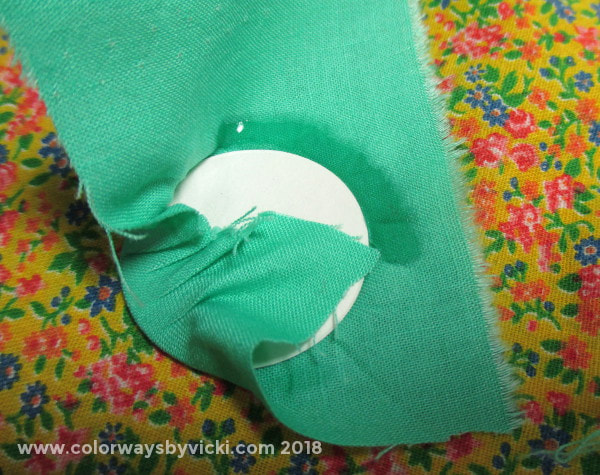 With the paintbrush I add some starch just around the edge of the applique shape. 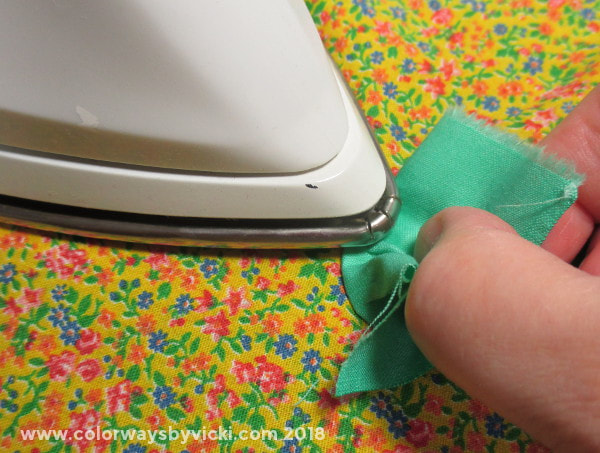 Leah's video give more detail about the process but you can see here how much easier it is to get a great sharp edge when you have more fabric to work with. I just carefully work around the applique painting and pressing with the tip or edge of the iron. 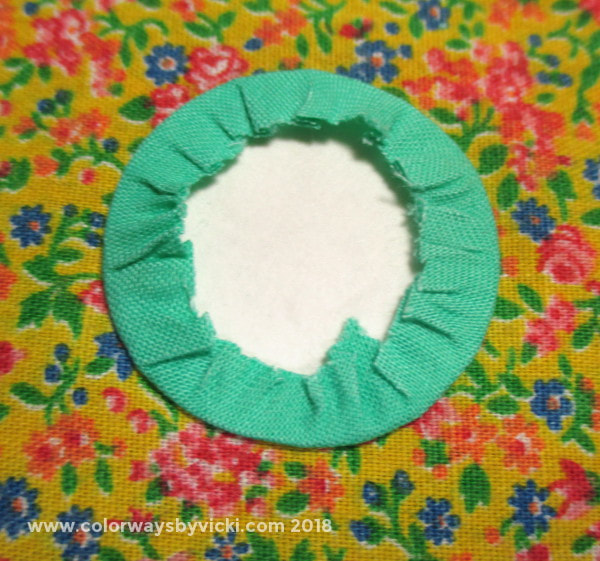 After it's all pressed I'll trim the excess fabric, peel out the freezer paper and press it one more time. 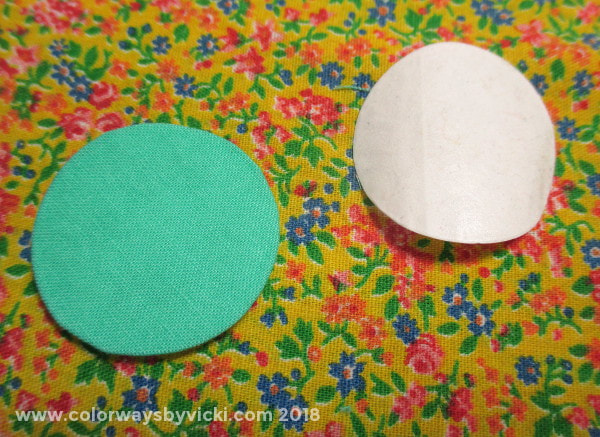 That's a pretty cgood circle! 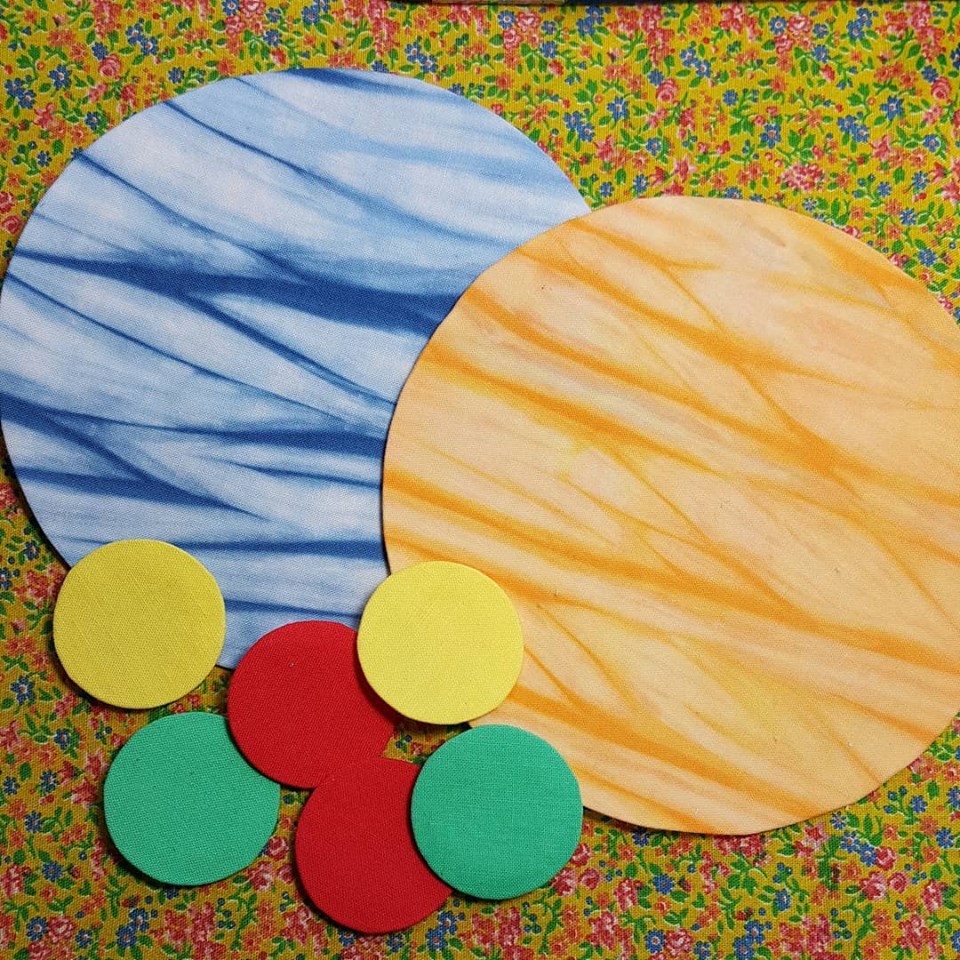 Here are a set of circles ready to applique.
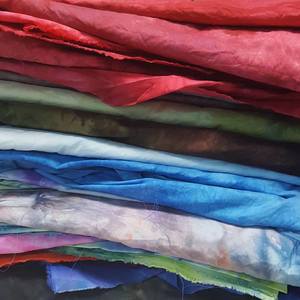
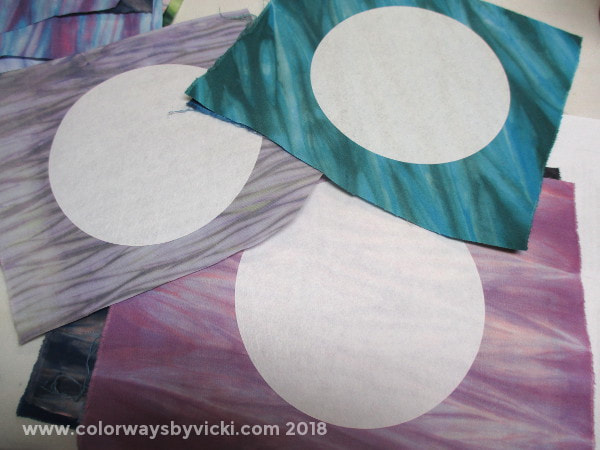
That hideous background fabric is just something I use to cover the ironing board to protect it from getting a lot of starch on it. That gem is from my Aunt's fabric stash that she gifted to me over 10 years ago. Marcy is back doing more quilting today so we'll have a post soon to show how to fix a major quilting faux pas. Yep, that's what I'm calling this new quilt. Because I'm determined to drive myself insane with some of these quilt ideas that I pursue and it might as well be this one that takes me over the edge. 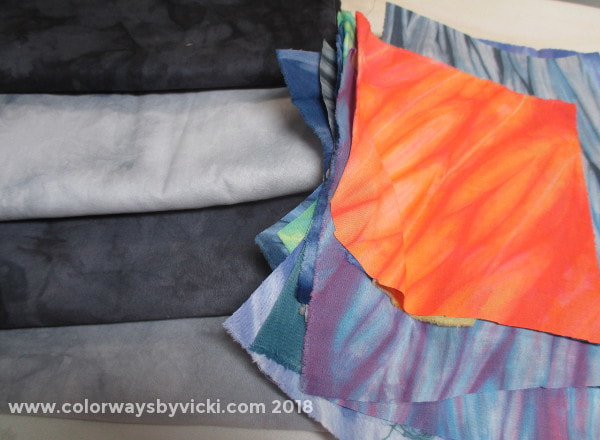 Every time I dye new shibori fabrics for the shop I add a fat eight on each pole for my personal collection. I've created quite an impressive collection of fabric and, so far, have only used them in Lura's Choice quilt and that was a few years ago. I've been wanting to do a quilt with appliqued circles and now is as good a time as any to start. I began by dyeing a selection of black/shades of gray fabrics and cut out some chunks of shibori for the moons. 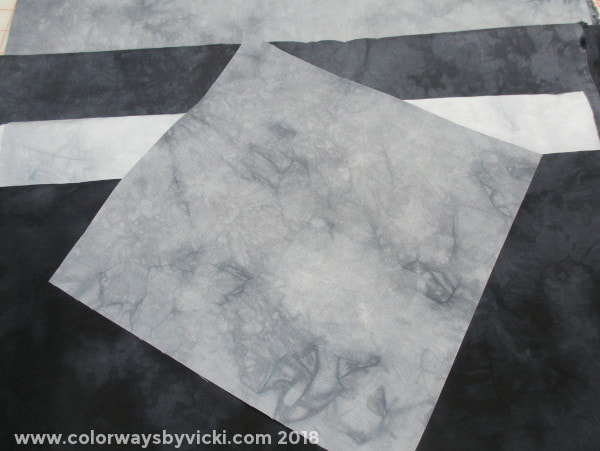 Estelle kindly came over this weekend and cut some square out for me so I could get started. (By the way, my arm is finally MUCH better! I can drink with the glass in my right hand. That's big!)  I used the Go! Cutter to cut out some fusible applique sheets. I'm using a 5" circle simply because that's the largest Go! die that I have. While Estelle cut I fused these to the back of my shibori chunks. 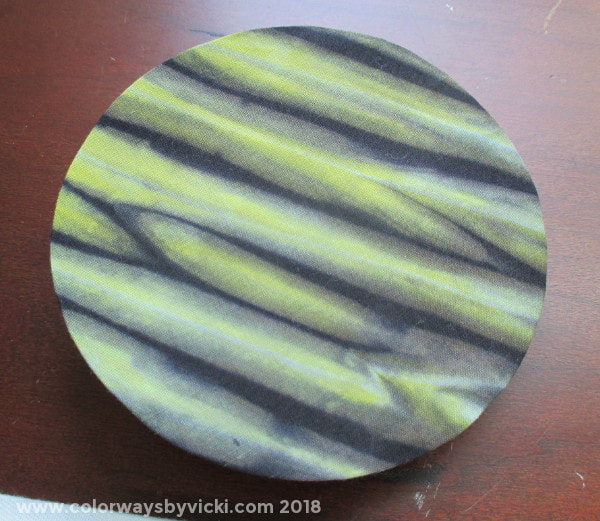 I'm working on another post to show you how I shaped the circles but here's the first one. Man, I love these fabrics! 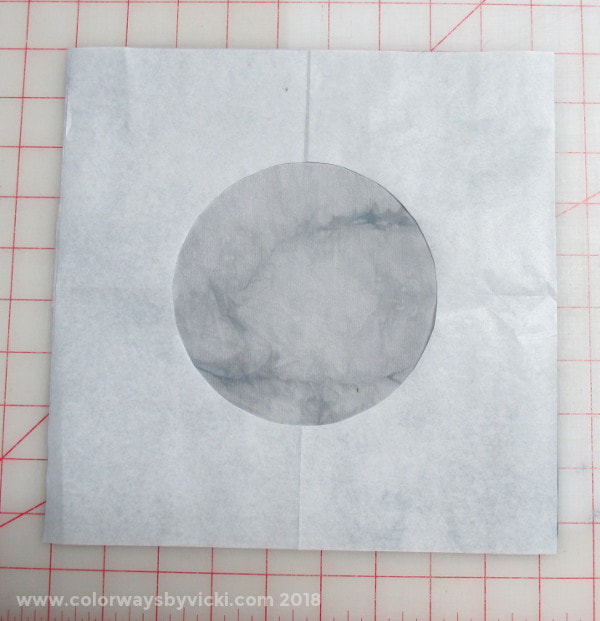 I made a little paper template to help me position the moon in the center of the block. Later, when I put the quilt together, I'll cut these blocks down to a smaller size. I know I'm not going to use the blocks this big but until I can get several done and see them together I won't know what size I want. 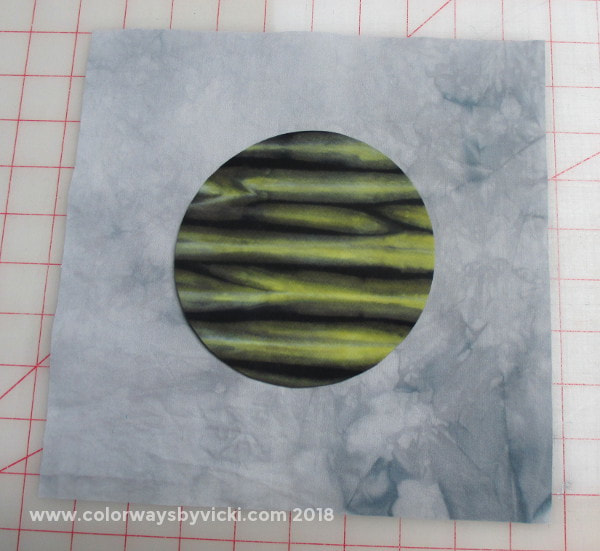 After the moon is centered on the fabric I tack it to the back with some Mistyfuse. I seriously love the moodiness of the background fabric. This quilt will basically use a combination of the Black and Gray Skies Gradients. 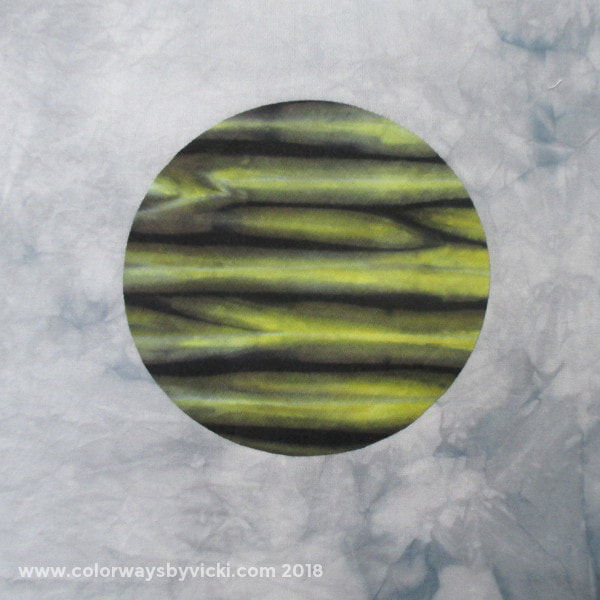 OK, I know this basically looks the same but in this photo it's actually stitched! On another block I'll show you the back and the tiny stitches that Becky taught me to stitch. I did the first block just to make sure I enjoyed it and want to continue. Who was I kidding? It's tedious and there are dozens of them to do. Of course I'll continue! 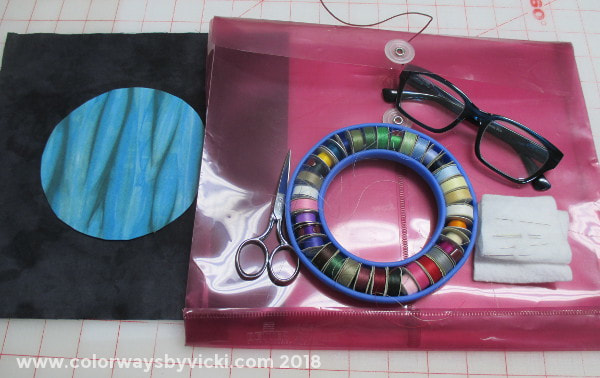 The last step in setting up this project was to put together a dedicated sewing kit with the needles, scissors, Bottom Line threads (because that's what I have), magnifying glasses and a folder. I"m ready to go!
I still have lots of the circles to prepare (for this and the other applique project) and I'm slowly working on these a bit each day. But I'm ready to start stitching the second block and I think it's pretty stunning....if I do say so myself. It's a real bummer to be in a situation where the only sewing that I could do is hand sewing and I just finished my last epic hand sewing project! Instead I've been spending my time planing the next TWO hand sewing project. I will not be caught empty handed again. My first project is almost ready to go. 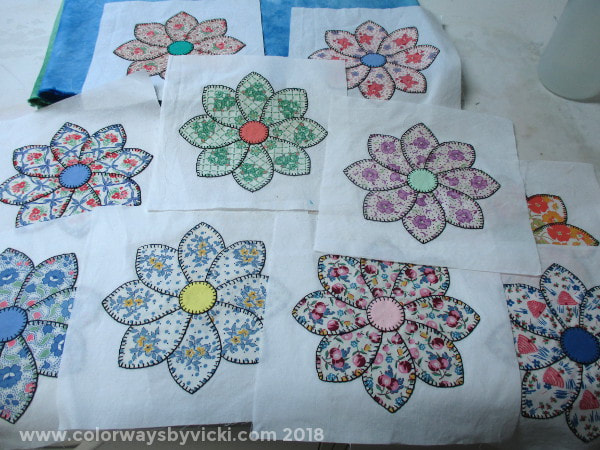 The first step in planning the new project was to take inventory of what's left from the last one and there's a lot of inventory! I have 10 appliqued blocks left over from the finished quilt.  Plus 30 more multi-colored flowers still to be appliqued! 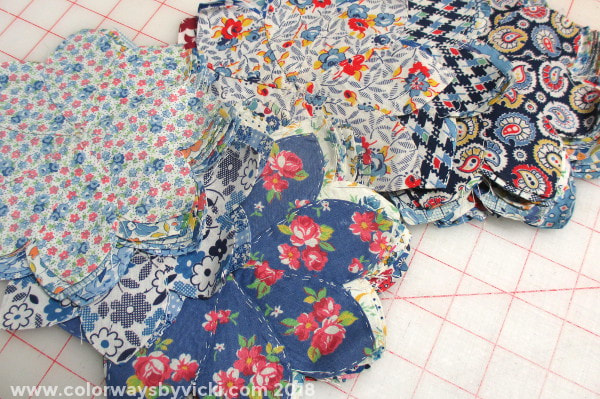 But that's not all! There are 54 flowers in blue! 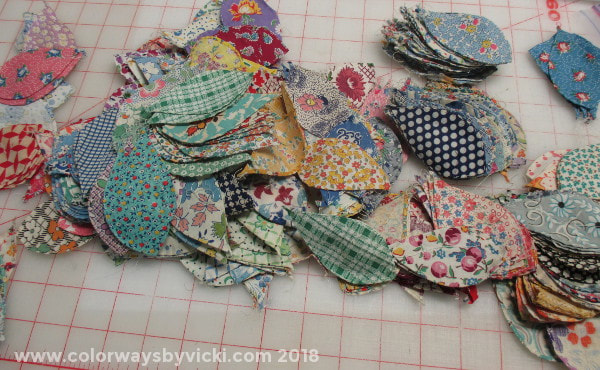 AND dozens of loose petals! Can you imagine one person basting all of these? There's enough here for at least 3 more large quilts and I'm pretty sure that I gave a whole set of flowers to a friend a few years ago. I wonder if this person ever made a quilt the themselves from all of this work? They had to have had access to some sort of dress factory because the variety of prints is astounding. In the quilt that I finished there were no duplicate fabrics in the large flowers. I'm pretty sure the blue set that I have also contains no duplicates. Amazing! And I only paid $15 for the whole lot. I felt that I had 3 choices here. I could continue with more multi flowers on white fabric and stitched in black. Or I could do a project with the blue flowers or maybe a strippie quilt with rows of vines and petals/leaves. 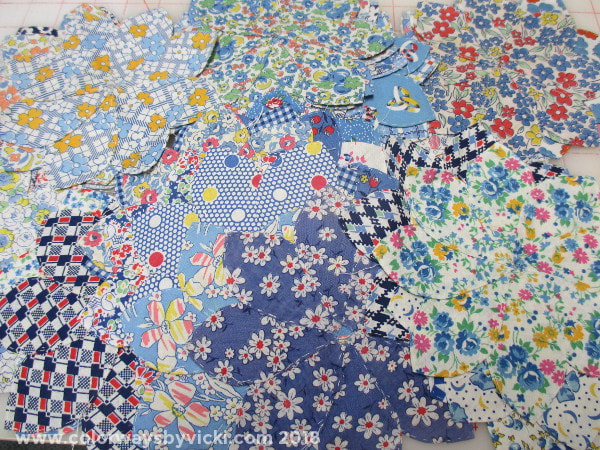 Becky was over visiting the day I was pondering what to do so I consulted with her and we decided to do the blue ones and to do them on pastel colors instead of white for a change of pace. After all I have over 1000 yards of white fabric. Why would I want to use that? We thought about 3 or 4 pastel colors that would read the same value and to use a bigger block size. A bigger block size could eliminate the need for sashing and also give me more quilting space. I considered dyeing some fabric but decided that solids would be more in keeping with the time period of these prints. So I was off to the fabric store for the first time in AGES. 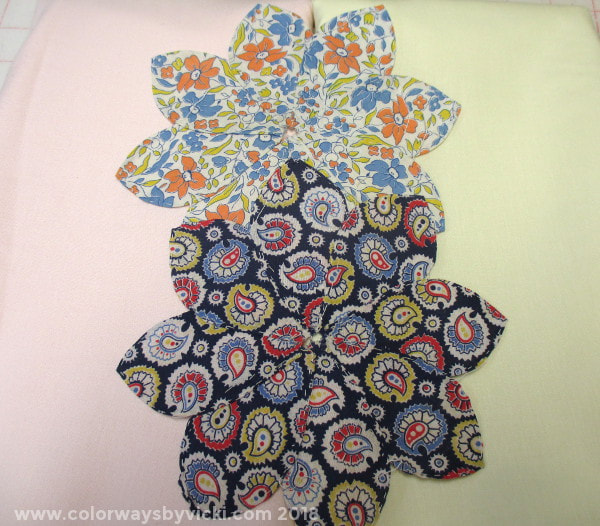 I picked up Mom and we headed off to a fabric store near her apartment. I can take her fabric shopping because she would NEVER say "you don't really need more fabric". At the first fabric store we found this light pink and vanilla. They are very pale and read as the same value. Although I generally hate pink I think these are perfect background colors for these blocks. I couldn't find any other colors to go with these but there are other fabric stores to check out. This fabric, by the way, is Michael Miller's Cotton Couture and it is fabulous! It's very soft and has a lovely sheen. I know that Kona is all the rage but I used it once and it was way too "ravelly" for me. This project is going to be around for a long time and the blocks will be handled a lot. Kona would just make me mad every time I touched it. I think the Michael Miller fabric will be a joy to work with. 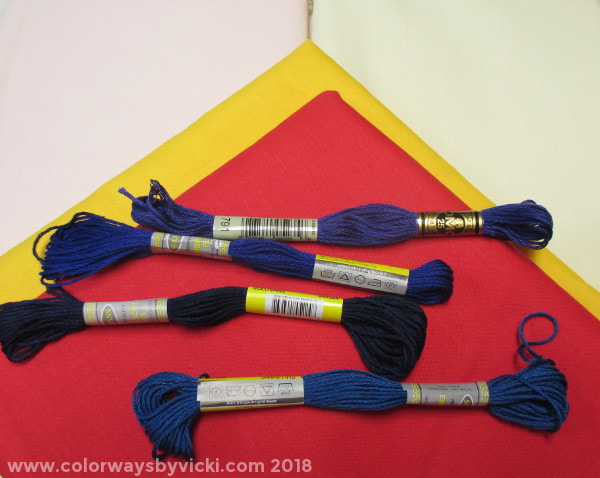 We also picked out this gold and red for the centers of the flowers and several different blue floss samples so I could decided in a color for the stitching. A few days later Marcy came over and we picked DMC 791 for the stitching thread and decided that the red and gold might be a little too bold. Yesterday Mom and I headed off to another store to see if they had more fabric options. The second store has loads of Michael Miller! 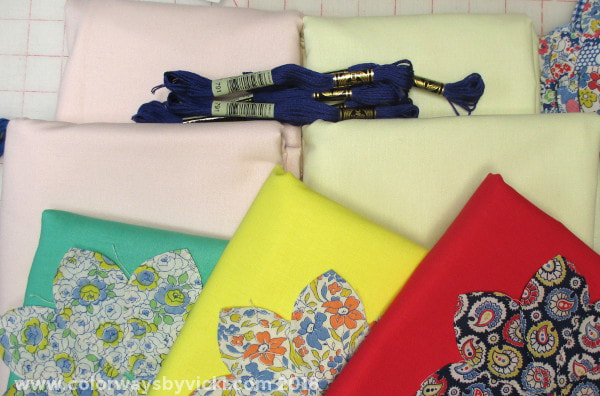 While there were lots more colors of the Michael Miller fabric there weren't any other pastels that I liked and we decided to stick with the pink and vanilla. I did find a better yellow and a pretty green to use with the red for centers. The gold will get filed in the stash for another project. I bought all of their 791 DMC floss, then went to an AC Moore and bought all of theirs then back to the first fabric shop to get more of the pink and vanilla. I probably have enough fabric for 2 quilts and that's about perfect for a quilt with no actual plan. No matter when I finish this I should have enough fabric to do whatever I want with it. I also have 25 skeins of floss and that should be plenty too!
Next I need to get the fabrics washed, some blocks cut and fuse on some flowers so I can start stitching. I might even ask Marcy or Becky to help me with some cutting so I can start stitching soon. I'm pretty sure I could do a little stitching while my arm heals. Then there's also the second applique project and I dyed fabric for that yesterday. It will be ready to cut next week. I haven't been as wise about my arm the past 2 days as I should and I'm going to do my best to be better this weekend..... |
FeedsTo subscribe click the RSS Feed button and copy the URL of that page into your blog reader.
In Bloglovin you need to search "Colorways By Vicki Welsh" to find the blog. About Vicki
I'm Vicki Welsh and I've been making things as long as I can remember. I used to be a garment maker but transitioned to quilts about 20 years ago. Currently I'm into fabric dyeing, quilting, Zentangle, fabric postcards, fused glass and mosaic. I document my adventures here. Categories
All
Archives
April 2024
|
 RSS Feed