Colorways By Vicki Welsh
  • Welcome
  • Blog
  • Galleries
    • Quilt Gallery >
      • 2025 >
        • Hanover Country Life Quilt
        • Oak Moth Quilt
      • 2024 >
        • Red SunsetQuilt
        • Big Blue Quilt
      • 2023 >
        • Heirloom Bear
        • Firefighter Quilt
        • The Goldfinch
      • 2022 >
        • Summer Sunset Quilt
        • Soundwave Quilt
      • 2021 >
        • A Big Green Quilt
        • Finally! Quilt
      • 2020 >
        • Jackies Choice Quilt
        • Penguins on Ice Quilt
        • Corona Cats Quilt
        • Kim's Garden
      • 2019 >
        • Indonesian Batik Quilt
        • Lost My Marbles
        • Remaking Flora's quilt
        • I'm Not a Snowflake Quilt
        • Where In The World Is My Cat Quilt
        • Fireworks
        • The Groovy Quilts
        • The Puppy Quilt
      • 2018 >
        • The Maine Quilt
        • Stars At Sea
        • Antelope Canyon Quilt
      • 2017 >
        • The Wedding Quilt Quilt
        • Rainbow's End Quilt
      • 2016 >
        • CSQ Challenge Quilt
        • Wholecloth Quilt of Valor
        • Luras Choice Quilt
        • Black Swan Quilt
        • 2016 Quilt of Valor Quilt
        • Non Unus Pluma Quilt
      • 2015 >
        • Snaps Quilt
        • Batik Crossroads Quilt
        • Wild Goose Chase Quilt
        • Fractured Fragments Quilt
        • Tell It To the Stars Quilt
        • Cathedral Window Quilt
        • Time In Place Quilt
        • Shaken Not Stirred Quilt
        • Pleiades Quilt
      • 2014 >
        • Spinning Stars Quilt
        • Fractured Spiral Quilt
        • Autumn Leaves Quilt
        • Sea Dreams Quilt
        • Woodland Star Quilt
        • Zombie Ball Quilt
        • Innova Angles Quilt
      • 2013 >
        • Murder For a Jar of Red Rum Quilt
        • Patroitic Quilts
        • Red Sunset Bedding Quilt
        • The Infamous Fish Quilt
        • Gratitudes Quilt
      • 2012 >
        • Illuminated Blocks Quilt
        • Kims Wedding Quilt
        • Crossing The South Anna Quilt
        • Coming Home Quilt
        • See Reverse Quilt
        • Overboard Quilt
        • Floras Fans and Modern Crumbs Quilt
        • The Patriot Quilt
        • On Point Quilt
        • Grinch Quilts
      • 2011 >
        • Star Struck Quilt
        • On A Whim Quilt
        • Catena Quilt
        • Zig Zag Scraps Quilt
        • Purple Keepsakes Quilt
        • Fiberactions Challenge Quilts
        • Journal Quilts 2011
      • 2010 >
        • Maggie the Messmaker Cross Stitch
        • Fiberactions Challenge Quilts
        • Wootten Memory Quilts
        • Teal Tomorrow Quilt
      • 2009 >
        • Shereen's Peaceful Garden
        • TShirt Quilt Commission
        • Three Generation Quilt
      • 2008 >
        • Flora's Quilts
        • Monkey Baby Quilts
        • Citrus Quilt
      • 2007 >
        • Snails Trail Quilts
        • Quilts of Valor
        • Other Quilts
      • 2006 and older >
        • Scrap Bin Quilt
        • Flora's Dutchman's Breeches
        • The Gift Quilts
        • Reversible Quilts
        • Spectacular Scraps Quilts
        • Foundation Pieced Quilts
        • Art Quilts
        • Kathy's Memorial Quilt
    • Symmetry Quilt Gallery
    • Dyeing Gallery >
      • Tie Dye Gallery
      • Shibori Gallery
    • Postcard Gallery
    • Fused Glass Gallery
    • Mosaic Gallery
    • Zentangle and Spirograph
  • Tutorials
    • Save My Bleeding Quilt
    • Quilting Tutorials >
      • The Gift Quilt Pattern
      • Keepsakes Quilt Pattern
      • Blocking a Quilt
      • Facing A Quilt Tutorial
      • Veterans Quilt Tutorials >
        • Allegiance Quilt Pattern
        • Gratitudes Quilt Pattern
        • Strength Quilt Pattern
        • Blockade Quilt Pattern
        • Redoubt Quilt Pattern
        • Regiment Quilt Pattern
        • Bars and Stripes Quilt Pattern
      • Rainbow Quilt Free Pattern
      • Binding a Quilt
    • Surface Design Tutorials >
      • Ice Dyeing tutorial
      • Snow Dyeing basics tutorial
      • Snow Dyeing Mandala
      • Sun Printing Tutorial
      • Lamp Printing Tutorial
      • Dyeing extra large fabrics
      • Hold the Retayne
      • Painted Shower Curtain Tutorial
      • Metallic Paint Effects on Fabric
      • Curing Metallic Fabric Paints
      • Zentange Pens
      • Leaf Printing Tutorial
      • Printing On Fabric
      • Life of MX Dye Concentrates
      • Testing Soda Ash in fabric dyeing
    • Placemat Tutorials >
      • Fat Quarter Placemat Tutorial
    • Basic Tutorials >
      • Custom Sewing Table
      • Liquid Spray Starch Recipe
    • Crafts and Small Projects >
      • Surgery Drain Bag Tutorial
      • Drawstring Bag Sewing Tutorial
      • Large Tote Tutorial
      • Big Fabric Flower Tutorial
      • The best potholders pattern
      • Notebook Cover Tutorial
      • Pillowcase tutorial
      • Wide Brim Sun Visor
      • Trash To Treasure Holiday Ornaments
      • Pet Bed From Scraps Tutorial
      • Framed Metal Quilt
      • Shooting Shirt Tutorial
      • Making Paper
      • Making Soap
      • Favorite Soap Reicpes
      • Bowl hot pad pattern
    • Longarm Quilting Tutorials >
      • The longarm machine does matter
      • Double Wavy Crosshatch
      • Wavy Crosshatch Longarm
      • Centering a Quilt back on a longarm
      • Quilting Snowball Blocks
      • Using Channel Locks
      • Adding backing on the longarm
    • Crochet and Other Tutorials >
      • Crochet Wheelchair Shawl
  • Contact

Blocking A Quilt Tutorial

Get into a discussion with quilters about the quilting process and most of them will tell you that they like binding the least. I'm not overly fond of binding either but the thing I hate doing the most is blocking a quilt. Fortunately not every quilt gets blocked. If it's going to be used it doesn't get blocked but every quilt that is destined to hang on the wall gets blocked.Fractured Fragments is going on the wall so it had to be blocked. First it had to go through a long soak like yesterday's quilt. I knew this one was going to bleed so I did that first. Then I put it in the washer for a final rinse and a trip through the spin cycle. This leaves the quilt wet but not soaking wet.


Here's how I go about blocking a quilt.
​

 First you need some space and a surface that you can pin into. When I put this carpet in my sewing room I picked it and the padding with consideration for blocking quilts. I picked wool padding because it's thicker and will not hold any moisture. The carpet is a commercial grade plush that I picked for the very thick but short nap. It's easy to pin into and it holds the pins in place.
If you don't have a carpet or other pinnable surface in your home get some insulation sheets from the hardware store. You can tape them together to create a pinnable surface. Smaller quilts can be pinned to your design wall if it's sturdy enough.
Picture
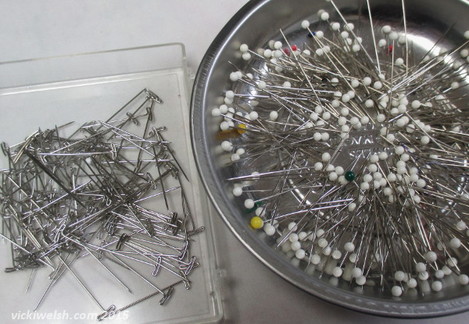
​You need lots of really sturdy pins. You know those gigantic quilting pins that you bought but never use because they are like sewing with nails? Those are the ones you want for this. They are going to have a lot of stress on them. T pins work great too.

Picture
​Finally you need your biggest rotary rulers and a measuring tape. You also need to be prepared to take some time. It took me 3 days to dread this task and about an hour and half to actually do it.

Picture
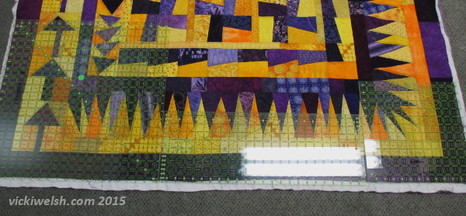
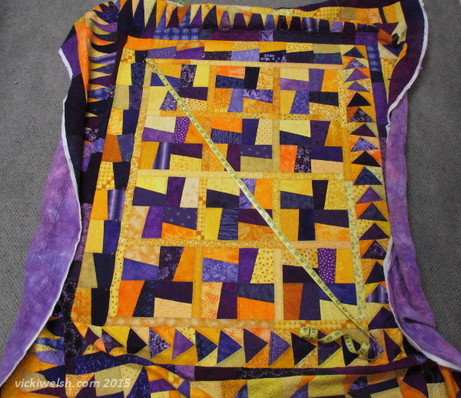
​Here it is right out of the washing machine ready for blocking. Blocking is done before the quilt is trimmed. You need that extra backing and batting to insert the pins into and to give you something to tug and pull.

As I was looking at this I felt that it was really important that the center pinwheel section be perfectly square (or more specifically perfectly rectangled). I decided to pin the center first to get it on square and then pin the borders off the center. I don't do that for most of my quilts but these borders are different widths. I know the size of the center blocks so it was best to work off that.

Picture
​Whether you start in the center or the edge, focus on one edge. I use the edge of the ruler to straighten the seam and the measures on the ruler to stretch the seam and blocks to the right size. The blocks along that edge are 4" so I placed my pins on those seam intersections as I stretched the blocks out to almost 4". There was enough stitching in this quilt that I have to accept that there's some shrinkage. I'm probably not going to ever get it to the original full size and that's fine.

Picture
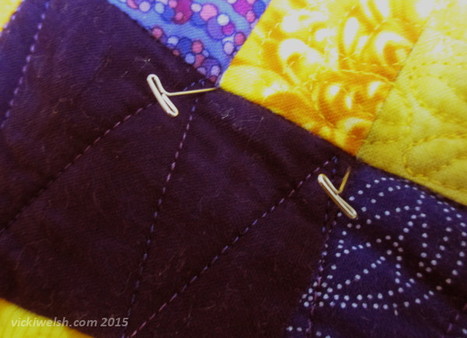
Insert the pins leaning out from the aligned edge. That will hold the edge in place as you pull and pin on the opposite side. If you put the pin in straight it will pull in when you do the other side and then you'll be doing it all over again!

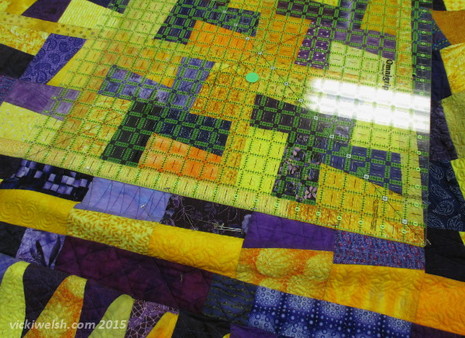
​These pins in the center of the quilt will be removed once the outer edges are done so don't worry about pin or stretch "marks".

Picture
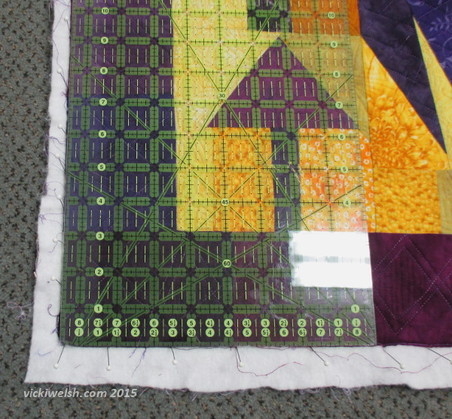
Use the square ruler to square up the corners as you work around the quilt. Here you can see that I've pinned the top and left side. I'm starting the bottom. I'm not worried about how curved the right side looks. It will all get pulled into shape as I work around. This process requires some man-handling so be prepared. If you have a friend to help that's even better.
​
Knee pads help too.

Picture
Now comes the most important step of making sure it's square. Measure diagonally in both directions and make sure the measurements are equal. If the measurements aren't the same then go back and figure out where you got off square.
I almost always have to repin some part of it. I can't seem to every do it perfect on the first try.
Next I worked on the outer edges. Once the whole quilt was pinned I removed the pins on the center section. If I left the pins in the center the seam lines in the center might be a little "pointy" where the pins are. Once the whole thing is pinned the ones in the center aren't needed anyway. I pulled out the center pins and smoothed out the seams to make sure everything was straight.

Picture
​Stretch, measure and pin the border the same as the center. On the outside edge I pin about every 1 to 2 inches.

Picture
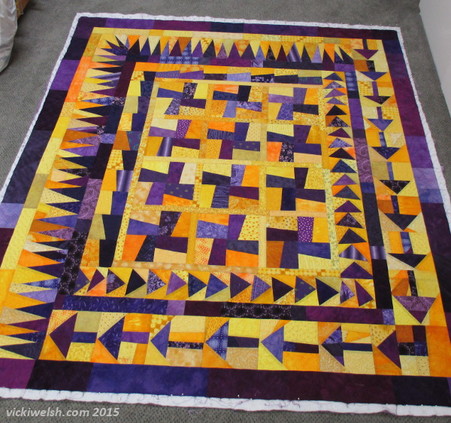
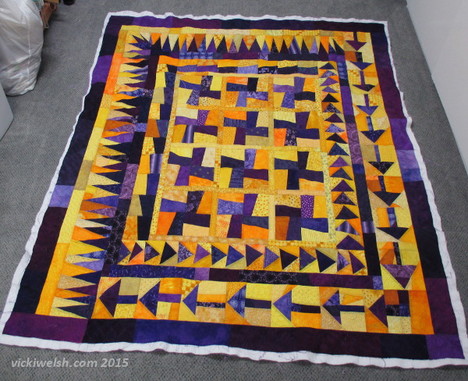
An hour and a half later here it is all pinned. I did have to rework the lower right corner because it wasn't perfectly square the first time. I figured out where the problem was by using my square ruler to check to see which corner border wasn't aligned right. I then pulled out the pins for about 18" along each side, re-pinned, re-measured and had some celebratory chocolate.
Since it's winter and so dry in my house the quilt was completely dry overnight. When I do this in the summer I set up a fan to blow over it to help it dry.

Contact
Thank you for visiting Colorways by Vicki Welsh.
Copyright © 2024 by Vicki Welsh. All rights reserved. Content from this site may not be reproduced or used in any manner whatsoever without the express written permission of Vicki Welsh. You are welcome to link and share links to any page on the site.
  • Welcome
  • Blog
  • Galleries
    • Quilt Gallery >
      • 2025 >
        • Hanover Country Life Quilt
        • Oak Moth Quilt
      • 2024 >
        • Red SunsetQuilt
        • Big Blue Quilt
      • 2023 >
        • Heirloom Bear
        • Firefighter Quilt
        • The Goldfinch
      • 2022 >
        • Summer Sunset Quilt
        • Soundwave Quilt
      • 2021 >
        • A Big Green Quilt
        • Finally! Quilt
      • 2020 >
        • Jackies Choice Quilt
        • Penguins on Ice Quilt
        • Corona Cats Quilt
        • Kim's Garden
      • 2019 >
        • Indonesian Batik Quilt
        • Lost My Marbles
        • Remaking Flora's quilt
        • I'm Not a Snowflake Quilt
        • Where In The World Is My Cat Quilt
        • Fireworks
        • The Groovy Quilts
        • The Puppy Quilt
      • 2018 >
        • The Maine Quilt
        • Stars At Sea
        • Antelope Canyon Quilt
      • 2017 >
        • The Wedding Quilt Quilt
        • Rainbow's End Quilt
      • 2016 >
        • CSQ Challenge Quilt
        • Wholecloth Quilt of Valor
        • Luras Choice Quilt
        • Black Swan Quilt
        • 2016 Quilt of Valor Quilt
        • Non Unus Pluma Quilt
      • 2015 >
        • Snaps Quilt
        • Batik Crossroads Quilt
        • Wild Goose Chase Quilt
        • Fractured Fragments Quilt
        • Tell It To the Stars Quilt
        • Cathedral Window Quilt
        • Time In Place Quilt
        • Shaken Not Stirred Quilt
        • Pleiades Quilt
      • 2014 >
        • Spinning Stars Quilt
        • Fractured Spiral Quilt
        • Autumn Leaves Quilt
        • Sea Dreams Quilt
        • Woodland Star Quilt
        • Zombie Ball Quilt
        • Innova Angles Quilt
      • 2013 >
        • Murder For a Jar of Red Rum Quilt
        • Patroitic Quilts
        • Red Sunset Bedding Quilt
        • The Infamous Fish Quilt
        • Gratitudes Quilt
      • 2012 >
        • Illuminated Blocks Quilt
        • Kims Wedding Quilt
        • Crossing The South Anna Quilt
        • Coming Home Quilt
        • See Reverse Quilt
        • Overboard Quilt
        • Floras Fans and Modern Crumbs Quilt
        • The Patriot Quilt
        • On Point Quilt
        • Grinch Quilts
      • 2011 >
        • Star Struck Quilt
        • On A Whim Quilt
        • Catena Quilt
        • Zig Zag Scraps Quilt
        • Purple Keepsakes Quilt
        • Fiberactions Challenge Quilts
        • Journal Quilts 2011
      • 2010 >
        • Maggie the Messmaker Cross Stitch
        • Fiberactions Challenge Quilts
        • Wootten Memory Quilts
        • Teal Tomorrow Quilt
      • 2009 >
        • Shereen's Peaceful Garden
        • TShirt Quilt Commission
        • Three Generation Quilt
      • 2008 >
        • Flora's Quilts
        • Monkey Baby Quilts
        • Citrus Quilt
      • 2007 >
        • Snails Trail Quilts
        • Quilts of Valor
        • Other Quilts
      • 2006 and older >
        • Scrap Bin Quilt
        • Flora's Dutchman's Breeches
        • The Gift Quilts
        • Reversible Quilts
        • Spectacular Scraps Quilts
        • Foundation Pieced Quilts
        • Art Quilts
        • Kathy's Memorial Quilt
    • Symmetry Quilt Gallery
    • Dyeing Gallery >
      • Tie Dye Gallery
      • Shibori Gallery
    • Postcard Gallery
    • Fused Glass Gallery
    • Mosaic Gallery
    • Zentangle and Spirograph
  • Tutorials
    • Save My Bleeding Quilt
    • Quilting Tutorials >
      • The Gift Quilt Pattern
      • Keepsakes Quilt Pattern
      • Blocking a Quilt
      • Facing A Quilt Tutorial
      • Veterans Quilt Tutorials >
        • Allegiance Quilt Pattern
        • Gratitudes Quilt Pattern
        • Strength Quilt Pattern
        • Blockade Quilt Pattern
        • Redoubt Quilt Pattern
        • Regiment Quilt Pattern
        • Bars and Stripes Quilt Pattern
      • Rainbow Quilt Free Pattern
      • Binding a Quilt
    • Surface Design Tutorials >
      • Ice Dyeing tutorial
      • Snow Dyeing basics tutorial
      • Snow Dyeing Mandala
      • Sun Printing Tutorial
      • Lamp Printing Tutorial
      • Dyeing extra large fabrics
      • Hold the Retayne
      • Painted Shower Curtain Tutorial
      • Metallic Paint Effects on Fabric
      • Curing Metallic Fabric Paints
      • Zentange Pens
      • Leaf Printing Tutorial
      • Printing On Fabric
      • Life of MX Dye Concentrates
      • Testing Soda Ash in fabric dyeing
    • Placemat Tutorials >
      • Fat Quarter Placemat Tutorial
    • Basic Tutorials >
      • Custom Sewing Table
      • Liquid Spray Starch Recipe
    • Crafts and Small Projects >
      • Surgery Drain Bag Tutorial
      • Drawstring Bag Sewing Tutorial
      • Large Tote Tutorial
      • Big Fabric Flower Tutorial
      • The best potholders pattern
      • Notebook Cover Tutorial
      • Pillowcase tutorial
      • Wide Brim Sun Visor
      • Trash To Treasure Holiday Ornaments
      • Pet Bed From Scraps Tutorial
      • Framed Metal Quilt
      • Shooting Shirt Tutorial
      • Making Paper
      • Making Soap
      • Favorite Soap Reicpes
      • Bowl hot pad pattern
    • Longarm Quilting Tutorials >
      • The longarm machine does matter
      • Double Wavy Crosshatch
      • Wavy Crosshatch Longarm
      • Centering a Quilt back on a longarm
      • Quilting Snowball Blocks
      • Using Channel Locks
      • Adding backing on the longarm
    • Crochet and Other Tutorials >
      • Crochet Wheelchair Shawl
  • Contact