Colorways By Vicki Welsh
  • Welcome
  • Blog
  • Galleries
    • Quilt Gallery >
      • 2025 >
        • Hanover Country Life Quilt
        • Oak Moth Quilt
      • 2024 >
        • Red SunsetQuilt
        • Big Blue Quilt
      • 2023 >
        • Heirloom Bear
        • Firefighter Quilt
        • The Goldfinch
      • 2022 >
        • Summer Sunset Quilt
        • Soundwave Quilt
      • 2021 >
        • A Big Green Quilt
        • Finally! Quilt
      • 2020 >
        • Jackies Choice Quilt
        • Penguins on Ice Quilt
        • Corona Cats Quilt
        • Kim's Garden
      • 2019 >
        • Indonesian Batik Quilt
        • Lost My Marbles
        • Remaking Flora's quilt
        • I'm Not a Snowflake Quilt
        • Where In The World Is My Cat Quilt
        • Fireworks
        • The Groovy Quilts
        • The Puppy Quilt
      • 2018 >
        • The Maine Quilt
        • Stars At Sea
        • Antelope Canyon Quilt
      • 2017 >
        • The Wedding Quilt Quilt
        • Rainbow's End Quilt
      • 2016 >
        • CSQ Challenge Quilt
        • Wholecloth Quilt of Valor
        • Luras Choice Quilt
        • Black Swan Quilt
        • 2016 Quilt of Valor Quilt
        • Non Unus Pluma Quilt
      • 2015 >
        • Snaps Quilt
        • Batik Crossroads Quilt
        • Wild Goose Chase Quilt
        • Fractured Fragments Quilt
        • Tell It To the Stars Quilt
        • Cathedral Window Quilt
        • Time In Place Quilt
        • Shaken Not Stirred Quilt
        • Pleiades Quilt
      • 2014 >
        • Spinning Stars Quilt
        • Fractured Spiral Quilt
        • Autumn Leaves Quilt
        • Sea Dreams Quilt
        • Woodland Star Quilt
        • Zombie Ball Quilt
        • Innova Angles Quilt
      • 2013 >
        • Murder For a Jar of Red Rum Quilt
        • Patroitic Quilts
        • Red Sunset Bedding Quilt
        • The Infamous Fish Quilt
        • Gratitudes Quilt
      • 2012 >
        • Illuminated Blocks Quilt
        • Kims Wedding Quilt
        • Crossing The South Anna Quilt
        • Coming Home Quilt
        • See Reverse Quilt
        • Overboard Quilt
        • Floras Fans and Modern Crumbs Quilt
        • The Patriot Quilt
        • On Point Quilt
        • Grinch Quilts
      • 2011 >
        • Star Struck Quilt
        • On A Whim Quilt
        • Catena Quilt
        • Zig Zag Scraps Quilt
        • Purple Keepsakes Quilt
        • Fiberactions Challenge Quilts
        • Journal Quilts 2011
      • 2010 >
        • Maggie the Messmaker Cross Stitch
        • Fiberactions Challenge Quilts
        • Wootten Memory Quilts
        • Teal Tomorrow Quilt
      • 2009 >
        • Shereen's Peaceful Garden
        • TShirt Quilt Commission
        • Three Generation Quilt
      • 2008 >
        • Flora's Quilts
        • Monkey Baby Quilts
        • Citrus Quilt
      • 2007 >
        • Snails Trail Quilts
        • Quilts of Valor
        • Other Quilts
      • 2006 and older >
        • Scrap Bin Quilt
        • Flora's Dutchman's Breeches
        • The Gift Quilts
        • Reversible Quilts
        • Spectacular Scraps Quilts
        • Foundation Pieced Quilts
        • Art Quilts
        • Kathy's Memorial Quilt
    • Symmetry Quilt Gallery
    • Dyeing Gallery >
      • Tie Dye Gallery
      • Shibori Gallery
    • Postcard Gallery
    • Fused Glass Gallery
    • Mosaic Gallery
    • Zentangle and Spirograph
  • Tutorials
    • Save My Bleeding Quilt
    • Quilting Tutorials >
      • The Gift Quilt Pattern
      • Keepsakes Quilt Pattern
      • Blocking a Quilt
      • Facing A Quilt Tutorial
      • Veterans Quilt Tutorials >
        • Allegiance Quilt Pattern
        • Gratitudes Quilt Pattern
        • Strength Quilt Pattern
        • Blockade Quilt Pattern
        • Redoubt Quilt Pattern
        • Regiment Quilt Pattern
        • Bars and Stripes Quilt Pattern
      • Rainbow Quilt Free Pattern
      • Binding a Quilt
    • Surface Design Tutorials >
      • Ice Dyeing tutorial
      • Snow Dyeing basics tutorial
      • Snow Dyeing Mandala
      • Sun Printing Tutorial
      • Lamp Printing Tutorial
      • Dyeing extra large fabrics
      • Hold the Retayne
      • Painted Shower Curtain Tutorial
      • Metallic Paint Effects on Fabric
      • Curing Metallic Fabric Paints
      • Zentange Pens
      • Leaf Printing Tutorial
      • Printing On Fabric
      • Life of MX Dye Concentrates
      • Testing Soda Ash in fabric dyeing
    • Placemat Tutorials >
      • Rise and Shine Placemat Tutorial
      • Coming Home Placemat Tutorial
      • Mineral Pool Placemat Tutorial
      • Sugar Maple Placemats
      • Fat Quarter Placemat Tutorial
      • Merry Mats Placemat Tutorial
    • Basic Tutorials >
      • Custom Sewing Table
      • Liquid Spray Starch Recipe
    • Crafts and Small Projects >
      • Surgery Drain Bag Tutorial
      • Drawstring Bag Sewing Tutorial
      • Large Tote Tutorial
      • Big Fabric Flower Tutorial
      • The best potholders pattern
      • Notebook Cover Tutorial
      • Pillowcase tutorial
      • Wide Brim Sun Visor
      • Trash To Treasure Holiday Ornaments
      • Pet Bed From Scraps Tutorial
      • Framed Metal Quilt
      • Shooting Shirt Tutorial
      • Making Paper
      • Making Soap
      • Favorite Soap Reicpes
      • Lotion Making
      • Bowl hot pad pattern
    • Longarm Quilting Tutorials >
      • The longarm machine does matter
      • Double Wavy Crosshatch
      • Wavy Crosshatch Longarm
      • Quilting Letters on a Quilt
      • Centering a Quilt back on a longarm
      • Quilting Snowball Blocks
      • Easy Longarm Piano Keys
      • Using Channel Locks
      • Sewing/Serging quilt backing to zippers
      • Adding backing on the longarm
    • Crochet and Other Tutorials >
      • Crochet Wheelchair Shawl
  • Contact

Mineral Pool Placemat Tutorial

Picture
The placemats were so much fun to make and not nearly as complex as they might look. The ley is to cut gentle curves.

I chose the 3 blues and 3 golds for my placemats and they are called Mineral Pool after the fabric palette that I used for the project.

The technique used is cutting and piecing a gentle curve. If the curve is cut gentle enough you really don't have to be too concerned with allowing for a curve seam allowance. But if you aren't comfortable with curved seams you can make them with angled straight seams.

The finished size of my placemat is 17" x 13" but you can make yours any size you want. If you want it larger you will need to cut wider strips.
Picture
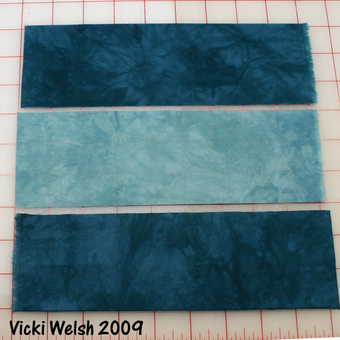
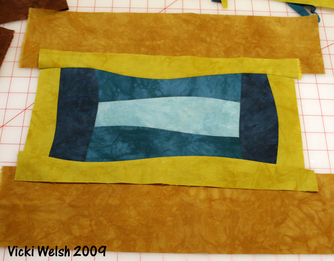
Step 1: Cut approximately 3" x 9" pieces of the blue fabrics. One of the light blue and 2 each for the medium and dark blues.

Step 2: Position a medium blue strip above and below the center light strip.

Picture
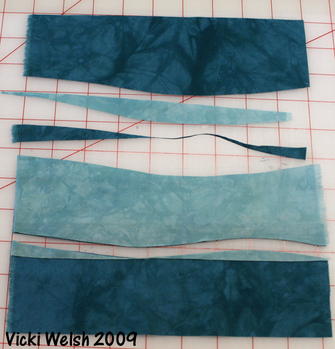
Step 3: Overlap the dark and light strips by about 3/4". I usually put the light strip over the dark so that I can see the shadow of the dark through the light fabric. Cut a GENTLE curve through both layers making sure that your blade is on both layers for the full length of the curve. You can see in the upper cut where I have removed the cut away bits. Sew these two seams and press to one side.

Picture
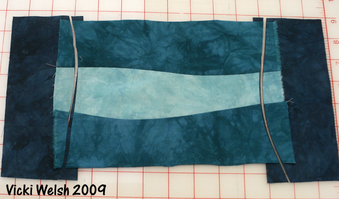
Step 4: Add the dark blue pieces to the sides of the center section. Notice that I cut the dark blue pieces longer than the section where it will be attached. I do this for every addition. It helps when I add the next piece and prepare to but the next curve. Make your cuts and sew these sections on.

Picture
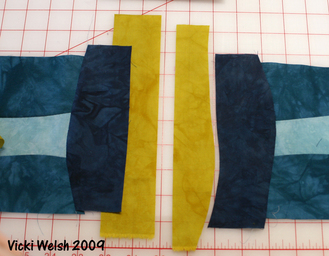
Step 5: The next section is a narrow gold section. This gold is added to each side and the top and bottom. Cut these pieces 2 "wide. Overlap, again, at least 3/4" and cut your curves. Sew and press. it does not matter if you add the sides first or the top and bottom. I chose to do the sides for this one.

Picture
Step 6: The final section is a wide section with dark gold on the top and bottom and dark brown on the sides (next photo). Cut these pieces 4" wide. You can see in this photo that when I overlap the center section with the wide section that the gold will finish quite narrow in some areas. It's even OK of the gold is only a sliver in some parts. Attach the dark gold and brown strips. Trim the placemat to your finished size. Mine is cut 17" x 13".

Picture
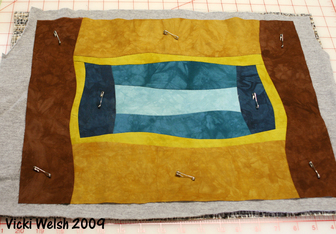
Step 7: I picked a fabric from my stash for the backing. Layer your placement just like you would a quilt. Lay the backing down wrong side up, smooth out the batting and then layer the top, right side up. I love using old flannel sheets for batting. They don't draw up in the wash like regular quilt batting does.
Pin through all layers.

Picture
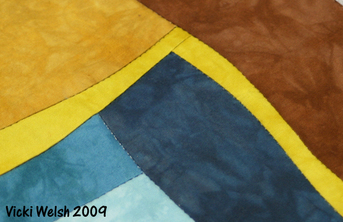
Step 8: Quilt it. I did a simple stitch in the ditch using Superior MonoPoly in the needle and a thread to match my backing in the bobbin. I also stitched through all layers around the entire edge of the placemat about 1/8" in from the edge, just to hold the layers stable. When you are done quilting, trim away the backing and batting.

Picture
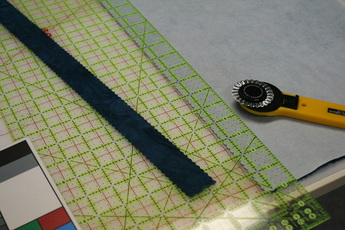
Step 9: I was not in the mood to do a binding on these so I decided to do a fused binding. I chose the two darker blues and added WonderUnder to the back of both. Normally I prefer Mistyfuse  but these will get washed often so I wanted something with a firmer hold.
​
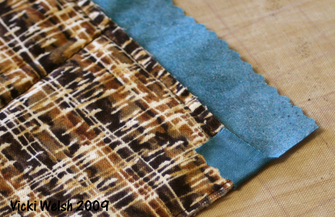
Step 10: Cut 2 strips of each fabric, 1 1/4" wide. I decided to use my lettuce edge blade to add some interest to the placemat. These strips need to be about 18" long.


Picture
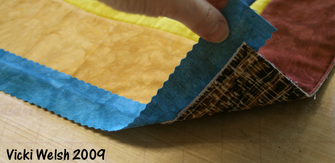
Step 11: For this step you will need your applique pressing sheet or a piece of parchment paper. Peel the paper backing from the binding strip. Lay the placemat right side up on the parchment sheet. Place one of the binding strips (sticky side down) on the edge of the placemat. You want the strip to be about half on and half off with a little bit hanging off each end. Press it in place using the exact instructions from the fusible manufacturer. After it cools peel the fused edge off the applique sheet.

Picture
Step 12: This is a little hard to see. The placemat is face down and I have cut the corner out of the binding strip so that there is just a little tab of binding from the front that I can fold to the back and them fold the rest of the binding strip to the back and fuse it all in place. That little tab helps to make sure that you don't have any batting corners sticking out. Attach your binding to all 4 edges. I topstitched over mine for a little extra security.
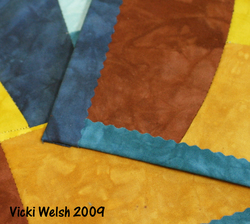
Picture
Finished!
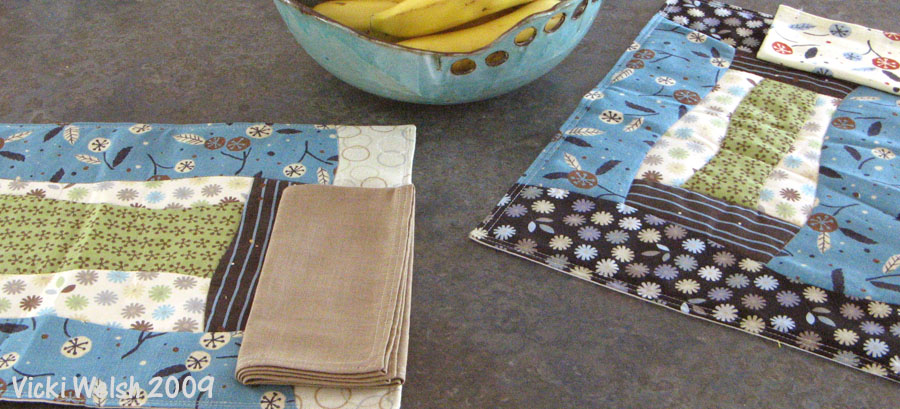
To the right is another set made in a different fabric collection.

Picture
Contact
Thank you for visiting Colorways by Vicki Welsh.
Copyright © 2024 by Vicki Welsh. All rights reserved. Content from this site may not be reproduced or used in any manner whatsoever without the express written permission of Vicki Welsh. You are welcome to link and share links to any page on the site.
  • Welcome
  • Blog
  • Galleries
    • Quilt Gallery >
      • 2025 >
        • Hanover Country Life Quilt
        • Oak Moth Quilt
      • 2024 >
        • Red SunsetQuilt
        • Big Blue Quilt
      • 2023 >
        • Heirloom Bear
        • Firefighter Quilt
        • The Goldfinch
      • 2022 >
        • Summer Sunset Quilt
        • Soundwave Quilt
      • 2021 >
        • A Big Green Quilt
        • Finally! Quilt
      • 2020 >
        • Jackies Choice Quilt
        • Penguins on Ice Quilt
        • Corona Cats Quilt
        • Kim's Garden
      • 2019 >
        • Indonesian Batik Quilt
        • Lost My Marbles
        • Remaking Flora's quilt
        • I'm Not a Snowflake Quilt
        • Where In The World Is My Cat Quilt
        • Fireworks
        • The Groovy Quilts
        • The Puppy Quilt
      • 2018 >
        • The Maine Quilt
        • Stars At Sea
        • Antelope Canyon Quilt
      • 2017 >
        • The Wedding Quilt Quilt
        • Rainbow's End Quilt
      • 2016 >
        • CSQ Challenge Quilt
        • Wholecloth Quilt of Valor
        • Luras Choice Quilt
        • Black Swan Quilt
        • 2016 Quilt of Valor Quilt
        • Non Unus Pluma Quilt
      • 2015 >
        • Snaps Quilt
        • Batik Crossroads Quilt
        • Wild Goose Chase Quilt
        • Fractured Fragments Quilt
        • Tell It To the Stars Quilt
        • Cathedral Window Quilt
        • Time In Place Quilt
        • Shaken Not Stirred Quilt
        • Pleiades Quilt
      • 2014 >
        • Spinning Stars Quilt
        • Fractured Spiral Quilt
        • Autumn Leaves Quilt
        • Sea Dreams Quilt
        • Woodland Star Quilt
        • Zombie Ball Quilt
        • Innova Angles Quilt
      • 2013 >
        • Murder For a Jar of Red Rum Quilt
        • Patroitic Quilts
        • Red Sunset Bedding Quilt
        • The Infamous Fish Quilt
        • Gratitudes Quilt
      • 2012 >
        • Illuminated Blocks Quilt
        • Kims Wedding Quilt
        • Crossing The South Anna Quilt
        • Coming Home Quilt
        • See Reverse Quilt
        • Overboard Quilt
        • Floras Fans and Modern Crumbs Quilt
        • The Patriot Quilt
        • On Point Quilt
        • Grinch Quilts
      • 2011 >
        • Star Struck Quilt
        • On A Whim Quilt
        • Catena Quilt
        • Zig Zag Scraps Quilt
        • Purple Keepsakes Quilt
        • Fiberactions Challenge Quilts
        • Journal Quilts 2011
      • 2010 >
        • Maggie the Messmaker Cross Stitch
        • Fiberactions Challenge Quilts
        • Wootten Memory Quilts
        • Teal Tomorrow Quilt
      • 2009 >
        • Shereen's Peaceful Garden
        • TShirt Quilt Commission
        • Three Generation Quilt
      • 2008 >
        • Flora's Quilts
        • Monkey Baby Quilts
        • Citrus Quilt
      • 2007 >
        • Snails Trail Quilts
        • Quilts of Valor
        • Other Quilts
      • 2006 and older >
        • Scrap Bin Quilt
        • Flora's Dutchman's Breeches
        • The Gift Quilts
        • Reversible Quilts
        • Spectacular Scraps Quilts
        • Foundation Pieced Quilts
        • Art Quilts
        • Kathy's Memorial Quilt
    • Symmetry Quilt Gallery
    • Dyeing Gallery >
      • Tie Dye Gallery
      • Shibori Gallery
    • Postcard Gallery
    • Fused Glass Gallery
    • Mosaic Gallery
    • Zentangle and Spirograph
  • Tutorials
    • Save My Bleeding Quilt
    • Quilting Tutorials >
      • The Gift Quilt Pattern
      • Keepsakes Quilt Pattern
      • Blocking a Quilt
      • Facing A Quilt Tutorial
      • Veterans Quilt Tutorials >
        • Allegiance Quilt Pattern
        • Gratitudes Quilt Pattern
        • Strength Quilt Pattern
        • Blockade Quilt Pattern
        • Redoubt Quilt Pattern
        • Regiment Quilt Pattern
        • Bars and Stripes Quilt Pattern
      • Rainbow Quilt Free Pattern
      • Binding a Quilt
    • Surface Design Tutorials >
      • Ice Dyeing tutorial
      • Snow Dyeing basics tutorial
      • Snow Dyeing Mandala
      • Sun Printing Tutorial
      • Lamp Printing Tutorial
      • Dyeing extra large fabrics
      • Hold the Retayne
      • Painted Shower Curtain Tutorial
      • Metallic Paint Effects on Fabric
      • Curing Metallic Fabric Paints
      • Zentange Pens
      • Leaf Printing Tutorial
      • Printing On Fabric
      • Life of MX Dye Concentrates
      • Testing Soda Ash in fabric dyeing
    • Placemat Tutorials >
      • Rise and Shine Placemat Tutorial
      • Coming Home Placemat Tutorial
      • Mineral Pool Placemat Tutorial
      • Sugar Maple Placemats
      • Fat Quarter Placemat Tutorial
      • Merry Mats Placemat Tutorial
    • Basic Tutorials >
      • Custom Sewing Table
      • Liquid Spray Starch Recipe
    • Crafts and Small Projects >
      • Surgery Drain Bag Tutorial
      • Drawstring Bag Sewing Tutorial
      • Large Tote Tutorial
      • Big Fabric Flower Tutorial
      • The best potholders pattern
      • Notebook Cover Tutorial
      • Pillowcase tutorial
      • Wide Brim Sun Visor
      • Trash To Treasure Holiday Ornaments
      • Pet Bed From Scraps Tutorial
      • Framed Metal Quilt
      • Shooting Shirt Tutorial
      • Making Paper
      • Making Soap
      • Favorite Soap Reicpes
      • Lotion Making
      • Bowl hot pad pattern
    • Longarm Quilting Tutorials >
      • The longarm machine does matter
      • Double Wavy Crosshatch
      • Wavy Crosshatch Longarm
      • Quilting Letters on a Quilt
      • Centering a Quilt back on a longarm
      • Quilting Snowball Blocks
      • Easy Longarm Piano Keys
      • Using Channel Locks
      • Sewing/Serging quilt backing to zippers
      • Adding backing on the longarm
    • Crochet and Other Tutorials >
      • Crochet Wheelchair Shawl
  • Contact