Colorways By Vicki Welsh
  • Welcome
  • Blog
  • Galleries
    • Quilt Gallery >
      • 2025 >
        • Hanover Country Life Quilt
        • Oak Moth Quilt
      • 2024 >
        • Red SunsetQuilt
        • Big Blue Quilt
      • 2023 >
        • Heirloom Bear
        • Firefighter Quilt
        • The Goldfinch
      • 2022 >
        • Summer Sunset Quilt
        • Soundwave Quilt
      • 2021 >
        • A Big Green Quilt
        • Finally! Quilt
      • 2020 >
        • Jackies Choice Quilt
        • Penguins on Ice Quilt
        • Corona Cats Quilt
        • Kim's Garden
      • 2019 >
        • Indonesian Batik Quilt
        • Lost My Marbles
        • Remaking Flora's quilt
        • I'm Not a Snowflake Quilt
        • Where In The World Is My Cat Quilt
        • Fireworks
        • The Groovy Quilts
        • The Puppy Quilt
      • 2018 >
        • The Maine Quilt
        • Stars At Sea
        • Antelope Canyon Quilt
      • 2017 >
        • The Wedding Quilt Quilt
        • Rainbow's End Quilt
      • 2016 >
        • CSQ Challenge Quilt
        • Wholecloth Quilt of Valor
        • Luras Choice Quilt
        • Black Swan Quilt
        • 2016 Quilt of Valor Quilt
        • Non Unus Pluma Quilt
      • 2015 >
        • Snaps Quilt
        • Batik Crossroads Quilt
        • Wild Goose Chase Quilt
        • Fractured Fragments Quilt
        • Tell It To the Stars Quilt
        • Cathedral Window Quilt
        • Time In Place Quilt
        • Shaken Not Stirred Quilt
        • Pleiades Quilt
      • 2014 >
        • Spinning Stars Quilt
        • Fractured Spiral Quilt
        • Autumn Leaves Quilt
        • Sea Dreams Quilt
        • Woodland Star Quilt
        • Zombie Ball Quilt
        • Innova Angles Quilt
      • 2013 >
        • Murder For a Jar of Red Rum Quilt
        • Patroitic Quilts
        • Red Sunset Bedding Quilt
        • The Infamous Fish Quilt
        • Gratitudes Quilt
      • 2012 >
        • Illuminated Blocks Quilt
        • Kims Wedding Quilt
        • Crossing The South Anna Quilt
        • Coming Home Quilt
        • See Reverse Quilt
        • Overboard Quilt
        • Floras Fans and Modern Crumbs Quilt
        • The Patriot Quilt
        • On Point Quilt
        • Grinch Quilts
      • 2011 >
        • Star Struck Quilt
        • On A Whim Quilt
        • Catena Quilt
        • Zig Zag Scraps Quilt
        • Purple Keepsakes Quilt
        • Fiberactions Challenge Quilts
        • Journal Quilts 2011
      • 2010 >
        • Maggie the Messmaker Cross Stitch
        • Fiberactions Challenge Quilts
        • Wootten Memory Quilts
        • Teal Tomorrow Quilt
      • 2009 >
        • Shereen's Peaceful Garden
        • TShirt Quilt Commission
        • Three Generation Quilt
      • 2008 >
        • Flora's Quilts
        • Monkey Baby Quilts
        • Citrus Quilt
      • 2007 >
        • Snails Trail Quilts
        • Quilts of Valor
        • Other Quilts
      • 2006 and older >
        • Scrap Bin Quilt
        • Flora's Dutchman's Breeches
        • The Gift Quilts
        • Reversible Quilts
        • Spectacular Scraps Quilts
        • Foundation Pieced Quilts
        • Art Quilts
        • Kathy's Memorial Quilt
    • Symmetry Quilt Gallery
    • Dyeing Gallery >
      • Tie Dye Gallery
      • Shibori Gallery
    • Postcard Gallery
    • Fused Glass Gallery
    • Mosaic Gallery
    • Zentangle and Spirograph
  • Tutorials
    • Save My Bleeding Quilt
    • Quilting Tutorials >
      • The Gift Quilt Pattern
      • Keepsakes Quilt Pattern
      • Blocking a Quilt
      • Facing A Quilt Tutorial
      • Veterans Quilt Tutorials >
        • Allegiance Quilt Pattern
        • Gratitudes Quilt Pattern
        • Strength Quilt Pattern
        • Blockade Quilt Pattern
        • Redoubt Quilt Pattern
        • Regiment Quilt Pattern
        • Bars and Stripes Quilt Pattern
      • Rainbow Quilt Free Pattern
      • Binding a Quilt
    • Surface Design Tutorials >
      • Ice Dyeing tutorial
      • Snow Dyeing basics tutorial
      • Snow Dyeing Mandala
      • Sun Printing Tutorial
      • Lamp Printing Tutorial
      • Dyeing extra large fabrics
      • Hold the Retayne
      • Painted Shower Curtain Tutorial
      • Metallic Paint Effects on Fabric
      • Curing Metallic Fabric Paints
      • Zentange Pens
      • Leaf Printing Tutorial
      • Printing On Fabric
      • Life of MX Dye Concentrates
      • Testing Soda Ash in fabric dyeing
    • Placemat Tutorials >
      • Rise and Shine Placemat Tutorial
      • Coming Home Placemat Tutorial
      • Mineral Pool Placemat Tutorial
      • Sugar Maple Placemats
      • Fat Quarter Placemat Tutorial
      • Merry Mats Placemat Tutorial
    • Basic Tutorials >
      • Custom Sewing Table
      • Liquid Spray Starch Recipe
    • Crafts and Small Projects >
      • Surgery Drain Bag Tutorial
      • Drawstring Bag Sewing Tutorial
      • Large Tote Tutorial
      • Big Fabric Flower Tutorial
      • The best potholders pattern
      • Notebook Cover Tutorial
      • Pillowcase tutorial
      • Wide Brim Sun Visor
      • Trash To Treasure Holiday Ornaments
      • Pet Bed From Scraps Tutorial
      • Framed Metal Quilt
      • Shooting Shirt Tutorial
      • Making Paper
      • Making Soap
      • Favorite Soap Reicpes
      • Lotion Making
      • Bowl hot pad pattern
    • Longarm Quilting Tutorials >
      • The longarm machine does matter
      • Double Wavy Crosshatch
      • Wavy Crosshatch Longarm
      • Quilting Letters on a Quilt
      • Centering a Quilt back on a longarm
      • Quilting Snowball Blocks
      • Easy Longarm Piano Keys
      • Using Channel Locks
      • Sewing/Serging quilt backing to zippers
      • Adding backing on the longarm
    • Crochet and Other Tutorials >
      • Crochet Wheelchair Shawl
  • Contact

Making Soap

Picture
I have allergies. Lots and lots of allergies. I have always been sensitive to soaps and lotions and I was fortunately to have a friend teach me how to make soap and lotion. This is my soap process. The photos are total crap but I think they clearly describe the process. If you decide that you want to make soap, I recommend reading The Soapmaker's Companion before jumping in.

Picture
Start with the materials and ingredients. Anything that you use for soap making needs to be kept and used for soap making only. I keep everything in a separate cabinet. Soap has three main ingredients: distilled water, lye and fats. 
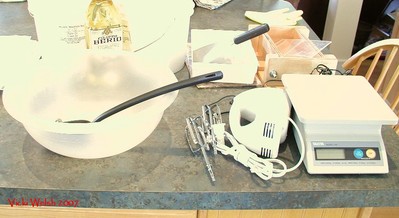
You need a scale, a mixer or blender ( soap makers actually recommend a stick blender), a soap mold (I have one that is made to be a soap mold but that white plastic tray makes a good one too. The big bowl is for measuring the fats and mixing the soap. The second photo shows the lye supplies. I keep all of these completely separate. I have two thermometers, one for fats and one for lye.

Picture
Next is the recipe. Majestic Mountain Sage is one place where I buy all of my supplies and they have a online lye calculator.  My other source is The Soap Dish.  I order from The Soap Dish especially when I need lye. Since meth labs started up we can't buy lye in stores anymore.

I use the lye calculator a lot because I frequently make "leftover" batches. Each "fat" or oil that you use has a different saponification value. That value is key to determining the exact amount of lye needed. You cannot randomly substitute oils in a recipe

I have several recipes that I like and have a separate tutorial with my 5 favorites.

Picture
Step 1:
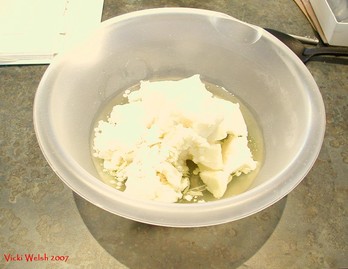
Measure all of the ingredients. The fats are measured into the big bowl. Set this aside until the lye and water are mixed.

Picture
Step 2:
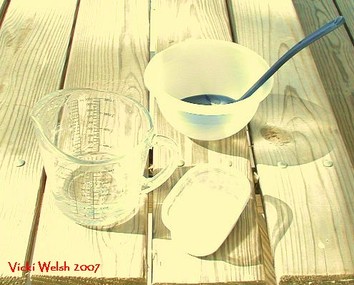
Put the distilled water into the pyrex container and the lye in a small plastic container. Take these items outside with the dedicated lye spoon and thermometer. I wear a mask, rubber gloves and eye protection when working with the lye. This stuff burns like crazy on your skin.

Picture
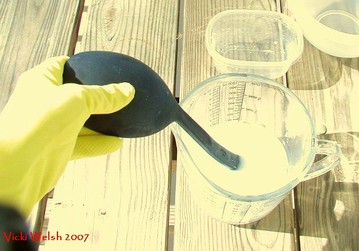
Step 3: Mix the lye into the water. ALWAYS POUR THE LYE INTO THE WATER AND NOT THE OTHER WAY AROUND. The water turns white at first, it smells really strong and it gets very HOT so be careful and do it outside for good ventilation. Keep stirring until the water is clear. Once mixed, the water temperature will be about 160 degrees. 

Step 4: Melt the fats. I use the microwave and try 3 minutes first and then add a minute until everything is melted. When beeswax is an ingredient it takes about 5 minutes to melt everything. Put the fats thermometer in the bowl. Today's batch was 140 degrees out of the microwave. Let the fats and lye cool until they are both around 110 degrees. If you are not using beeswax you can cool to a lower temperature.
Picture
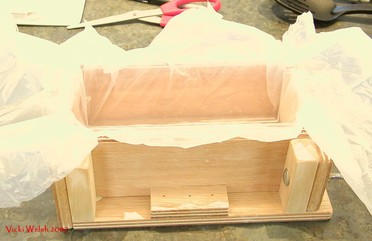
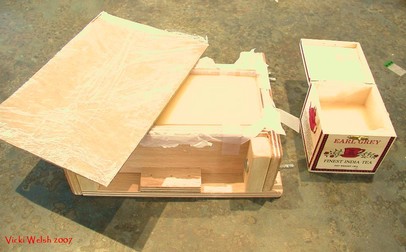
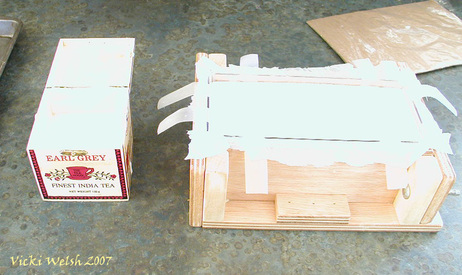
Step 5: Prepare the mold. I am using a purchased soap mold but almost any container works fine. I line the mold with a plastic grocery bag and use the acrylic liner panels to hold the plastic in place. I trim it all up and use scotch tape to hold everything in place. The mold needs a cover. I use a piece of cardboard covered in plastic wrap.

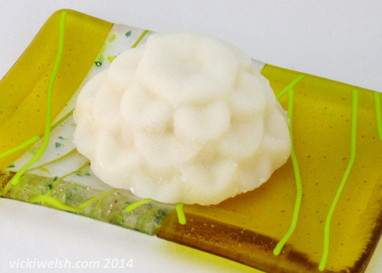
Since first writing this tutorial I discovered silicone molds and bow use them almost exclusively. They don't need lining, make individual bars of soap (see photo at the top of the page) and non stick to  make unmolding super easy.

Picture
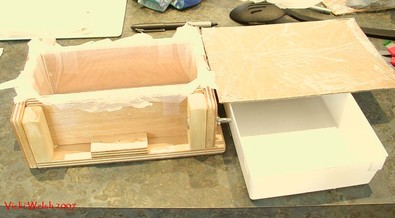
In this photo you can see the fancy cardboard cover. The white pan underneath is a drawer organizer that I also use as a mold. I line it with wax paper of freezer paper (shiny side out). Unless you are really particular about your bar shape, you do not need to buy a custom mold.

Picture
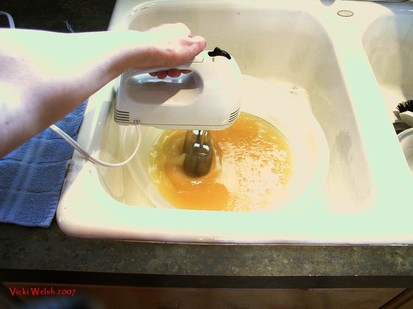
Step 6: When the lye and oils are both around 110 degrees start mixing the lye into the fats. Slowly add the lye while blending. I use a hand mixer because that's what I got free from someone. Stick blenders work great and is probably the favorite tool of soap makers.

This is a critical step. You must thoroughly blend the lye into the fat or you will have lye streaks in the soap bars and they will not be usable. The books all refer to the mix "tracing" as being the right time to stop. 
The best guidance I've seen is to mix and the stop long enough to walk to the kitchen and pour a glass of water. Walk back and if the oil is separating in the mix you need to blend longer. If the mixture cools too much it will start getting really thick. If that happens it's time to pour.

Picture
Step 7: Pour the soap mixture in the mold. In this photo you see a small box to the right. My soap mix is a few ounces to large for the one mold so I pour the remaining in this wax paper-lined box.

Picture
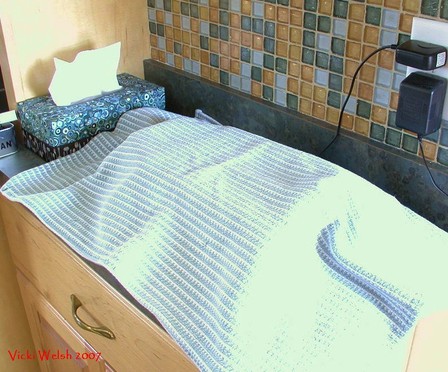
Cover the mold with the plastic-covered cardboard and then with a blanket or several towels. Now just walk away and leave it alone for 24 hours.....

If you stick your hand under the blankets after a few hours you will feel the heat next to the soap. After about 24 hours you can remove the insulation and then let the soap stay in the mold until it's firm enough to cut. For me, that's usually one more day. 

I did everything to this point in about 1.5 hours and that includes taking the photos, set up, clean up and re-ordering supplies while the fats and lye cooled! It's also very economical. I ordered enough supplies for 8 - 10 more batches of soap and the total cost was about $45. A batch of soap makes up to 10 bars. That's about 50 cents per bar!


Picture
Step 8: Sometimes when I use an "ordinary" container the soap will tend to stick. I put the container in the freezer for about 30 minutes and the soap will usually slide out. The plastic drawer organizer lined with freezer paper works beautifully as a mold. That little box I use for the overflow sometimes gives me a fit but a few hits upside down on the counter will usually knock out the soap.

​Using silicone molds eliminates any problem. Just pop the soap out of the molds.


Picture
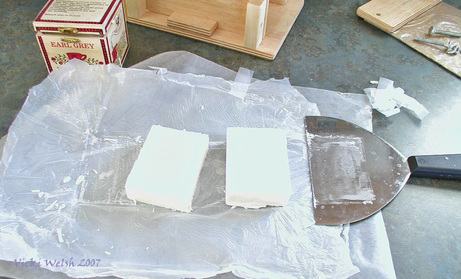
Step 9: Cut the bars. Soap bars shrink a lot during curing so cut them wide.I usually get 8 - 9 bars from the soap mold and I cut the soap in the small box into small bars for travel soap.  A drywall knife is great for cutting soap.

Picture
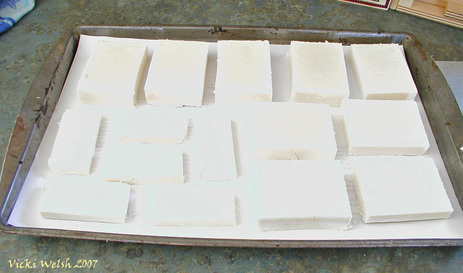
Step 10: I arrange the bars on an old cookie sheet lined in paper and leave it to cure for about 3 weeks. The curing process allows the excess moisture to evaporate and hardens the bars. They will shrink about 25% in weight. If you use them too soon the soaps will dissolve quicker in the bath.

Contact
Thank you for visiting Colorways by Vicki Welsh.
Copyright © 2024 by Vicki Welsh. All rights reserved. Content from this site may not be reproduced or used in any manner whatsoever without the express written permission of Vicki Welsh. You are welcome to link and share links to any page on the site.
  • Welcome
  • Blog
  • Galleries
    • Quilt Gallery >
      • 2025 >
        • Hanover Country Life Quilt
        • Oak Moth Quilt
      • 2024 >
        • Red SunsetQuilt
        • Big Blue Quilt
      • 2023 >
        • Heirloom Bear
        • Firefighter Quilt
        • The Goldfinch
      • 2022 >
        • Summer Sunset Quilt
        • Soundwave Quilt
      • 2021 >
        • A Big Green Quilt
        • Finally! Quilt
      • 2020 >
        • Jackies Choice Quilt
        • Penguins on Ice Quilt
        • Corona Cats Quilt
        • Kim's Garden
      • 2019 >
        • Indonesian Batik Quilt
        • Lost My Marbles
        • Remaking Flora's quilt
        • I'm Not a Snowflake Quilt
        • Where In The World Is My Cat Quilt
        • Fireworks
        • The Groovy Quilts
        • The Puppy Quilt
      • 2018 >
        • The Maine Quilt
        • Stars At Sea
        • Antelope Canyon Quilt
      • 2017 >
        • The Wedding Quilt Quilt
        • Rainbow's End Quilt
      • 2016 >
        • CSQ Challenge Quilt
        • Wholecloth Quilt of Valor
        • Luras Choice Quilt
        • Black Swan Quilt
        • 2016 Quilt of Valor Quilt
        • Non Unus Pluma Quilt
      • 2015 >
        • Snaps Quilt
        • Batik Crossroads Quilt
        • Wild Goose Chase Quilt
        • Fractured Fragments Quilt
        • Tell It To the Stars Quilt
        • Cathedral Window Quilt
        • Time In Place Quilt
        • Shaken Not Stirred Quilt
        • Pleiades Quilt
      • 2014 >
        • Spinning Stars Quilt
        • Fractured Spiral Quilt
        • Autumn Leaves Quilt
        • Sea Dreams Quilt
        • Woodland Star Quilt
        • Zombie Ball Quilt
        • Innova Angles Quilt
      • 2013 >
        • Murder For a Jar of Red Rum Quilt
        • Patroitic Quilts
        • Red Sunset Bedding Quilt
        • The Infamous Fish Quilt
        • Gratitudes Quilt
      • 2012 >
        • Illuminated Blocks Quilt
        • Kims Wedding Quilt
        • Crossing The South Anna Quilt
        • Coming Home Quilt
        • See Reverse Quilt
        • Overboard Quilt
        • Floras Fans and Modern Crumbs Quilt
        • The Patriot Quilt
        • On Point Quilt
        • Grinch Quilts
      • 2011 >
        • Star Struck Quilt
        • On A Whim Quilt
        • Catena Quilt
        • Zig Zag Scraps Quilt
        • Purple Keepsakes Quilt
        • Fiberactions Challenge Quilts
        • Journal Quilts 2011
      • 2010 >
        • Maggie the Messmaker Cross Stitch
        • Fiberactions Challenge Quilts
        • Wootten Memory Quilts
        • Teal Tomorrow Quilt
      • 2009 >
        • Shereen's Peaceful Garden
        • TShirt Quilt Commission
        • Three Generation Quilt
      • 2008 >
        • Flora's Quilts
        • Monkey Baby Quilts
        • Citrus Quilt
      • 2007 >
        • Snails Trail Quilts
        • Quilts of Valor
        • Other Quilts
      • 2006 and older >
        • Scrap Bin Quilt
        • Flora's Dutchman's Breeches
        • The Gift Quilts
        • Reversible Quilts
        • Spectacular Scraps Quilts
        • Foundation Pieced Quilts
        • Art Quilts
        • Kathy's Memorial Quilt
    • Symmetry Quilt Gallery
    • Dyeing Gallery >
      • Tie Dye Gallery
      • Shibori Gallery
    • Postcard Gallery
    • Fused Glass Gallery
    • Mosaic Gallery
    • Zentangle and Spirograph
  • Tutorials
    • Save My Bleeding Quilt
    • Quilting Tutorials >
      • The Gift Quilt Pattern
      • Keepsakes Quilt Pattern
      • Blocking a Quilt
      • Facing A Quilt Tutorial
      • Veterans Quilt Tutorials >
        • Allegiance Quilt Pattern
        • Gratitudes Quilt Pattern
        • Strength Quilt Pattern
        • Blockade Quilt Pattern
        • Redoubt Quilt Pattern
        • Regiment Quilt Pattern
        • Bars and Stripes Quilt Pattern
      • Rainbow Quilt Free Pattern
      • Binding a Quilt
    • Surface Design Tutorials >
      • Ice Dyeing tutorial
      • Snow Dyeing basics tutorial
      • Snow Dyeing Mandala
      • Sun Printing Tutorial
      • Lamp Printing Tutorial
      • Dyeing extra large fabrics
      • Hold the Retayne
      • Painted Shower Curtain Tutorial
      • Metallic Paint Effects on Fabric
      • Curing Metallic Fabric Paints
      • Zentange Pens
      • Leaf Printing Tutorial
      • Printing On Fabric
      • Life of MX Dye Concentrates
      • Testing Soda Ash in fabric dyeing
    • Placemat Tutorials >
      • Rise and Shine Placemat Tutorial
      • Coming Home Placemat Tutorial
      • Mineral Pool Placemat Tutorial
      • Sugar Maple Placemats
      • Fat Quarter Placemat Tutorial
      • Merry Mats Placemat Tutorial
    • Basic Tutorials >
      • Custom Sewing Table
      • Liquid Spray Starch Recipe
    • Crafts and Small Projects >
      • Surgery Drain Bag Tutorial
      • Drawstring Bag Sewing Tutorial
      • Large Tote Tutorial
      • Big Fabric Flower Tutorial
      • The best potholders pattern
      • Notebook Cover Tutorial
      • Pillowcase tutorial
      • Wide Brim Sun Visor
      • Trash To Treasure Holiday Ornaments
      • Pet Bed From Scraps Tutorial
      • Framed Metal Quilt
      • Shooting Shirt Tutorial
      • Making Paper
      • Making Soap
      • Favorite Soap Reicpes
      • Lotion Making
      • Bowl hot pad pattern
    • Longarm Quilting Tutorials >
      • The longarm machine does matter
      • Double Wavy Crosshatch
      • Wavy Crosshatch Longarm
      • Quilting Letters on a Quilt
      • Centering a Quilt back on a longarm
      • Quilting Snowball Blocks
      • Easy Longarm Piano Keys
      • Using Channel Locks
      • Sewing/Serging quilt backing to zippers
      • Adding backing on the longarm
    • Crochet and Other Tutorials >
      • Crochet Wheelchair Shawl
  • Contact