|
Well, Christmas is officially underway here. I've gotten the first set of cards done! 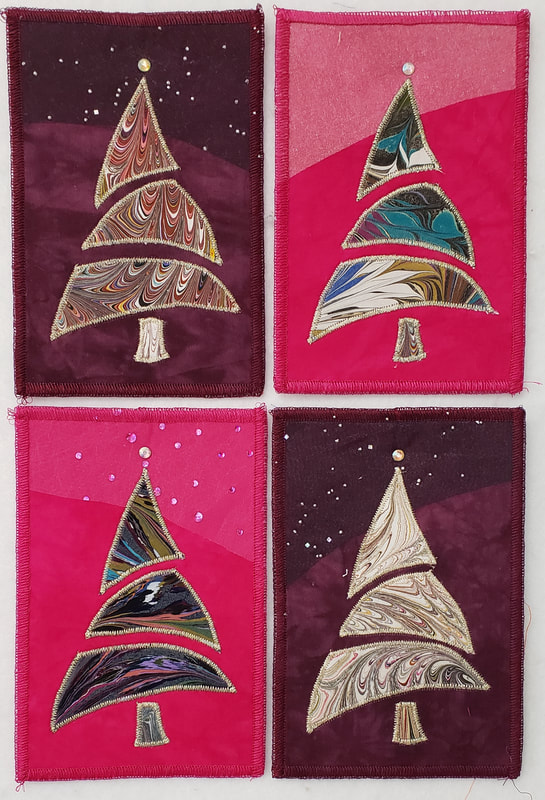 I don't know how the color is showing up on your screen but half of the 24 cards are on a bright pink background. It's very "not me" but I thought it really set off the dark fabric trees well. I have a few friends who will appreciate the pink cards. 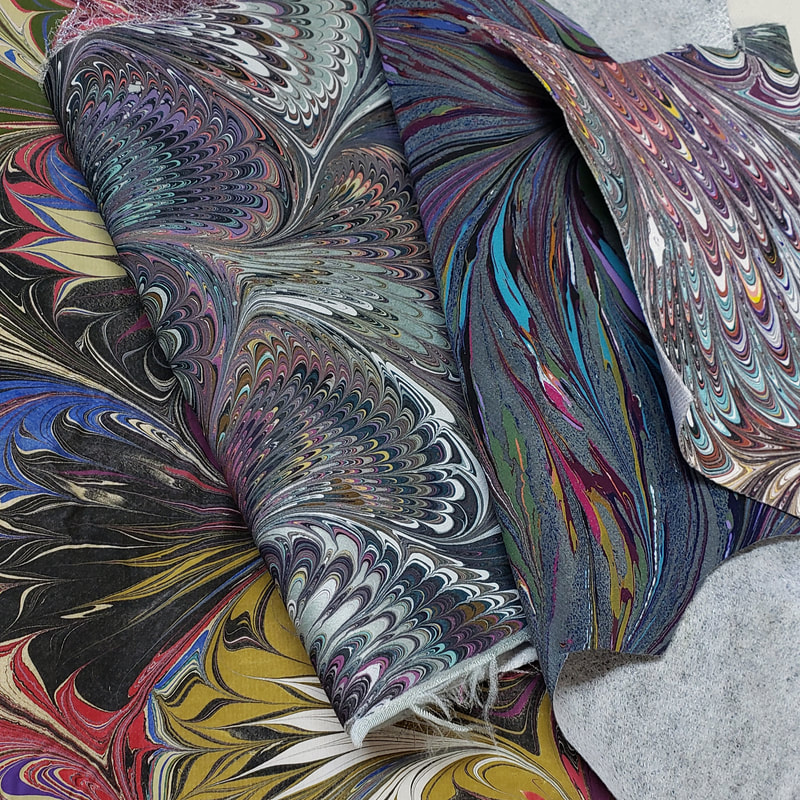 Often my card designs start with a fabric that I want to use instead of starting with a design and that was the case with these cards. Years ago I bought these painted silk fabrics. I bought them in Houston so it had to be 10 years or more and I think I bought them with the idea of using them in my symmetry quilts. They never worked for that so they wound up in the cabinet of bits and pieces. I found them last week and thought they might be good for tree images on cards. I started by fusing interfacing on the back and then adding a layer of fusible web. The fabric is really thin like scarf fabric so it had to be stabilized to be cut out. I knew I'd put them on a hand dyed fabric background but that wasn't going to be quite enough to complete the design.  Off I went to another bin to find something sparkly to add behind the tree. These fabrics helped narrow down the background choices.
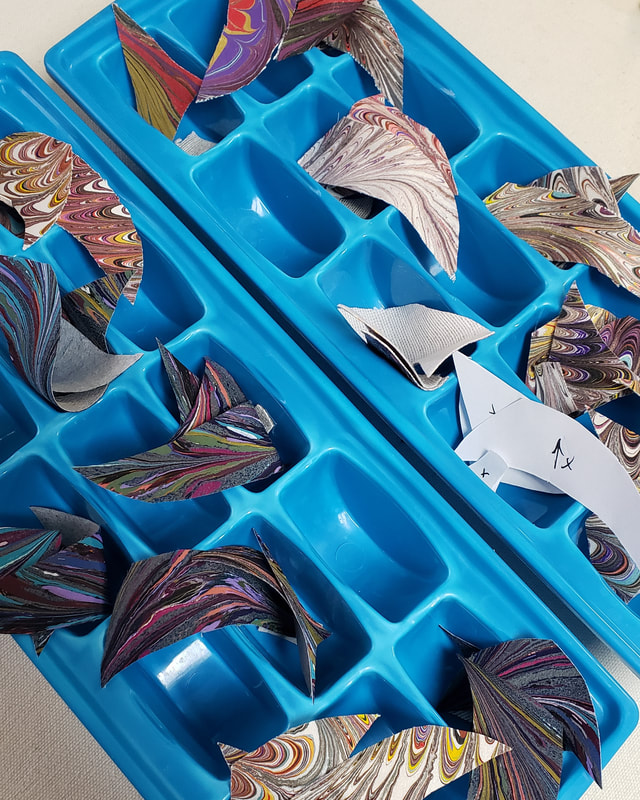
Now, I don't draw. When I need a template I head on over to Google and search for silhouettes and that's where I found this tree. I downloaded it, put it in my photo editor and resized it to fit the 4 x 6 postcard size. Then I was off for an evening of cutting out trees. Ice cube tray were really helpful to keep the pieces together. 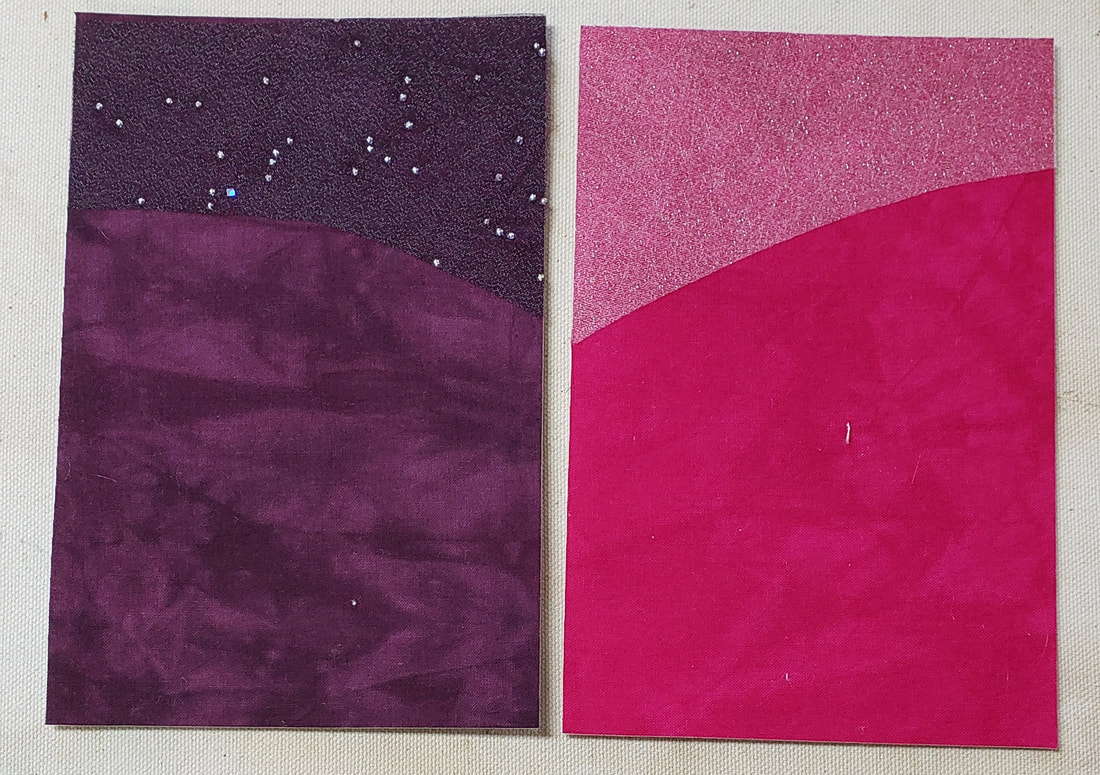 The backgrounds were fused, 12 in each color.  Then the fun part of fusing and stitching the trees. I used Superior in Light Gold to edge the trees. I finished them off on the serger. You can see from the first photo that I also added a crystal tree topper.
Now on to the second design which I think is going to be a stocking.  Totally Tubular by Gene Black, 54" x 57" This week's inspiration comes to us from Gene Black. Gene recently won one of my giveaways for a collection of my "waste" fabrics. These are strips of fabric that I use when dyeing gradients. They get amazing textures on them from that process. I don't but rather save them for giveaways (hint, hint).
In this quilt Gene used a technique that he learned from watching an episode of The Quilt Show. Tula Pink demonstrated the method for making the sections for this quilt. He combined the hand dyes with shirting fabrics to great effect. For sharing, Gene received a 20% coupon for the shop that's good for 3 months! If you have made anything with my hand dyed fabric I hope you will consider sharing it in the Customer Gallery. The only rule is that projects have to be complete. It doesn't have to be made totally from hand dyed fabric, just include a recognizable amount. 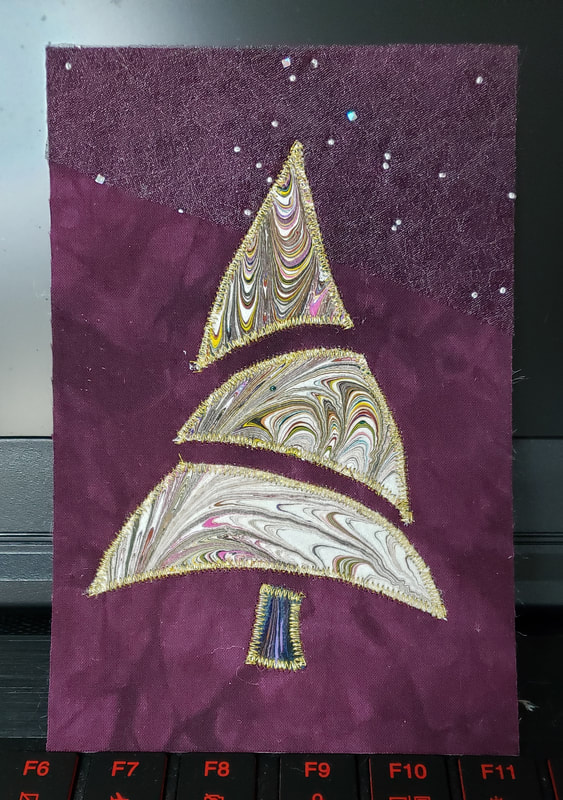 With Finally! done I've moved on to postcard planning. After doing a couple of sessions of leaf blowing I dug into my supplies and this is my first prototype. Hopefully I'll have set done my Monday.
Have a great weekend! 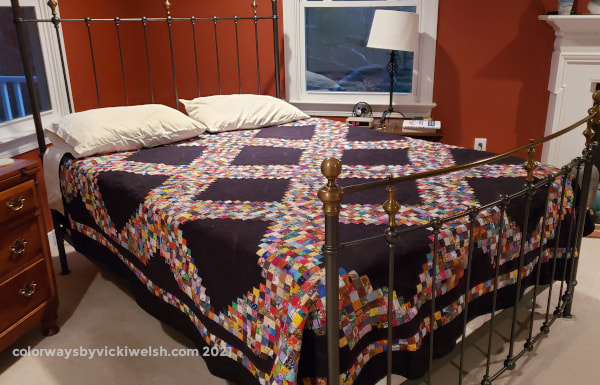 I've been thinking way to hard to come up with a name for this quilt. I've toyed with all kinds of ideas (Insanity, 3970, 23 years) but all day yesterday I just kept thinking "Finally it's done!" Of course "Finally!" has to be the name of this quilt.
It's finally done, it's finally on my bed and I finally got to sleep under it. I can report that its really warm and really heavy! Check out more details and photos here. Now I feel a little discombobulated about what to do next. I think I'll just focus on the Christmas postcards while I organize my thoughts about future quilt projects. I had the weekend to myself and I think I got a lot done. Chris is away on his annual hunting trip to Nebraska and is coming home this evening with some turkeys and pheasants for the freezer. While he was away I hunkered down with my audiobooks and got some things done. The postage stamp quilt binding will be done tomorrow just in time to take to the quilt club meeting for show-and-tell. I still can't believe that I'm actually finishing that project! I need to get a label made later in the week. 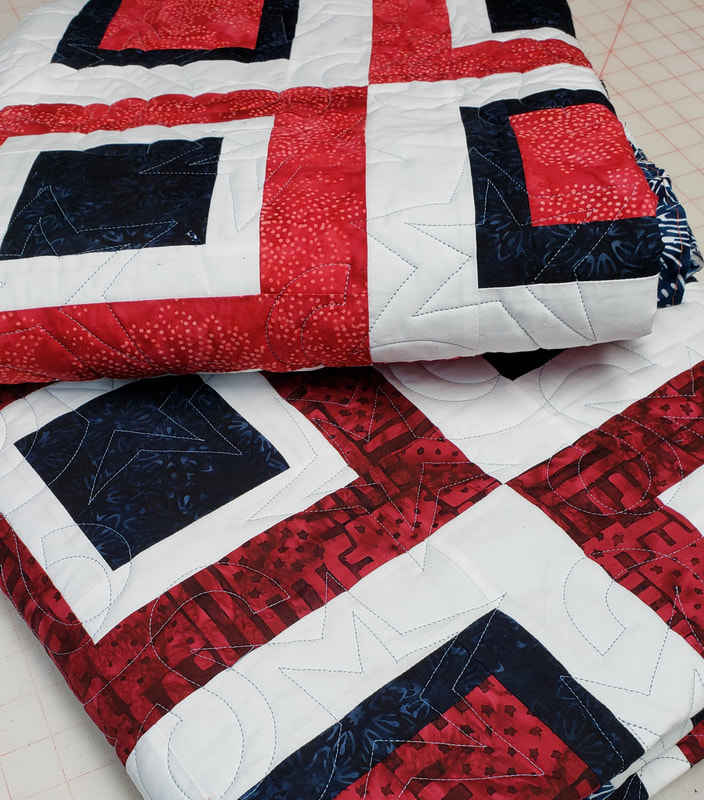 In less exciting news, I got 2 of my own veterans quilts quilted. I'll bind these this weekend at our club sewing days. I'll probably be able to also finish the rail fence tops that I started last month. That would be cool. That would give me 4 more finished projects before year end. I'm all about padding the stats. 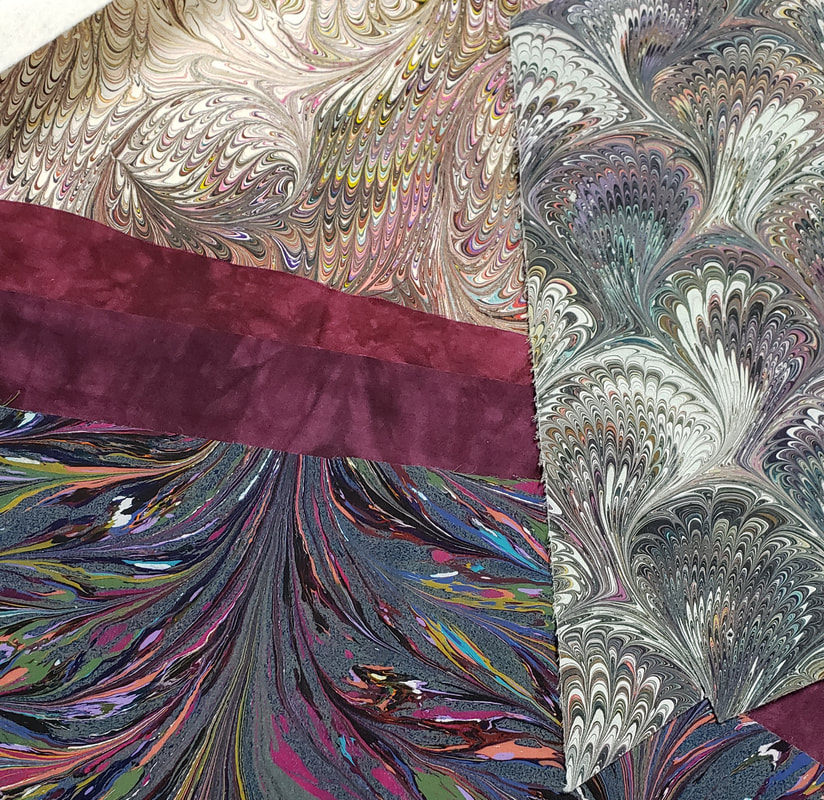 I also made some design process on the Christmas postcards. I do a tree themed one every year and I think I'm going to have trees made from these hand painted silk fabrics on a dark burgundy background. 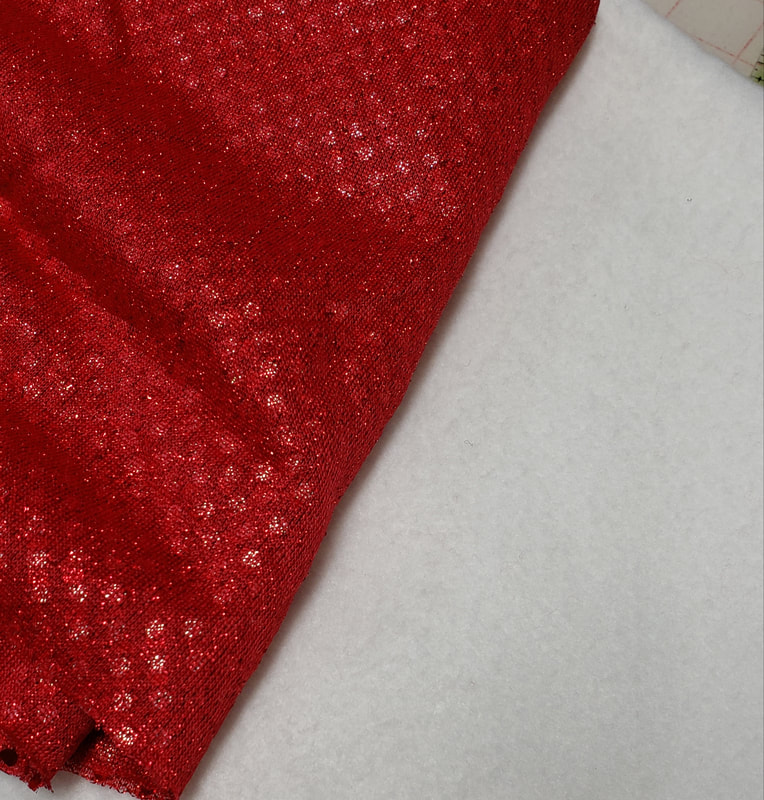 My friend Anne gave me this red sparkly fabric to make a doll outfit with. There's tons of it so I'm feeling a card featuring a stocking with white felt as the cuff. 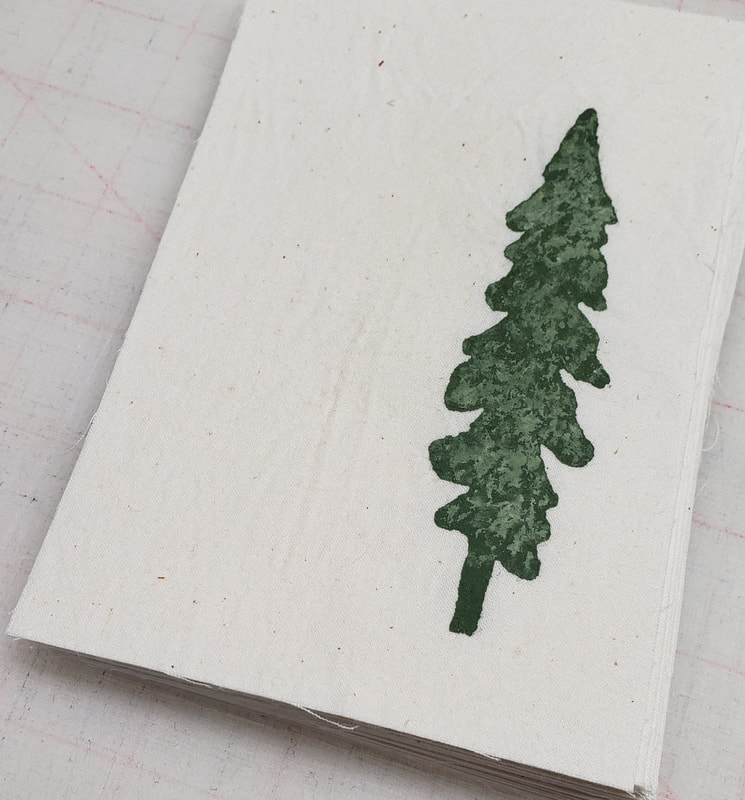 You might remember this reject from last year. It might get resurrected. This morning I have to go to the doctor to have blood drawn so I may go to the Joann that's nearby and see if I can find a wide plaid ribbon that could be sewn to the side and I might have 2 tree-themed cards this year, which is not a problem at all. While I'm in that neighborhood I'm going to visit my brother to take him some shirts that I dyed for him. 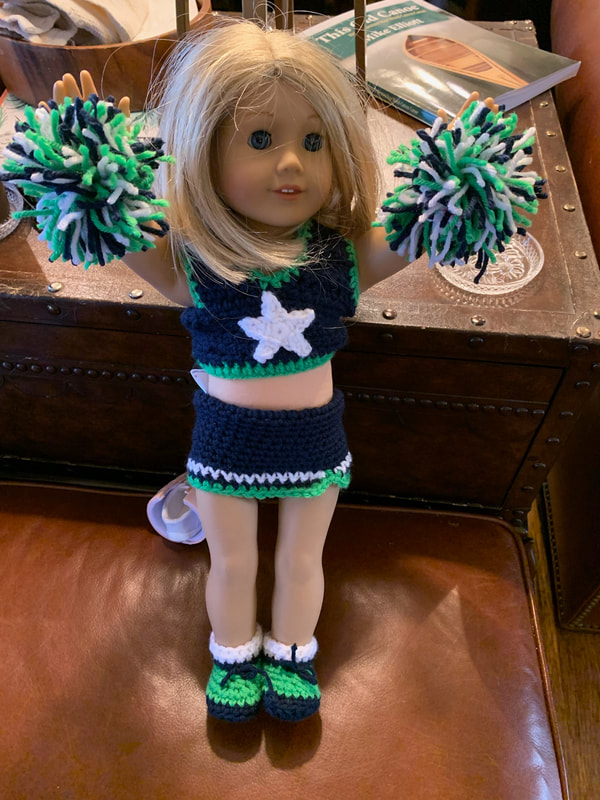 I also have to deal with this. Remember when I made the cheer outfit? I followed the directions and used her hook size but I crochet really tight and ALWAYS have to go up a hook size. I should have done that for this project. It's supposed to be American Girl, not American Hooker. 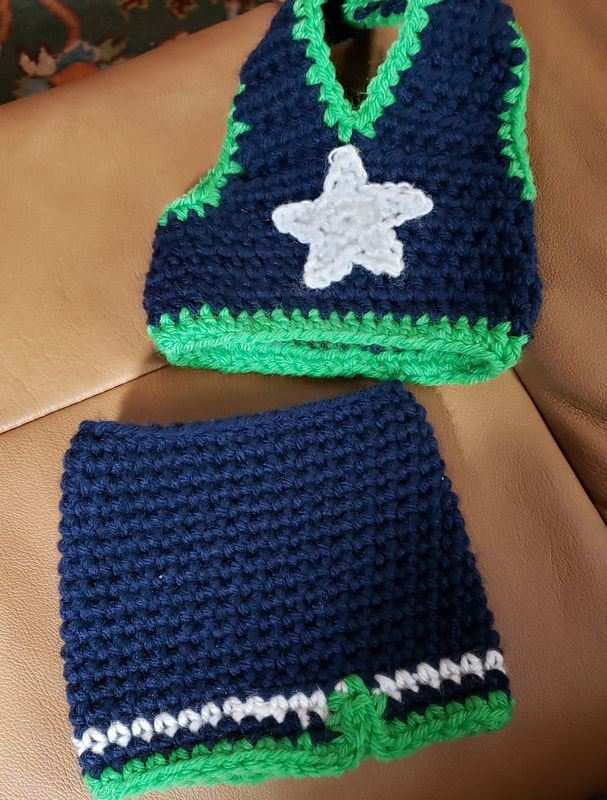 I think I've fixed it. I made both pieces over again using an H hook and I added 1 extra row to the skirt. The extra row was an accident but it can't hurt. Poor little AG, she must be really cold in that first outfit. 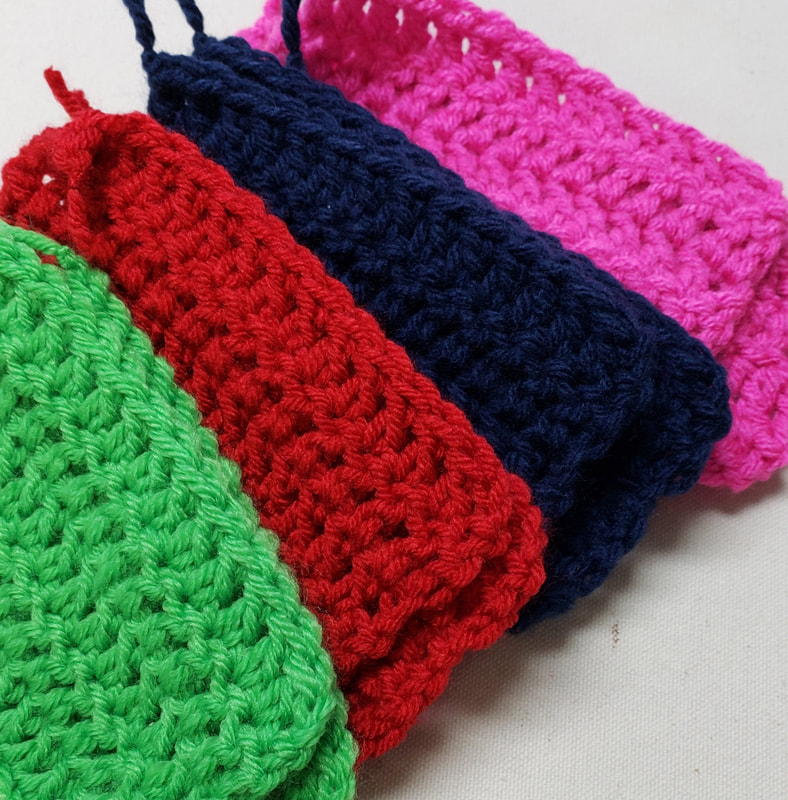 While I was working on the AG outfit I was using yarn from Dollar Tree, Joann and Hobby Lobby. It made me wonder which of the "bargain" yarns hold up best. Since there's nothing I like better than a good research project I've decided to do a test. I'm going to make 4 swatches from each brand of yarn. 1 set will be control, 1 will be machine cold gentle wash and flat dry, 1 will be machine cold gentle wash and tumble dry and 1 will be machine hot wash and tumble dry. I'll each set in laundry bags and run them with my laundry and I'm going to do it 4 times. I want to see how each brand holds up and which ones pill or if all of them are basically the same. That will tell me how to label the donation things that I make and give me some guidance on what yarns to buy in the future.
So far I've made swatches of I Love This Yarn, Premier Just Yarn, Premier Just Active and Big Twist. I'm also going to swatch Premier Basix, Lion Brand Pound of Love, Red Heart, Mainstay and maybe Caron One Pound. If I get motivated I'll go to Hobby Lobby and get some of their house brand one-pounder. I think that will cover it for the bargain yarns. I'm not going to order anything that I can't get locally, this project is already a little out of control. This one is going to take a few weeks. My focus this week needs to be Christmas cards. 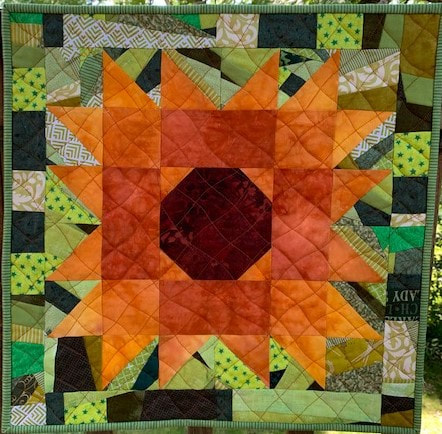 Ring of Fire by Wendy Tuma Today's inspiration is this lovely mini-quilt from Wendy Tuma. It's from the pattern Face The Sun in the Scrappy Improv Quilting book by Kelly Young. She used only the Sassafras Gradient for all the colors of her sunflower. You can read more about it and see lots more photos on her blog.
For sharing, Wendy received a 20% coupon for the shop that's good for 3 months! If you have made anything with my hand dyed fabric I hope you will consider sharing it in the Customer Gallery. The only rule is that projects have to be complete. It doesn't have to be made totally from hand dyed fabric, just include a recognizable amount. I didn't post yesterday because Wednesday was dyeing day and Thursday was errand day so I just didn't get a lot done. I can report that I'm 53% done with the binding on the postage stamp quilt! I basically stitch 3 lengths of thread every day. Since the ornament closet is empty I set off on a little bit of reorganizing (mostly of the yarn stash) and that led to some much-needed reorganization of the office/shop. It 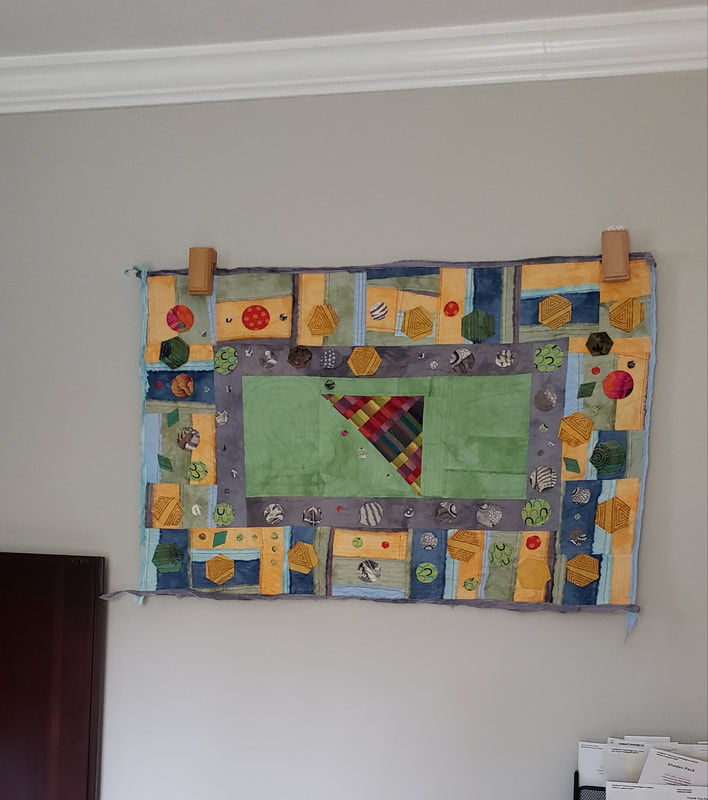 In that process I FINALLY hung this quilt that my friend, Marcy, made for me. It's absolutely perfect on the gray walls of the office! I love it and I'll see it every day when I'm packing orders. 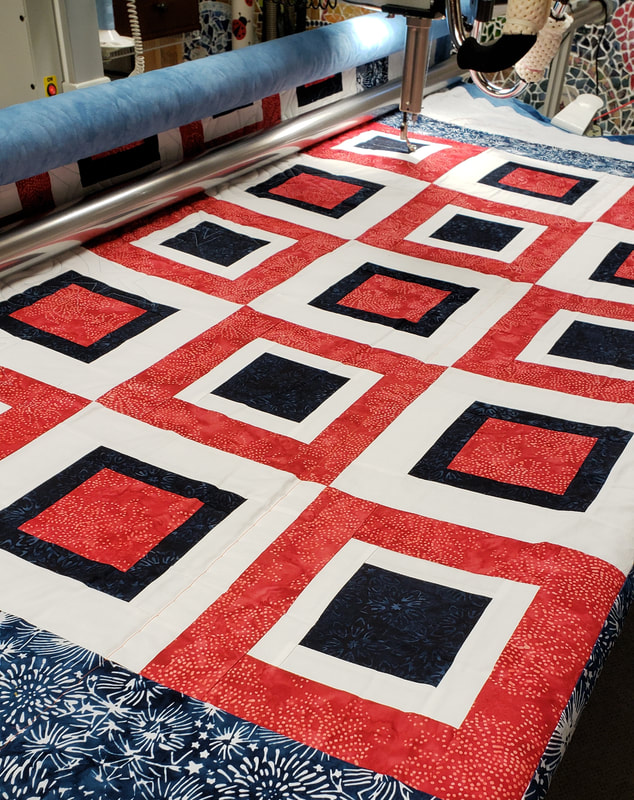 I've got the longarm fired up again and I'm starting with 2 of my own veterans quilts. I should have these done this weekend. 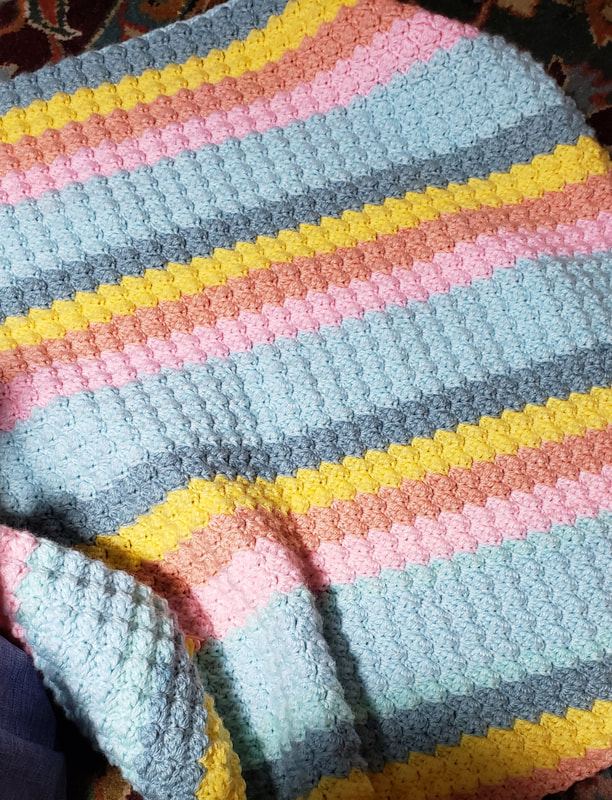 I'm making good progress on this blanket. I haven't decided if I'm going to donate this one as a baby quilt or as a wheelchair quilt. I think it's going to be a little big for a baby quilt but it would work fine for either. Another week or so and this one will be wrapped. 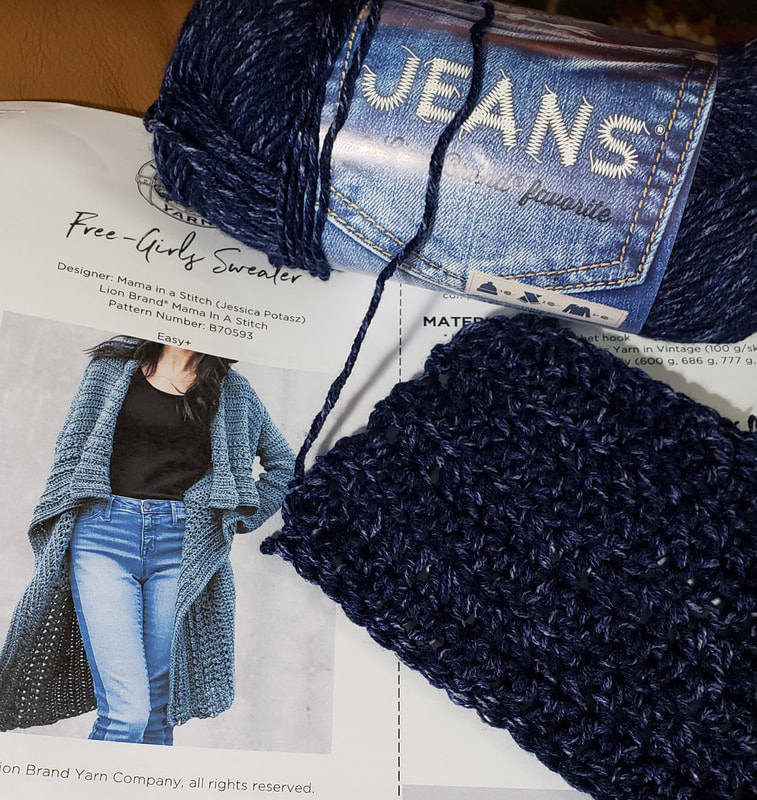 So it's time to think about new projects and here's one of them. Lion Brand recently had a sitewide 35% off sale and I picked up this kit. I love a duster coat so what's not to love about a duster sweater. Mary Ann said that this yarn was really soft and nice to work with so it seemed like I should give it a try. I made a swatch last night to motivate myself to finish the blanket. 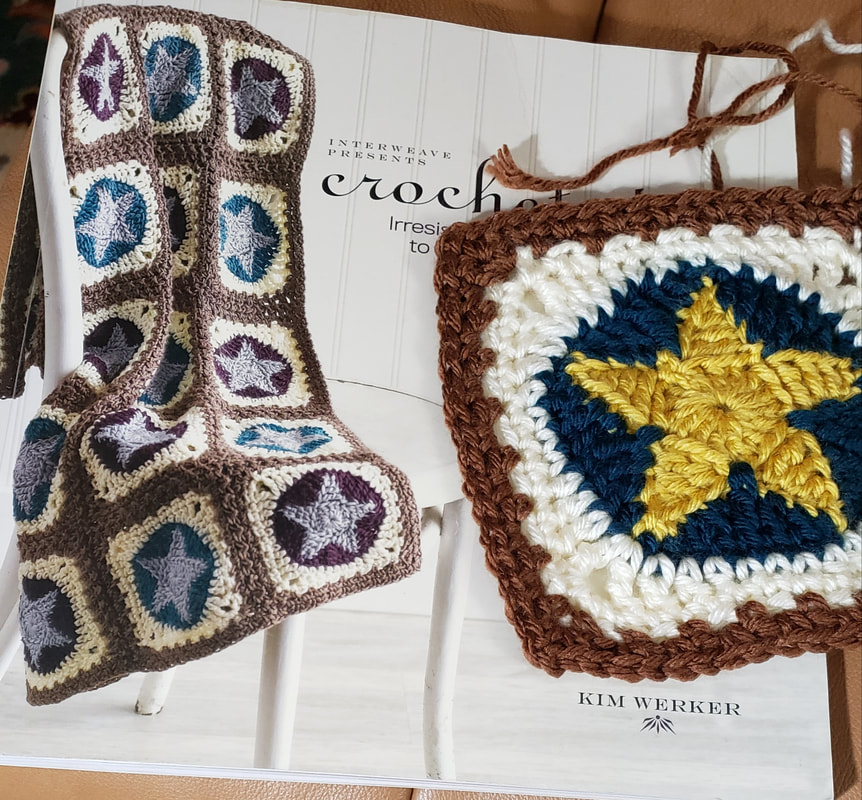 Another project that I bought yarn for is this blanket. I wanted a granny square format project as my next car project. I realized this summer that blankets are way too hot and bulky to work on in the car. I made one really bad sample block just to make sure I'm happy with the colors. I did a lot wrong in this one but I know what's wrong and I know I'll be able to make the blocks. I got this book used from Thriftbooks and I think it was less than $10.
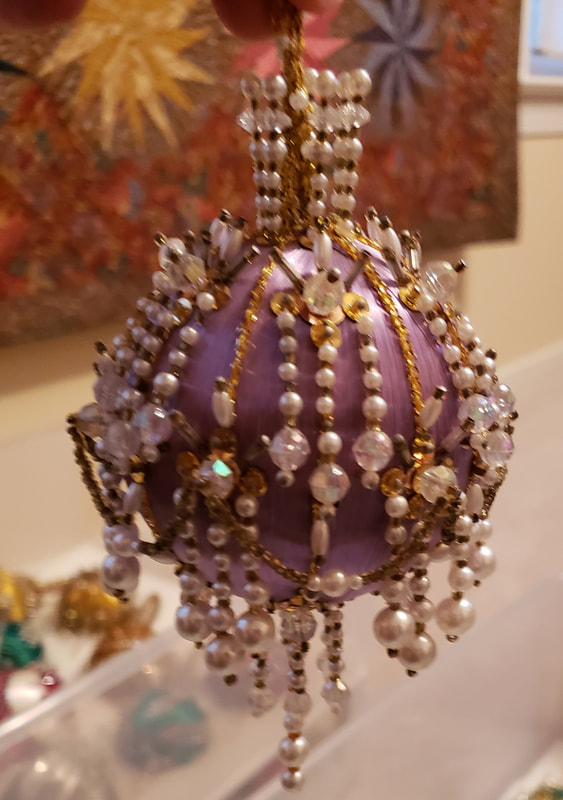
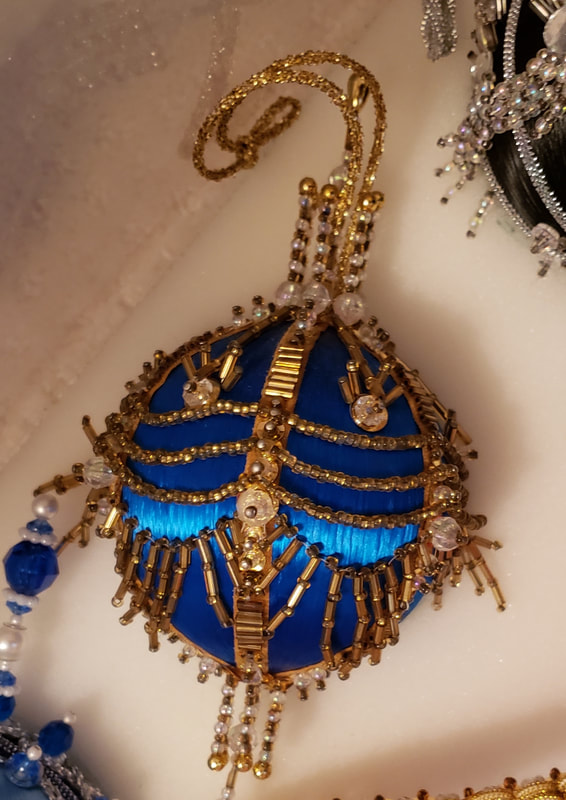
I don't know when we will take our next road trip but I'm ready! Today we have some repairs being done at the house and then I have to go get more soda ash for dyeing. I'll do some more binding and maybe get one of the veterans quilts quilted. I hope you have a great weekend. But first, I can report that the binding on the postage stamp quilt is now 37% complete. I actually didn't work on it at all this weekend because of the rest of this post, but I set a new of next Tuesday so I can take it to show-and-tell. I'm working on it diligently now and have finished one full side and 2 corners. It's progress. What I did all weekend was work on the ornament storage. For new readers, I'll give a little background. Are you old enough to remember when we used to get a catalogue of catalogues? There was no internet so we could only find out about new shopping sources by getting a catalogue that literally was only a collections of catalogues that you could subscribe to, mostly for free. It was in one of those that I discovered Cracker Box Kits. I was working at Bank of America and living in Charlotte, NC. Chris was stationed in Charleston, SC and we were lucky if we saw each other on weekend. He was deployed 9 of the 18 months he was stationed there. I already had acquired TWO knitting machines and, of course, I had my sewing. But making Christmas ornaments seemed intriguing. I ordered a couple of kits and I was hooked. Even back in 1993 one of their inexpensive kits was over $20. The most expensive was about $70. That was one called Cinderella's Coach and I did eventually get it too just before it priced over $100....FOR A KIT! Each ornament took a minimum of about 14 hours and up to 40 hours to complete. It was fabulous entertainment and stress reduction from a really stressful job.  Fast forward to 1998 and we moved here. I found this awesome upside-down tree and we used it for display for years but it was a complete paint in the next to set up. I eventually found three rotating trees and used those until recently. I tried to find the photo of the most recent display but I can't find it. I did love displaying them but no one ever saw them. When Christmas happens around here we are always going somewhere else. They are now on their way to my sister-in-law (and brother but he has no say in this transaction) to display on her beautiful white Christmas tree. After almost 30 years, it's time for the ornaments to move on and I am thrilled that my SIL and niece want them. You will not be surprised to discover I kept records of the the kits I made and when I made them. I even kept all of the instructions. I remember that someone actually once contacted me to buy one of the instructions. Of course, I just gave it to her. But that shows the devotion of the people who made these kits. I easily have $3000 (but probably closer to $5000) invested in these. But, that's nothing compared to what I have invested in sewing machines. I justify it as my drug money. The instructions were VERY detailed and you had to work on the step-by-step, reading ahead was to be avoided. There were very few drawings so the instructions had to be very specific and they were! I never had to contact them for clarification.
These are the first 2 kits I made in 1993. On the left is Wind in the Willows and on the right is Curtain Call. Every ornament had a name and an inspiration story. The guy who designed them had previously designed costumes in Las Vegas. You can see the influence for sure. The business is in New Hope, PA. The original designers/owners (Paul and Walter) are, sadly, gone but someone who loved the ornaments bought the business and continues it. I got to go to New Hope once and visit their little showroom and meet them. They were real characters. 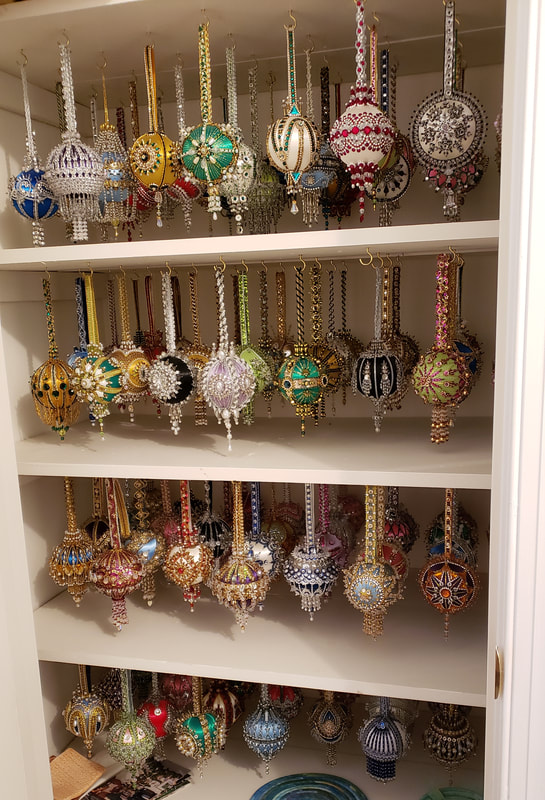 I have this linen closet in the upstairs hallway and that's where I stored them. Hanging them is the best way to store them. My college roommate once commented that if she ever had to explain to the FBI what I was like that she would just bring them here to see this. That's about right. I do love organization and precision. Which brings me to the transfer storage. My SIL doesn't have a closet like this so I needed to come up with a way to store them. It has to be in bins that she can stack and that led me to 1" thick foam with circles cut out for then to rest in. 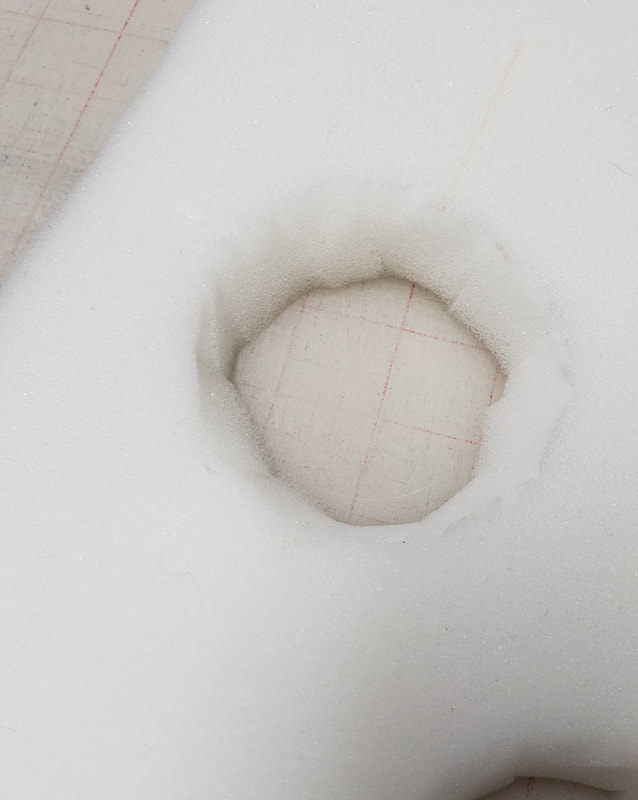 The problem started with cutting circles. I just couldn't figure out how to cut them so I spent HOURS AND DAYS working out a plan to add a layer of fabric to hide the ugly foam cuts. The fabric needed to be pleated to sink down into the foam holes and it was a nightmare. Finally on Saturday night I gave up and decided that I had to find a better way to cut the circles. I walked through every corner of the house and every craft space and even looked through that trash. That's when I saw the discarded tin can from making hummus. I thought I might be able to heat the open end and melt the foam. That does not work at all and you are in real danger of burning the crap out of yourself. Dont' try that. Then I thought of the tin can lid. That sucker is really sharp. People cut themselves on lids all the time. How could I make the edge of the can sharp like the lid? Well it turns out that you can hold the can opener sideways and cut off the rim of the can! Yes, yes you can! You do have to use some pliers to smooth out some bends but it works awesomely. 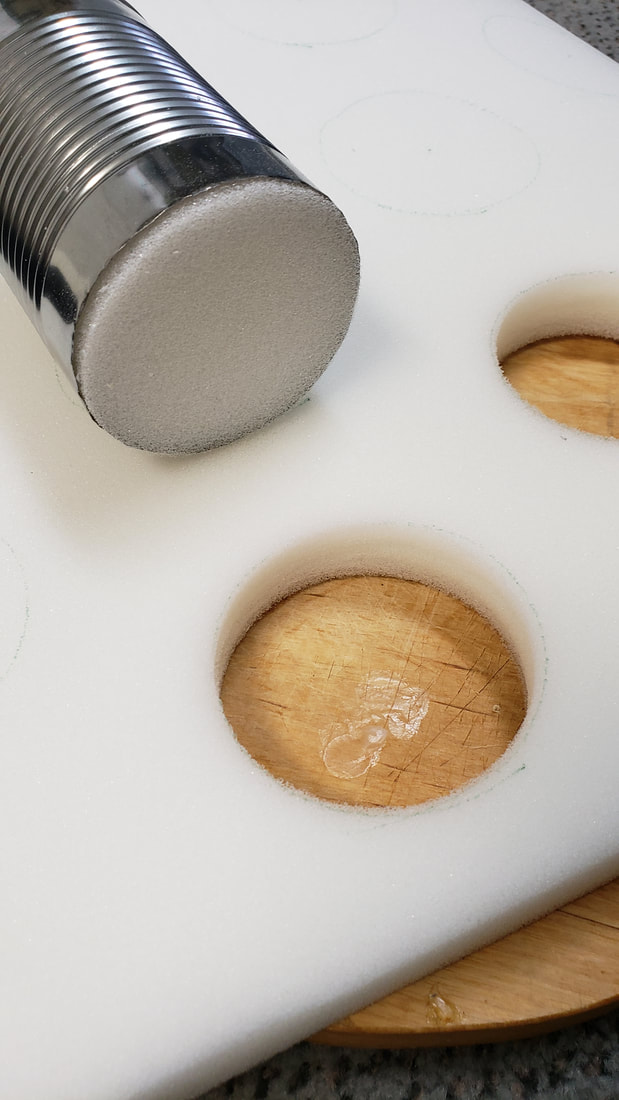 Dig it. Freaking awesome perfect circles! Think of all the sizes of circles you could cut with all the different sizes of cans. Oh, the possibilities! 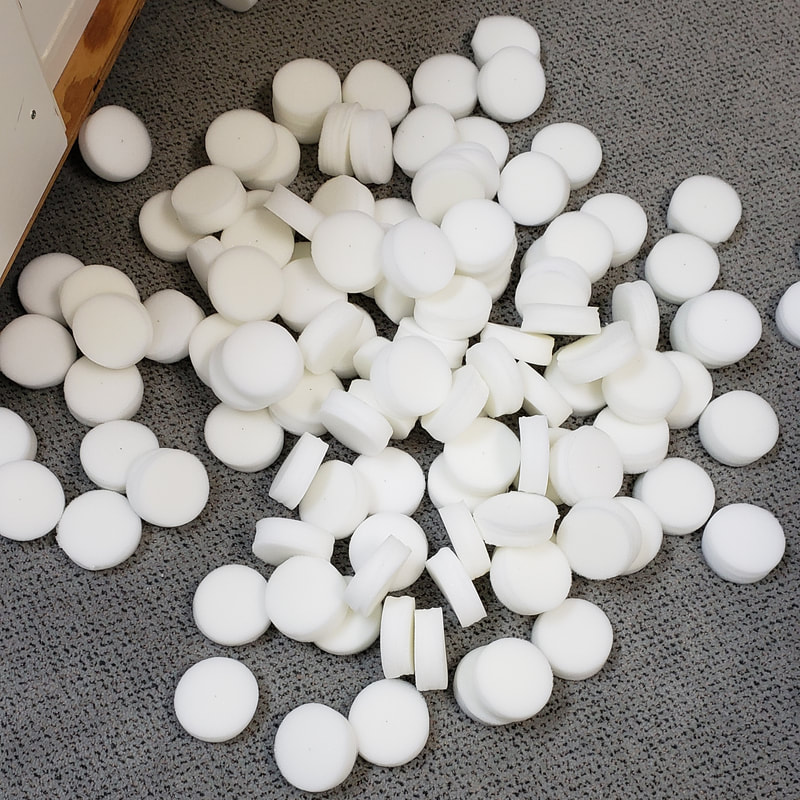 120 of them to be exact. 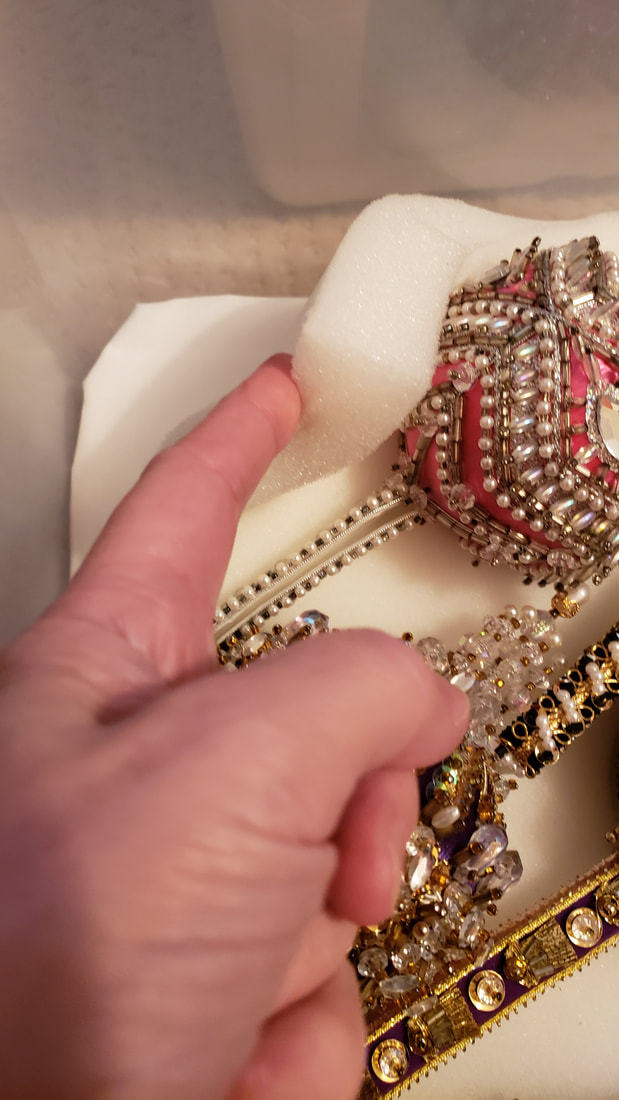 So the final solution is a layer of puffy polyester batting covered in fabric to provide padding for sticky-out parts of the ornaments under a layer of 1" thick foam. 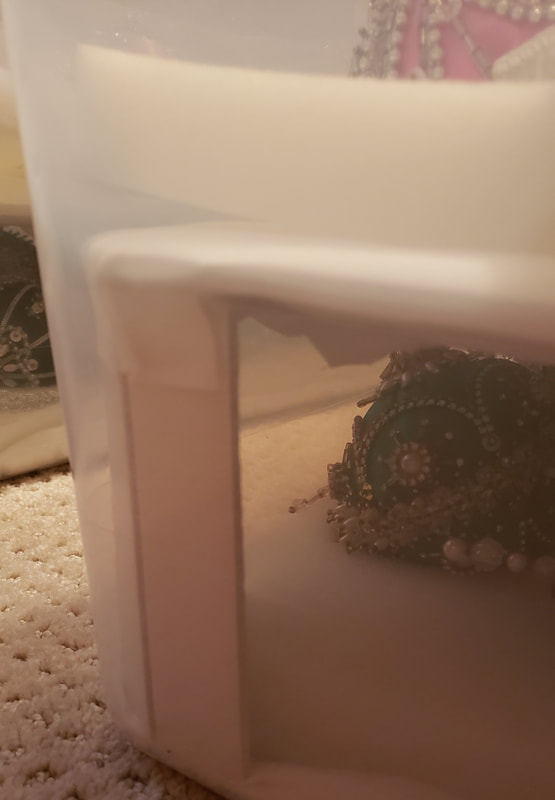 Each bin has 2 layers of ornaments. I made a shelf from foam core board. I tried to get 3 layers in a bin but it was just too tight and the top ornaments would be smashed by the lid. 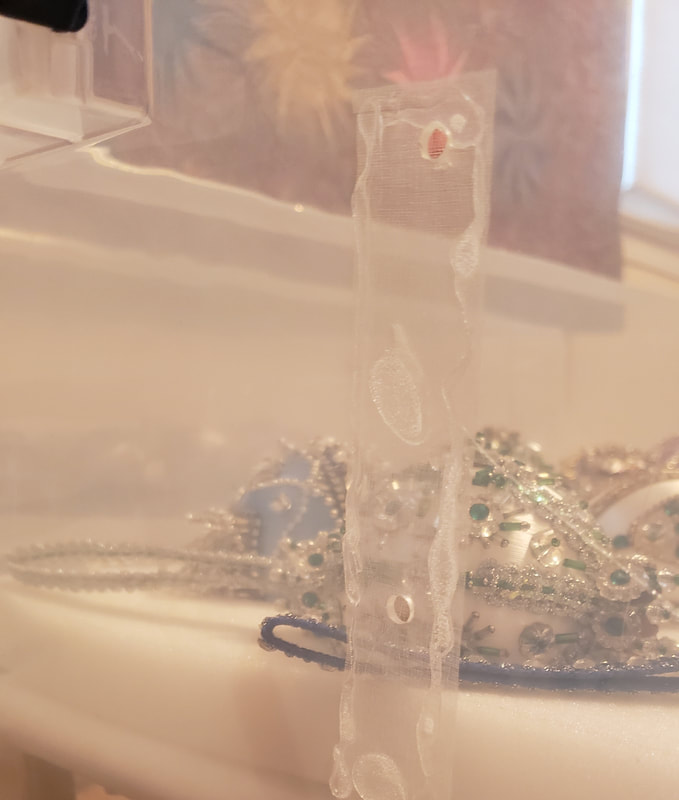 I was also worried about plastic off-gassing so I wanted to allow for some air circulation. I drilled 3 holes in each end and glued on a piece of organza so that bugs couldn't get in through the holes. That was probably overkill but, hey, it's me. 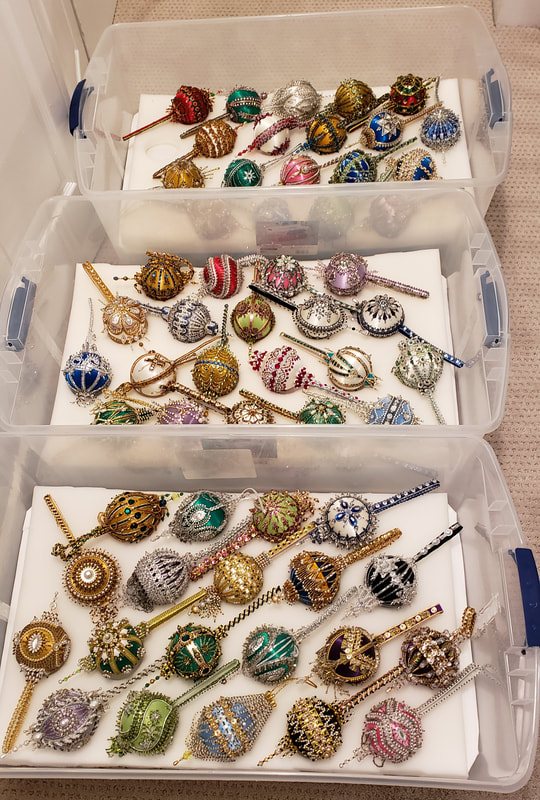 Here are the 3 bins packed and ready to go. I've shaken the bins and the ornaments are quite stable in there. Sometime before Thanksgiving, Mom and I will drive down to Newport News to deliver them to their new home.
Very exciting. In case you are wondering what's going into that empty linen closet. It's surely not linens but you might get a whiff of yarn if you walk by it in the next few weeks. |
FeedsTo subscribe click the RSS Feed button and copy the URL of that page into your blog reader.
In Bloglovin you need to search "Colorways By Vicki Welsh" to find the blog. About Vicki
I'm Vicki Welsh and I've been making things as long as I can remember. I used to be a garment maker but transitioned to quilts about 20 years ago. Currently I'm into fabric dyeing, quilting, Zentangle, fabric postcards, fused glass and mosaic. I document my adventures here. Categories
All
Archives
July 2024
|


 RSS Feed