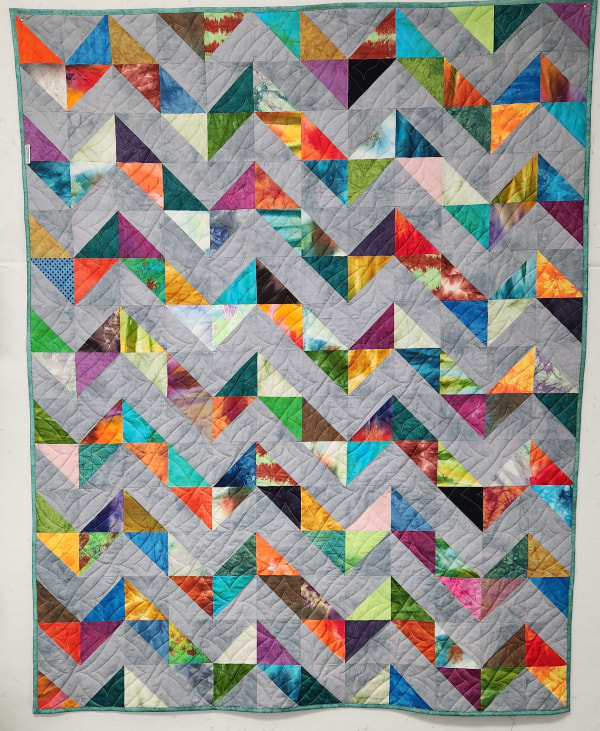
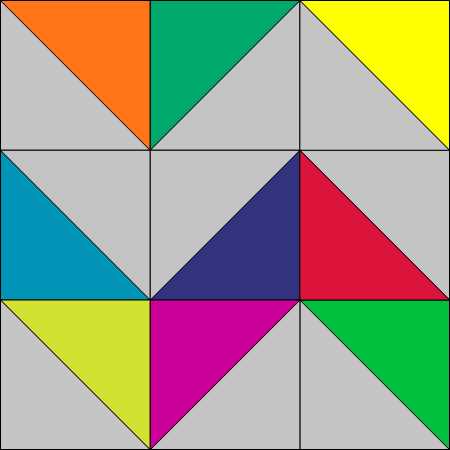
 Is done! I really love this quilt and I'm happy to know that it's going to one of our veterans. This quilt is all scrappy. The gray fabrics are leftover from previous veterans quilt backs and the colors are all from my hand dyed scrap bin. I tend to periodically cut my scrap bin contents with my Accuquilt Go. I already had a big stack of 4" HST pieces when I got the idea for this quilt. 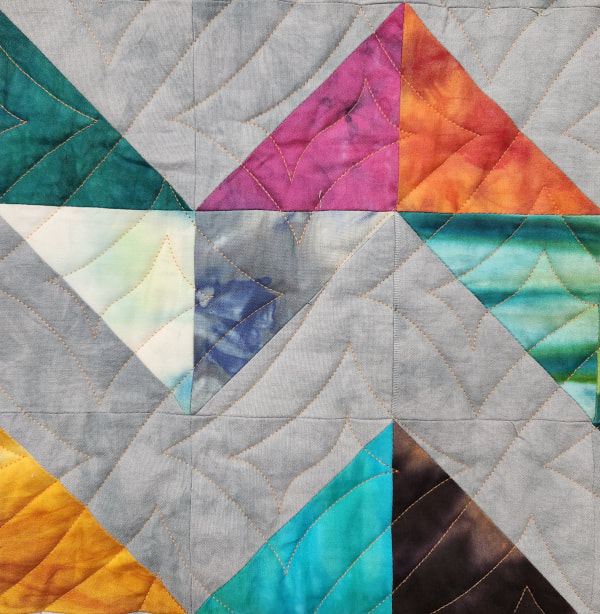 This quilt wasn't my idea and, unfortunately, I don't remember where I got the idea. But it's a simple quilt. This is the block.
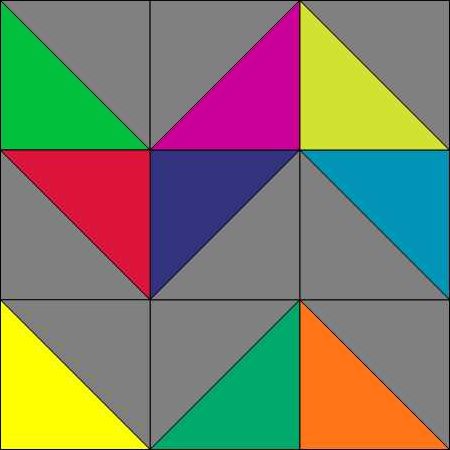
The secret to this quilt is that it's all the same block but alternating blocks are turned upside down. 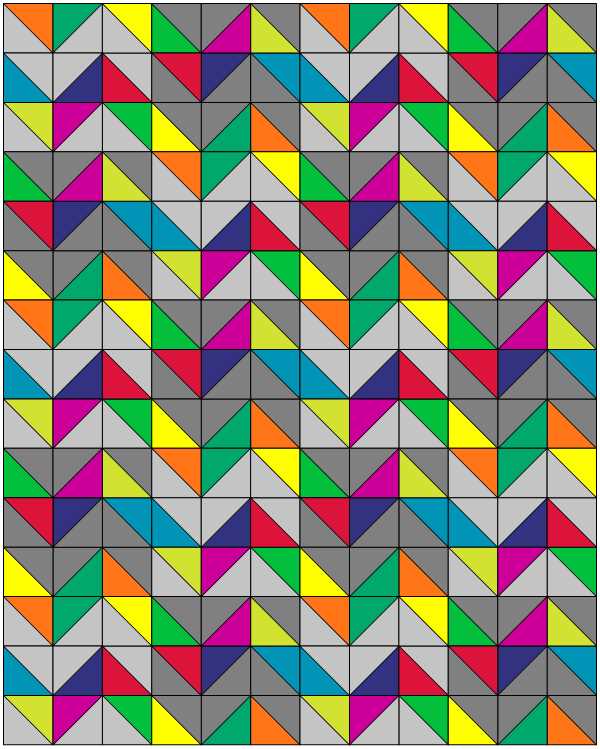 I worked up the EQ file in 2 different shades of gray so you can see the block layout.
Cool, isn't it? I may need to make another of these. 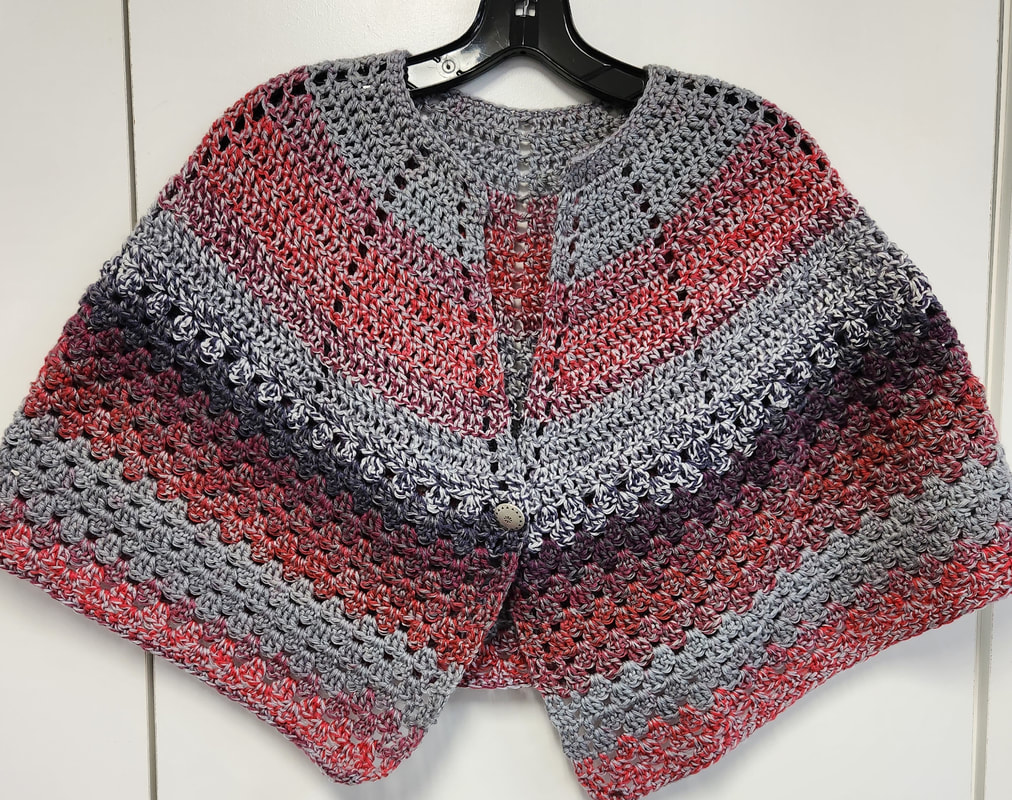 My second version of ths shawl is complete! From The Heart organization specifically requests wrap around shawls for donation to assisted living and nursing home facilities. The shawl that seems to be most popular is a free one by Susan Coes. That one is OK but I wanted more wedges. Then I found this one by Carrie Penny. That was great except that I wanted a neckline so that the shawl set more forward on the body. I also thought that it wasn't necessary to keep increasing for the full length. I melded what I learned from those two and created my own pattern that also happens to be pretty fast to stitch up. 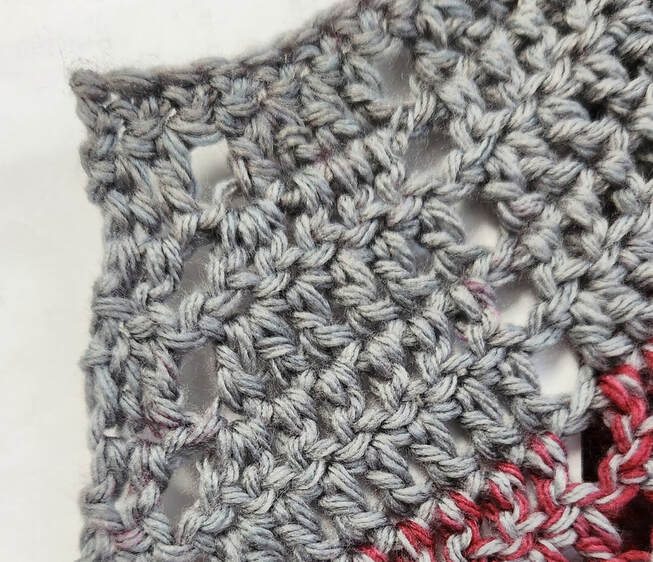 I also wanted it to have a bit of a decorative edge and a single crochet neck edge for a little nroe neck stability. I have written up the "pattern" and you can download it here.
I am not a pattern writer and it has not been tested so try it at your own risk! If you find errors please let me know and I'll fix it. Once you get going it's really simple and it's easy to make up for an missed increase on the next row so you don't have to frog much. If you do try it out please let me know if there's anything I can do to make the pattern more understandable. 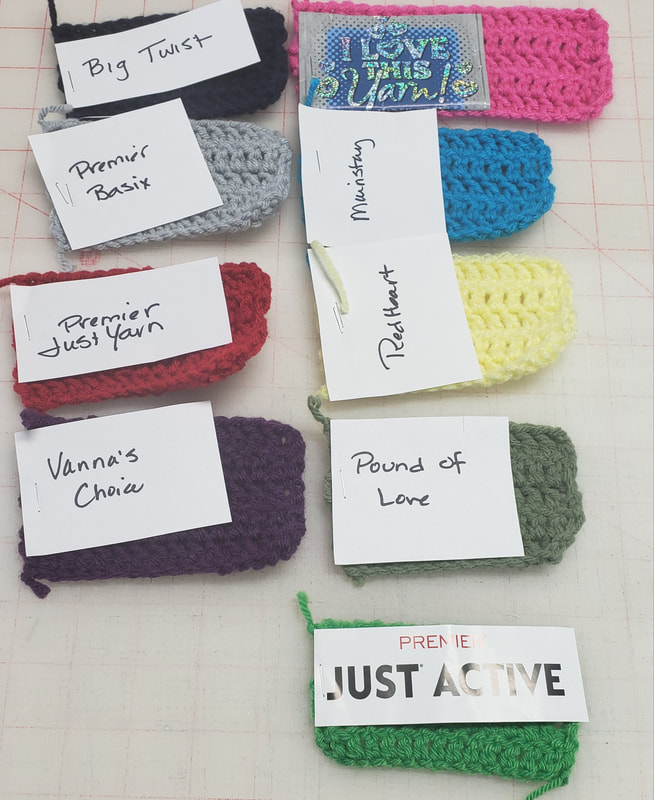 You might remember that several weeks ago I mentioned that I was going to do some testing of durability of acrylic value yarns. I just went through my stash and picked the yarns that I had on hand but I did also purchase some Mainstay and Red Heart since they are such popular value yarn choices. I could have added lots of others but I felt this sampling would give me a good idea of the durability of these yarns in general. I don't consider Vanna's Choice a value yarn, but I had just bought some on deep clearance and thought this test would give me a good idea of what to do with it. Here's how the test worked: I made swatches with 4 rows of double crochet using a 5.5mm (I) hook. I had a control set of swatches and a set that went through washing cold and flat drying, a set that was washed cold and machine dried and a set that was washed warm and machine dried. I went through the cycles 5 times and the initial results showed that the washing temperature doesn't seem to matter, it's the dryer that affects the yarn. If you dry flat the yarn will continue to look and feel exactly the same as it did off the skein. After the 5 cycles I decided to focus on dryer tests and to send the swatches through washing and drying 5 more times for a total of 10 dryer cycles. My dryer is set to hot. Observations:
 When I say a yarn is a favorite or least favorite you have to take that with a grain of salt. There's really not a ton of difference between most of them. That said, Big Twist is my least favorite. It's, hands down, the softest of the yarns I tested but it's also the most likely to pill. I wouldn't necessarily avoid using this yarn but I'd recommend not drying it in the dryer. You can see the pilling starting to form in the sample. 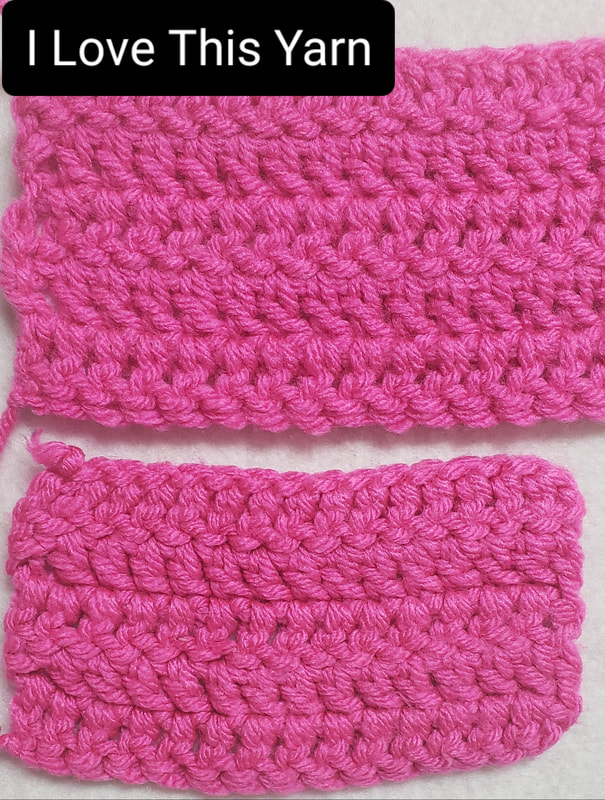 You can't tell from this photo, but I Love This Yarn (Hobby Lobby) shrank the least. The top swatch was the first that I made and I decided that I didn't want to make my swatches that big. I like this yarn a lot because it's soft off the skein and it stays soft through the wash. It didn't pill but I see evidence that it might after another 10 or so washes....maybe. It's also one of the most expensive when not bought on the regular 30% sale. 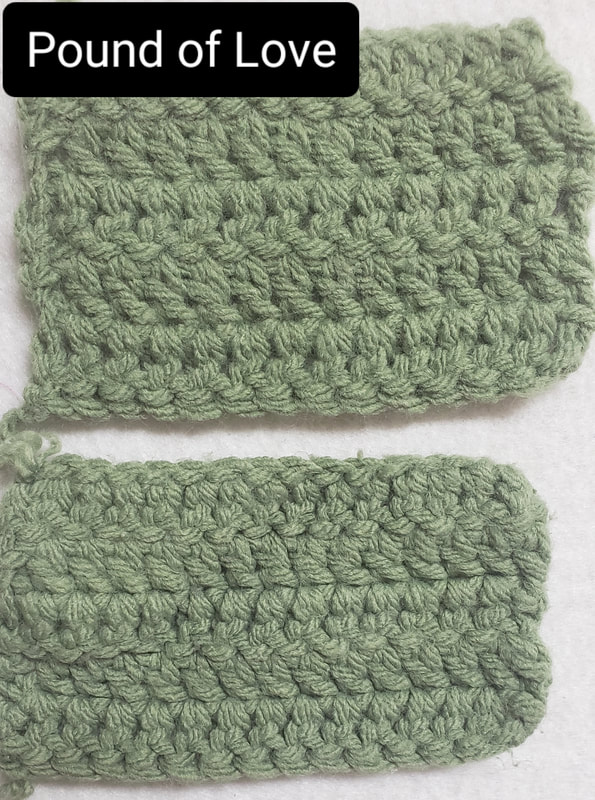 Pound of Love (Lion Brand) is almost as soft as Big Twist. You can see that the stitches are denser after washing and it will eventually pill a little bit but not as much as Big Twist. Given the choice I'd probably choose Pound of Love over Big twist. In fact, I have yarn to make a gingham blanket from this yarn. I will use a larger hook size to accommodate for the shrinkage. 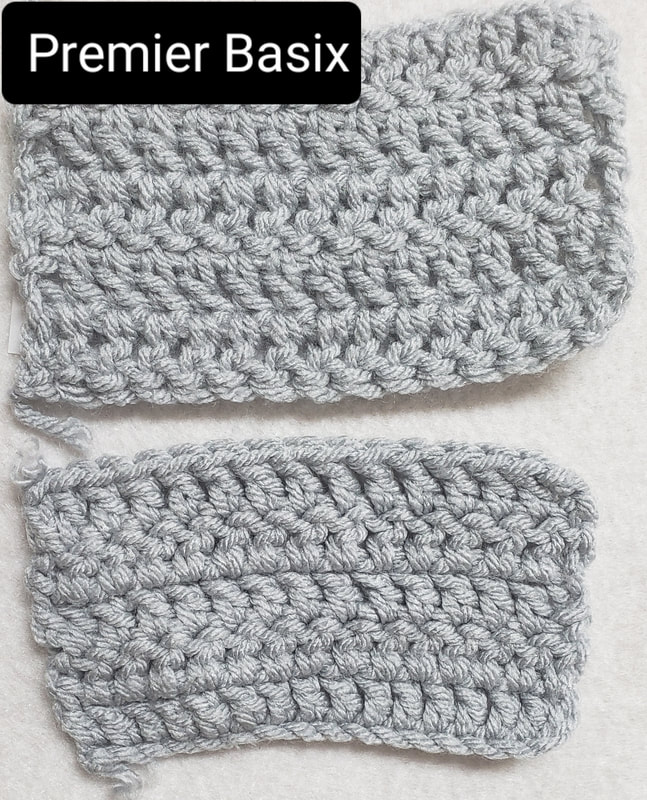 I have never used Premier Basix so I bought some to try a while back and haven't used it yet. It did shrink in both length and width. This yarn is going to make very durable projects. My washed sample actually feels a little stiffer than the original but that might be because of the shrinkage. My opinion is very neutral on this one. If the price is right, I'd buy. 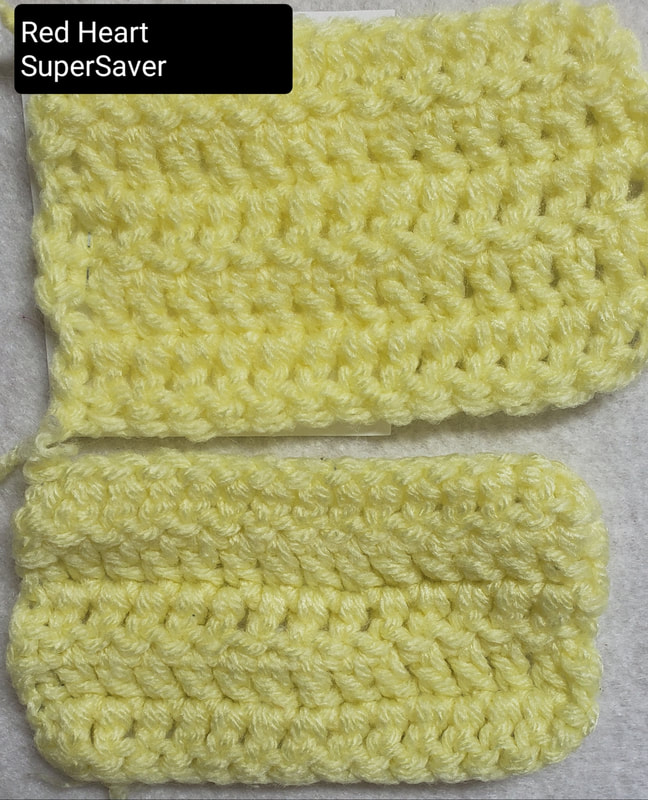 So now I know why people love Red Heart. This stuff is super durable. I know that in the photo it looks like there was some shrinkage, but that's not the actual result. This didn't shrink at all. It didn't soften a lot after 10 washes but it didn't pill either. 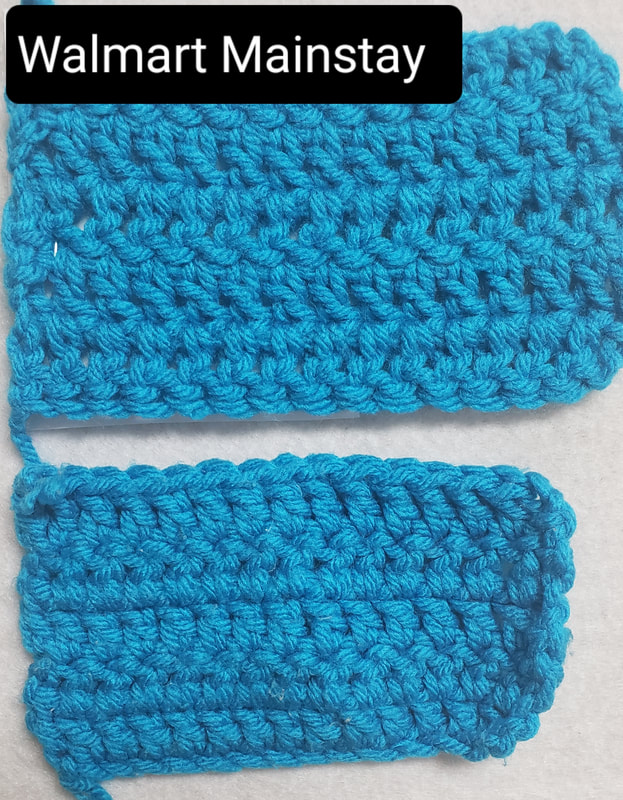 Mainstay is Walmart's house brand that comes in a very limited number of colors. It did shrink a tiny bit but I think it's a little softer than Red Heart but just as durable. It's the best value of all of them and I'd be fine using Mainstay white, black and gray mixed with yarns from other companies. They only have about about 6 or 8 colors in total.
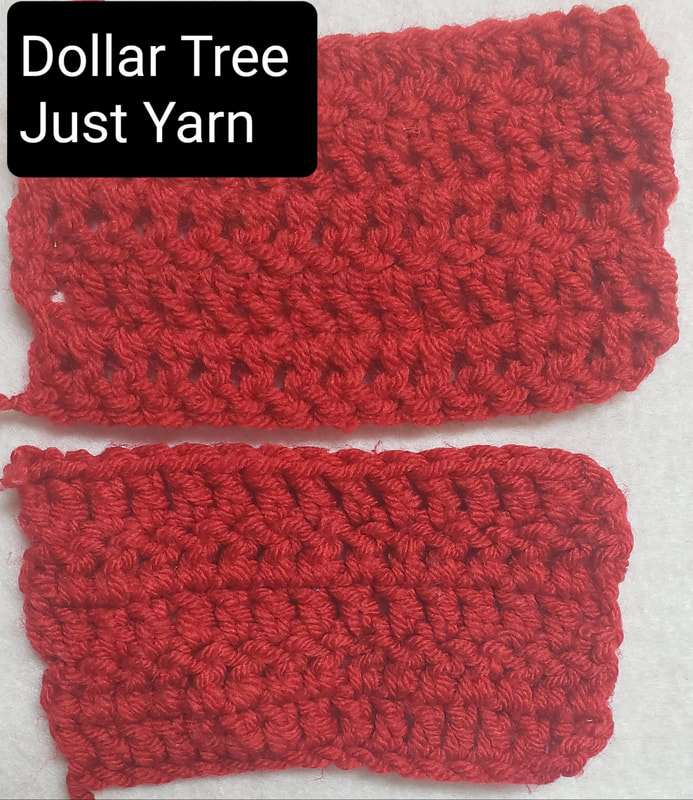
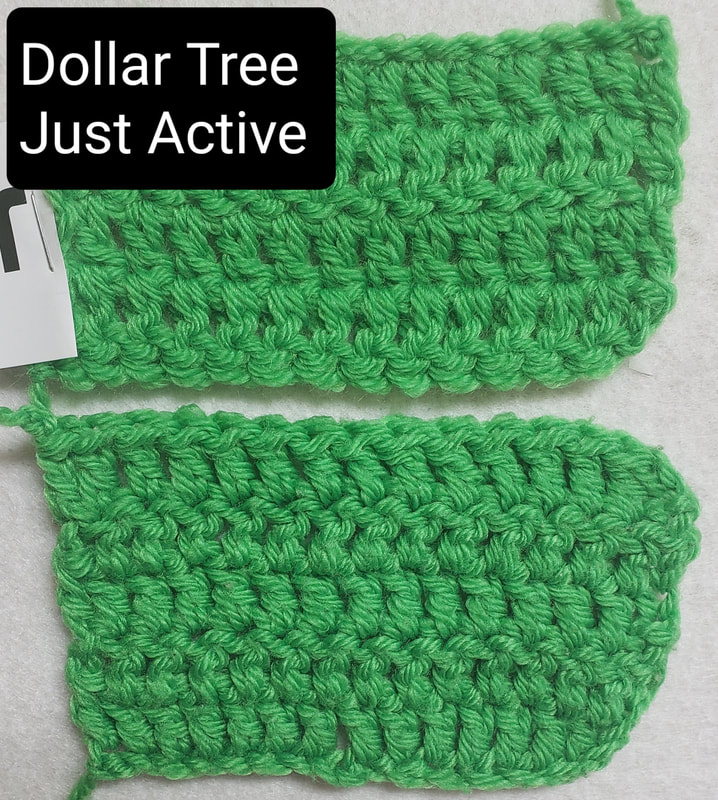
The surprise of all surprises are the Dollar Tree yarns. They are both by Premier. I think that Just Yarn is simply a lighter weight of Premier Basix and I like it much better than Basix. It's softer and more drapey but just as durable. The Just Active has some polyester blended in. It's soft like Big Twist but it looks just as good after 10 washes as it did off the skein. The downside of these yarns is going to be cost (based on the new $1.25 price point) and the small size of the skeins. But, yes, I'd buy them. It will be interesting to see if the skeins are made a little bigger with the new $1.25 price point. 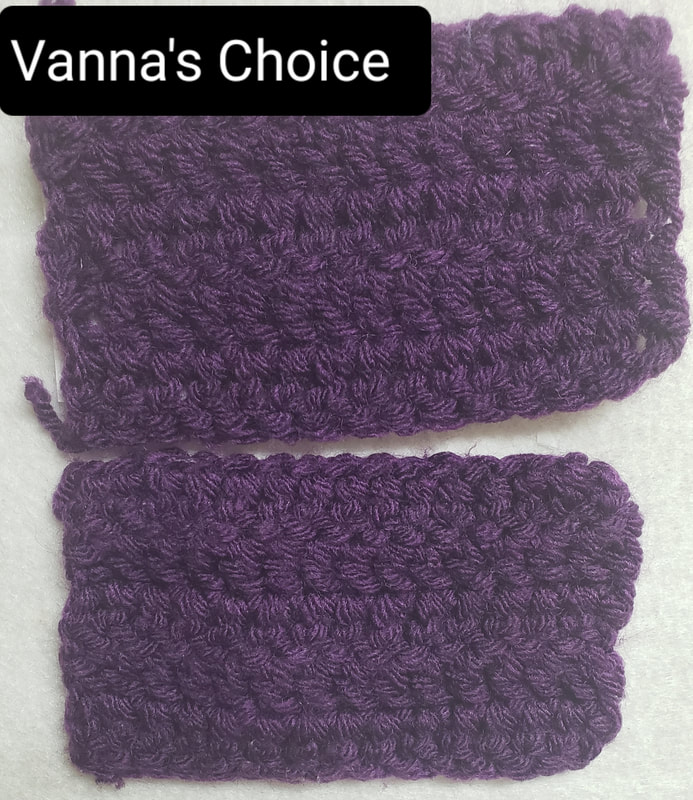 Like I said earlier, I put in some Vanna's Choice (Lion Brand) because I had some. This yarn is more expensive than the others and the swatches show that it's a higher quality. It's a thick #4 (worsted) and you could use a J or K or maybe an L hook with it to make a nice drapey blanket. It would probably make a nice winter cardigan too. So, with all of that said and given that I make mostly donation items, I'm comfortable using any of these yarns except Red Heart. The only reason that I won't use Red Heart is because I had an allergic reaction to it once. Otherwise, it's a great yarn. I'd probably also avoid Big Twist because I think it's the least durable. 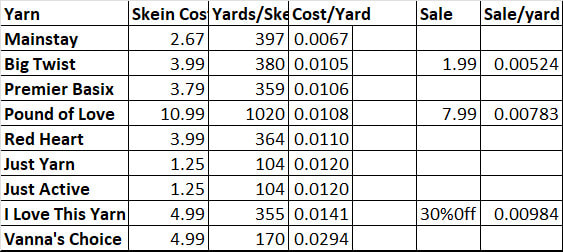 That means that price will likely be the determining factor when I buy yarn. This chart compare the cost per yard for each of these yarns based on the full retail price on the day I prepared this chart. They are sorted on cost order. Mainstay is the least expensive. I Love This Yarn is the most expensive of the value yarns and I'm not convinced that most people would categorize it as a value yarn.
But I think it's a more realistic comparison to look at what the normal sale price is. I Love This Yarn is 30% off every other week. Does anyone buy this yarn at full price? I know I never do. Big Twist and Pound of Love are on sale at Joann on a very regular basis. Looking at the sale price, Big Twist and Pound of Love are the bargains and I Love This Yarn is also a bargain. Check out the cost of the Dollar Tree yarns. They aren't expensive but they aren't bargains either! But if I did amigurumi, I'd buy the small skeins of this yarn all day long. It's a great way to get lots of variety of colors in small skeins. For me, I learned a couple of important things: 1. All yarns are of good quality and I can be confident using them for gifts or donations. I expect that I Love This Yarn (on sale) will become my go-to value yarn. It's great quality and soft to work with and Hobby Lobby is close to me. My Michael's is kind of a dump and Joann is a bit of a drive. 2. I now have a price point for comparing sale prices of nicer yarns. If there's a sale and the better quality yarn is in the .01 - .015/yard range, I'm stocking up! I did some of that during the sales at Lion Brand and JoAnn. For example, I absolutely love Lion Brand Anti-Pilling yarn and I bought a ton of it from Joann on Cyber Monday for .0107/yard, that was something like 65% off and in the range of Premier Basix and Pound of Love. I didn't mention Premier much. I love their yarns too but they haven't bee pushing sales as much as Lion Brand lately. Some other yarns that I like and that I would consider mildly stockpiling if at least 40% off are: Mandala Ombre - .0157/yard if 40% off Vanna's Choice - .0176 Ice Cream Blend - .0082 - I picked up some of this on clearance at a deeper discount At less than 40% off, I'm not interested unless I have a specific project in mind. This one lesson is going to save me from a lot of not-so-great sales in the coming months and years. I have put this chart on my phone so that I can have it as a reference if I'm out shopping and trying to figure out if a yarn is a bargain. What do you think? What value yarns do you like best of you knit or crochet and what kinds of projects do you like to do with them? are finally done! 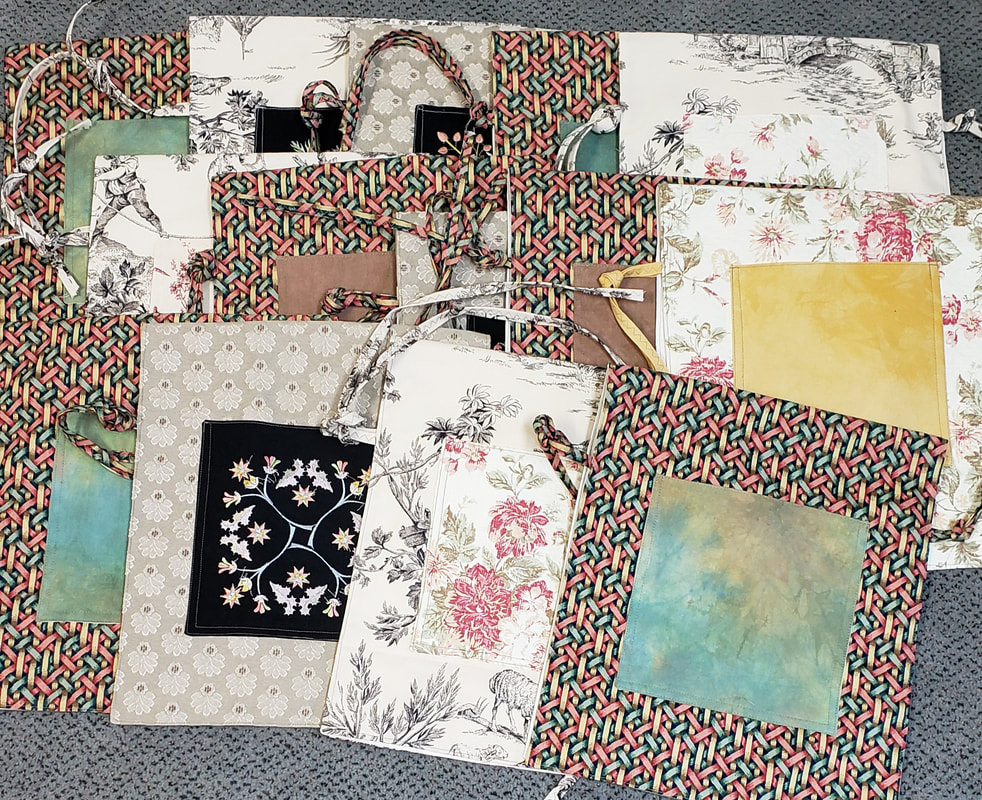 There are only 14 in the photo. One of them decided to be a truant from the photo shoot. I'm really pleased that I got 15 caddies out of a pretty small stack of fabric. Now I just need to get them tagged and delivered along with 9 that I made in May. That's right, I haven't even delivered those yet! I don't intend to make any more anytime soon so I'll get these delivered soon along with some blankets and capes. 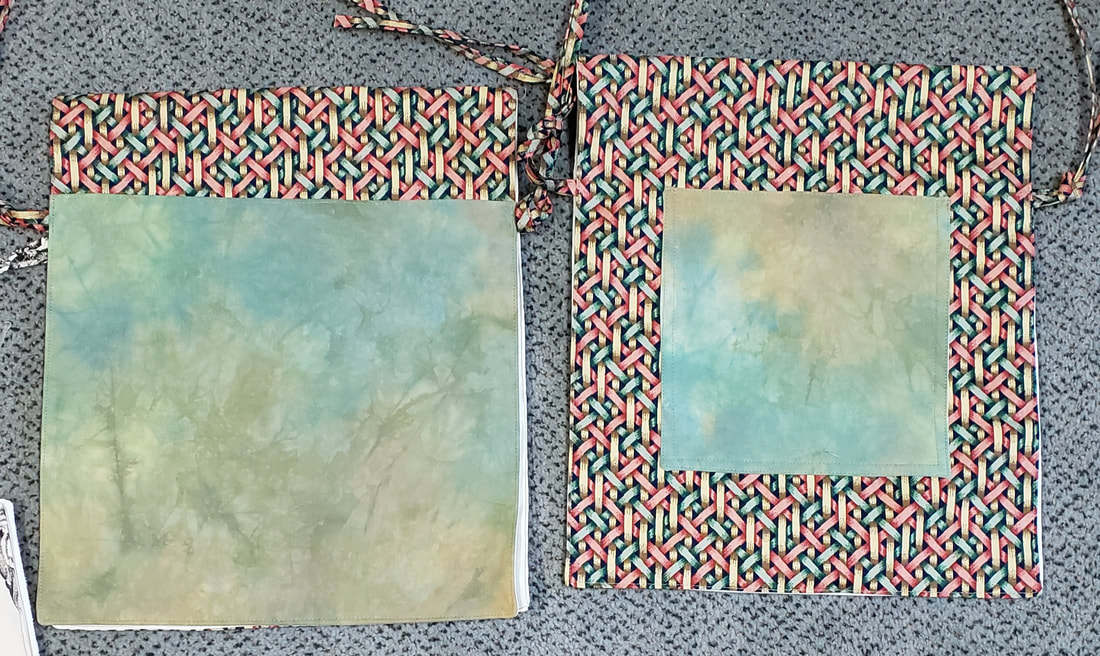 Each of the caddies has a big pocket on one side and a patch pocket on the other. I don't remember why I designed them this way but I hope it will work for people. 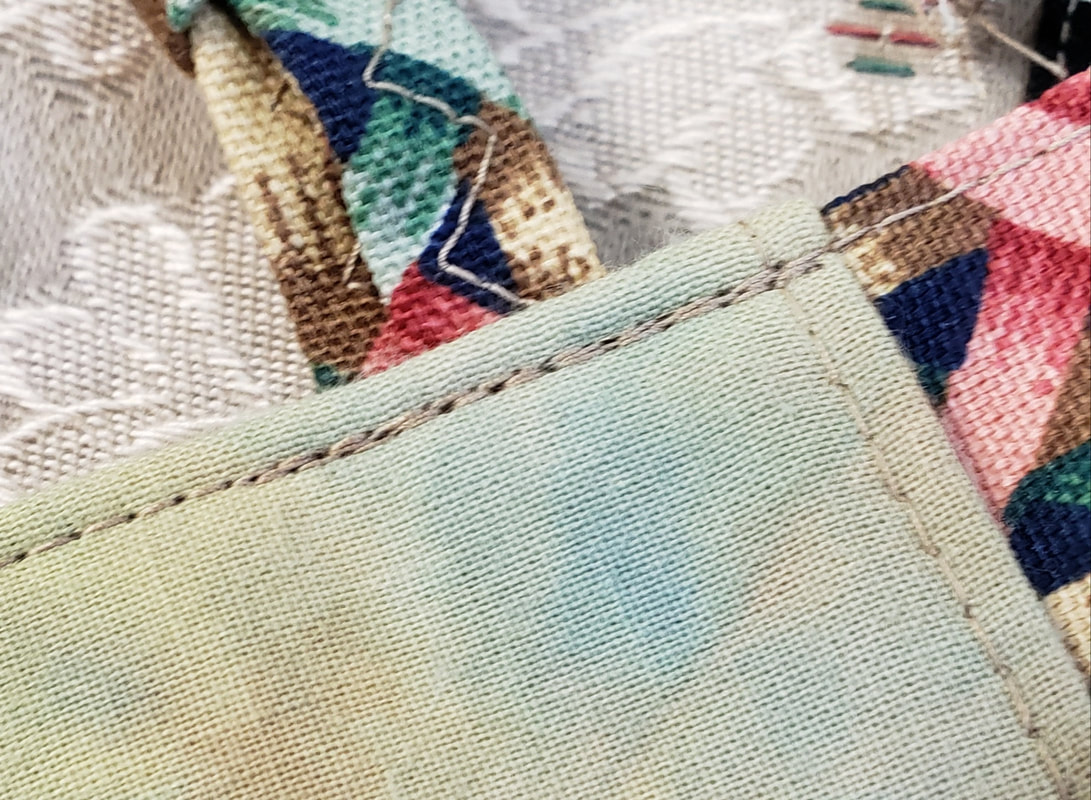 When I sew them I make sure to triple stitch every area that will get stress. 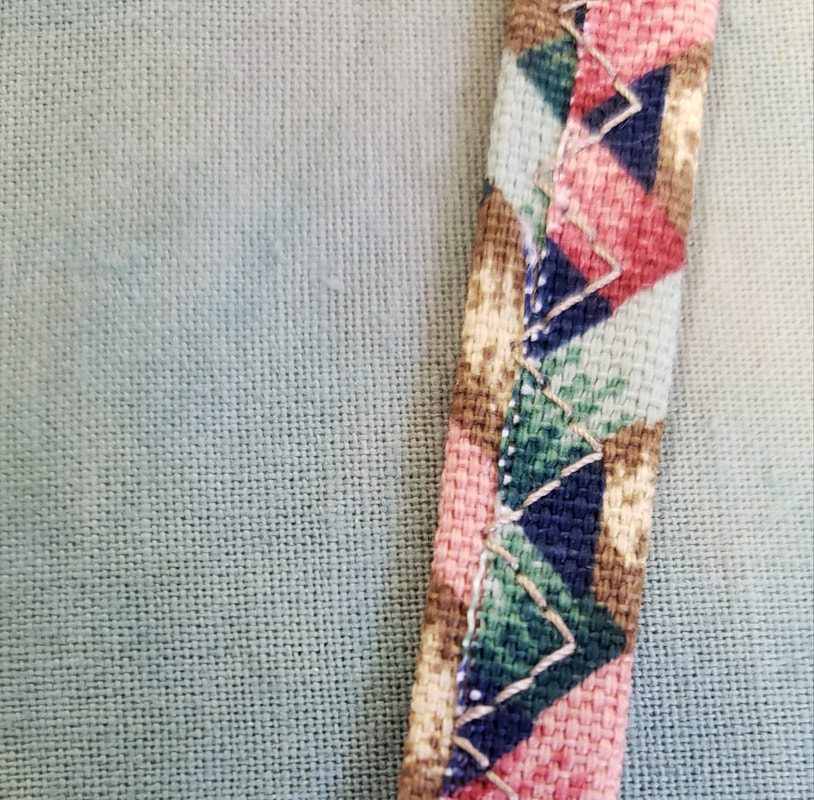 The ties are simply a 1" strip of fabric folded in thirds and zig-zagged over the raw edges. I think they will hold up just fine. 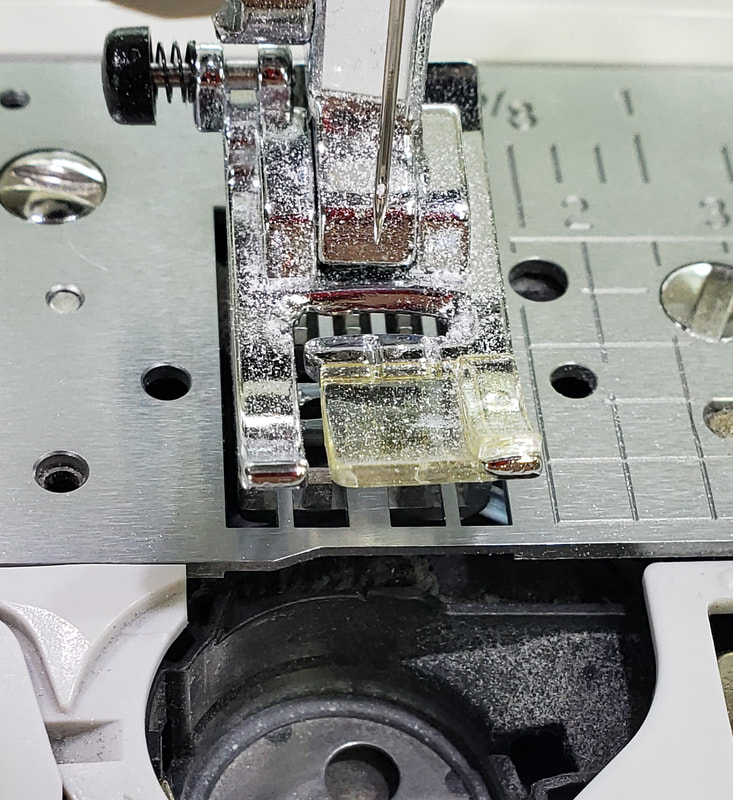 This is why I don't plan to make more anytime soon (or maybe ever). Home dec fabrics are treated with stuff that flakes off and I breathe and it enrages my sinuses. I expect my machine isn't all that happy either! 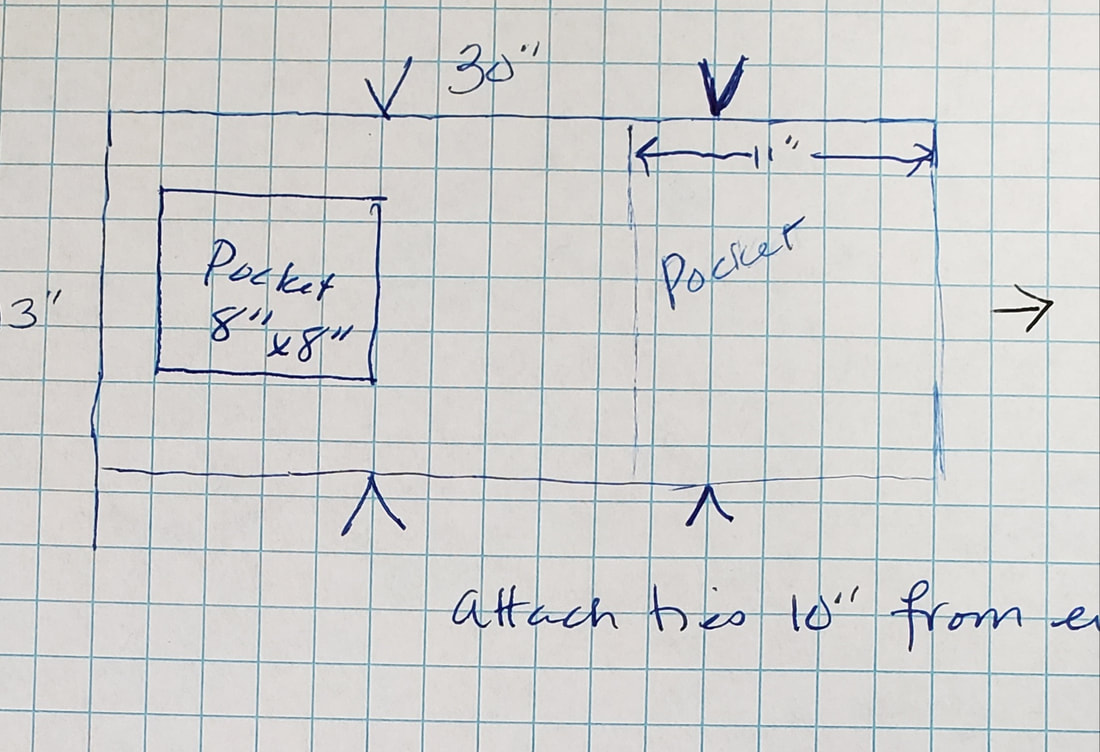 For anyone who cares, this is a rough drawing of the FINISHED measurements of my caddies. I accidentally cut off a 1 on the left side. It should read 13". Is this "right"? I really don't have any idea. My Mom used to work in a nursing home and she said they will generally take whatever they can get. The demand never ends.
This weekend I will work on the ornament storage and I will either load some veterans quilts for quilting or sew the binding on the postage stamp quilt to get it ready for hand sewing. From an image point of view, this has to be the most boring post ever. There's a lot of white space in this post but we'll move on and see if I can answer all the questions I received on last week's post about making your own fusible batting tape. I think that the pre-packaged batting tape it wonderfully convenient but also insanely expensive. Depending on the number of pieces of batting, you could quickly go through $10 worth of tape to make one new batting. That's still less expensive than a new batt but making your own costs half as much. One question was about the kind of fusible I buy. I get a knit fusible because they fuse at lower temperatures. You do not want to press your batting with a super high heat iron. When Joann has their interfacings on sale half off you can't go wrong with Pellon Easy Knit. Pellon also has Fusi-Knit and that works fine too. Get whatever is least expensive.  For this little demo I'm using black and white batting so you can easily see the two pieces of batting. I start by overlapping the two batting edges a bit. I need to get these edges so that they will butt together flush. 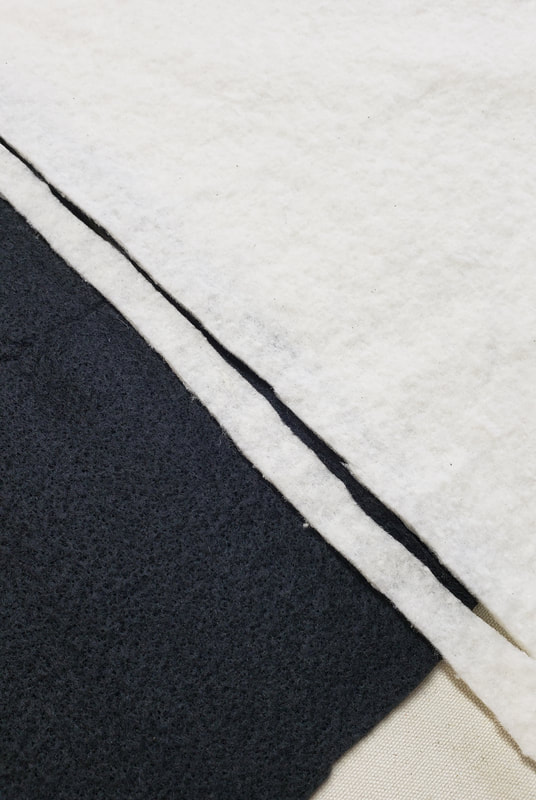 Cut through both layers where they overlap and you will have a nice clean edge to fuse. The cut doesn't have to be perfectly straight. It can be slightly wavy. Pull out the two trimmed edges and add those to the "pet bed stuffing" bag. 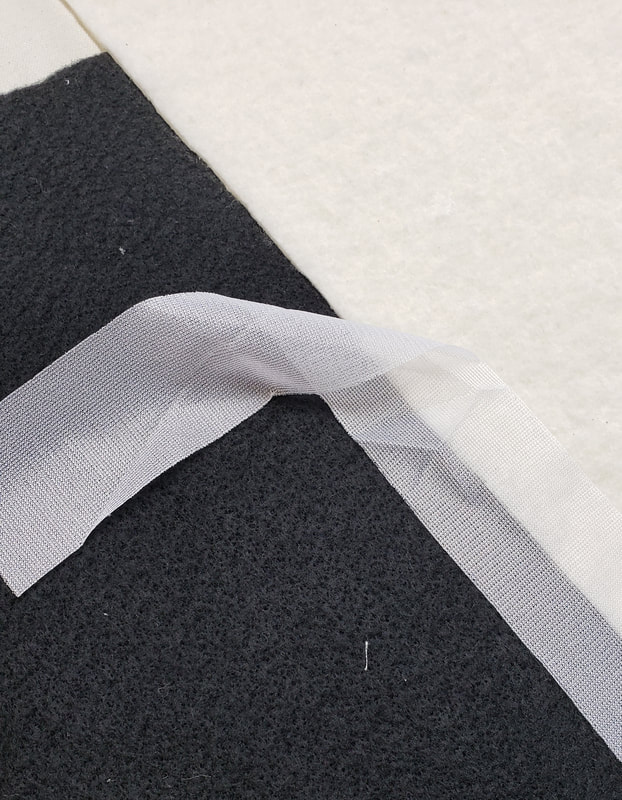 The batting strips don't need to be any wider than 1.5". Feel both sides of the interfacing. The bumpy side is the glue side. Those are glue beads. Put that side against the batting. You will do this wrong at least once and then you will get to clean your iron. I set my iron on the Poly Blend setting and I leave the steam on. These knit interfacings don't need high heat. A high heat iron will melt the interfacing and your poly blend batting and then you can clean your iron again. Use very little pressure. Just let the steam do the work. Hold the iron over a section for 5 - 10 seconds and then move to the next section. When you hold the fused piece up you will quickly see any sections that need to be touched up. 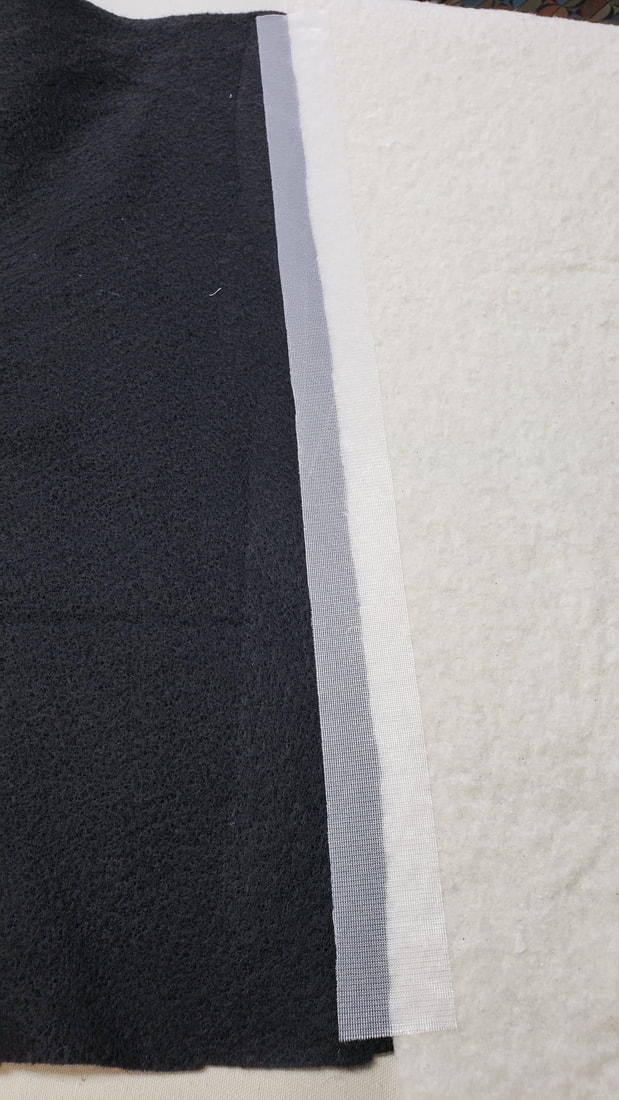 That's all there is to it! 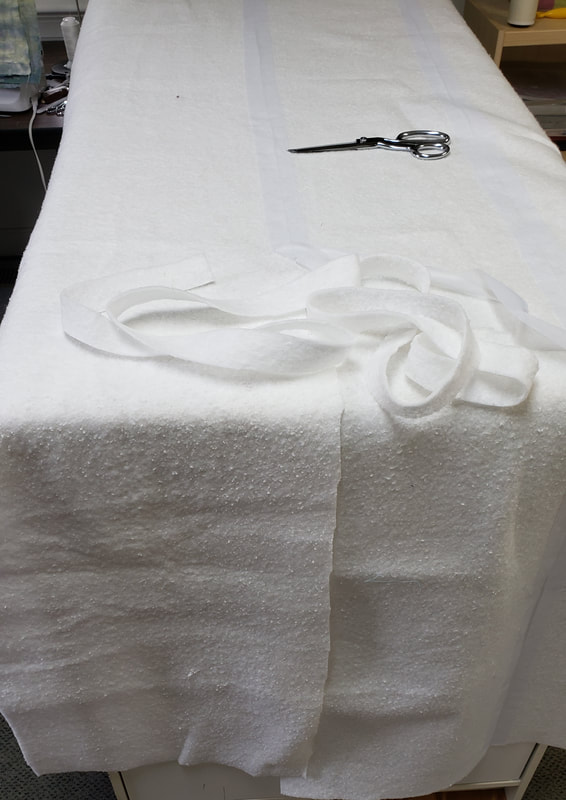 When I'm working on a big piece I just do it in sections. I cut and fuse whatever fits on the ironing board and make sure that the part that's hanging over has some overlap. Then I just roll up the fused section and finish if off. 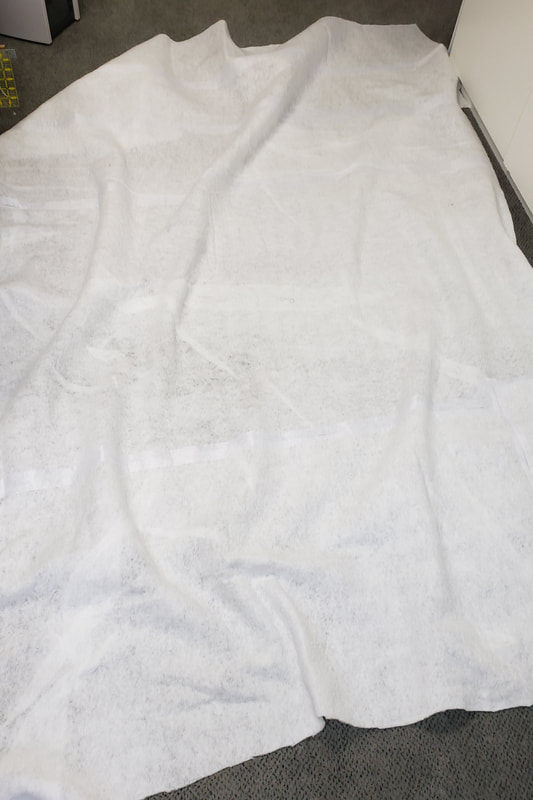 Fifteen minutes of work and I had a whole new (free) batting for 2 more veterans quilts! 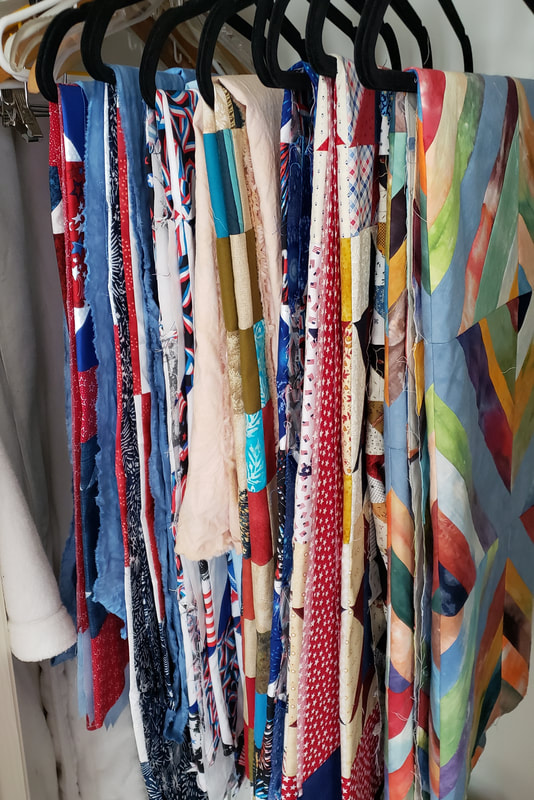 I need all the free batting I can get because my closet is full of veterans quilts to be quilted! 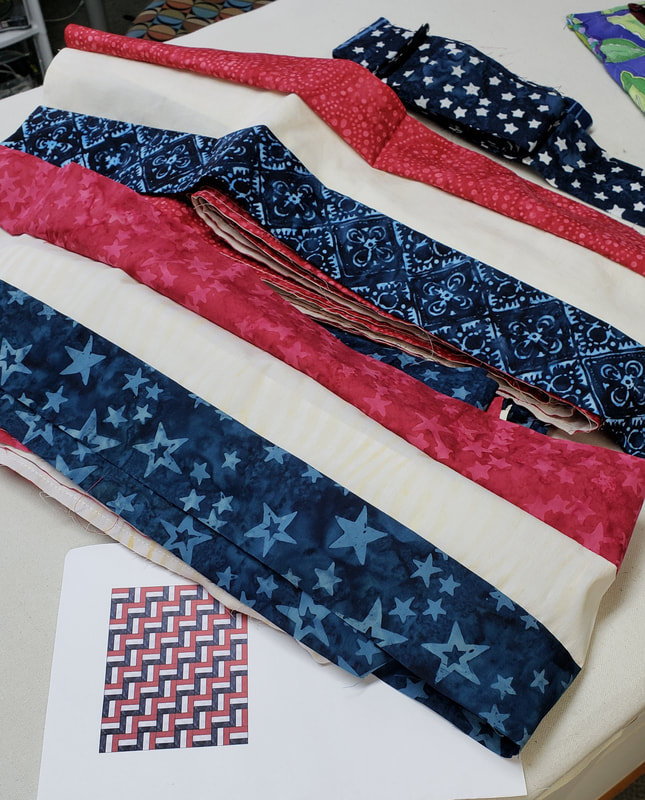 Then there are 2 rail fence quilts that I started at sewing this weekend. I'll get the strips pressed and cut this month and will get these tops put together next month.
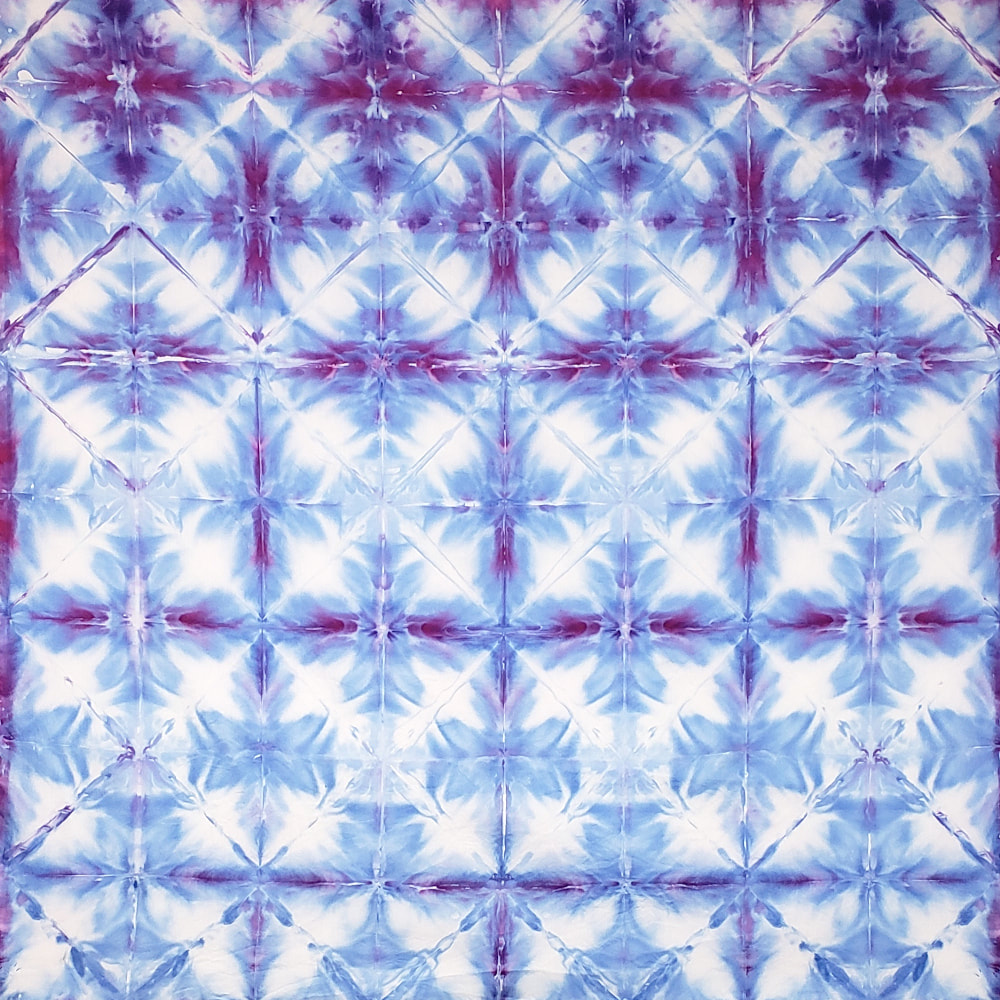
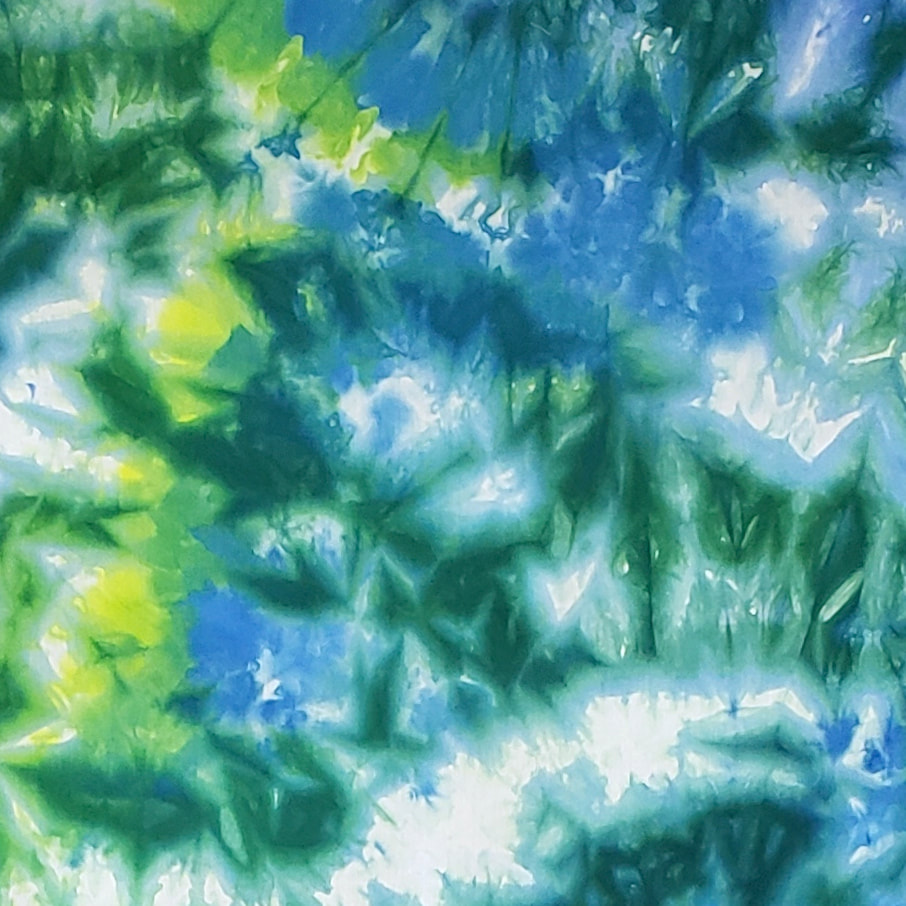
I know, I promised this tutorial over 2 weeks ago! It has taken some time to get the photos edited and the tutorial written up but it's finally here. I have outlined the process that I use for ice dyeing but if this is something that you are seriously interested in please take the time to read/watch how other people do it as well. There are as may processes for ice dyeing as there are family mashed potato recipes. It's good to check them all out.
In this tutorial I also show how I create the Galaxy fabrics as a by-product of the ice dyeing process. I don't like to waste dye and ice dyeing is a huge dye wasting process. Creating the Galaxy fabrics is a great way to use that wasted dye. T shirts would be awesome dyed in the bottom of an ice dyeing bin. Get the tutorial here and have fun ice dyeing your own fabric. If you see any typos or if anything is confusing, please let me know. I'm happy to fix the document. 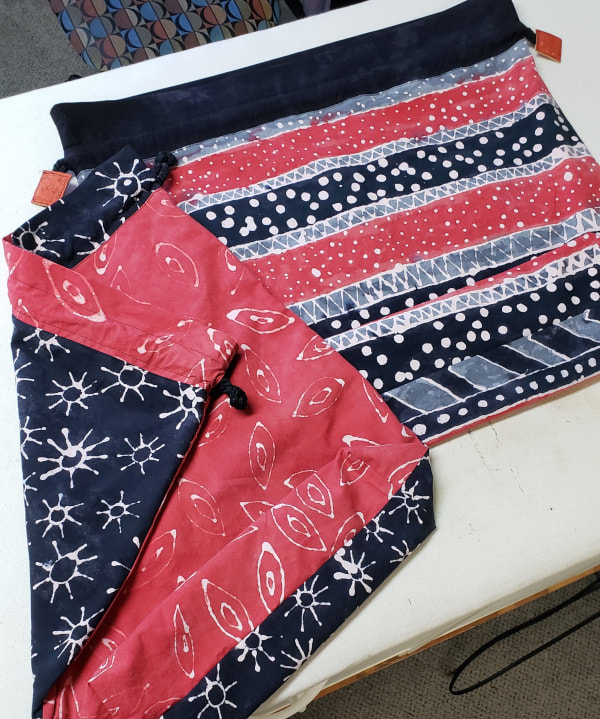 I have seriously lost my mind but I'm having fun at it. I never thought I'd say this but I need to get back to making doll dresses! Here are the two newest ones and they are made from the very first fabrics that I ever dyed when my best friend made me dye fabric one summer against my will. These were made with glue resist. The one on the left is red on one side and black on the other. I made these bags as big as the fabric allowed. That's why I love these projects. I can finally use my special fabrics and can use the whole piece because size really doesn't matter in this case. 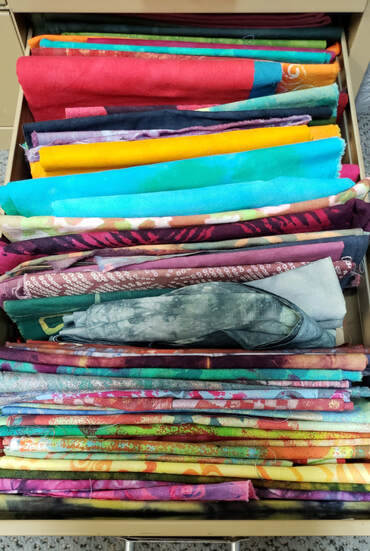 Of course that created another project. Here's one of 2 drawers of some of my earliest dyeing. Anne and I did lots of print paste, resist and other special dyeing techniques and created some really cool fabrics. But I don't use the fabrics because I know for a fact that they will all bleed. I've decided that it's finally time to fix that and to soak all of these fabrics so that I'll use them in future projects. 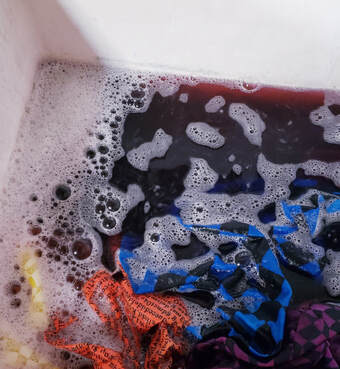 In case you didn't think I was being accurate about the bleeding here's the first group that I put through soak cycles. That's only 12 fat quarters! We were following the conventional wisdom of that time so we didn't know better. It took me several years to figure out that I could actually fix bleeding fabric. These fabrics have already been processed and are back in the drawer and ready to be something someday. They will not be drawstring bags, I promise. 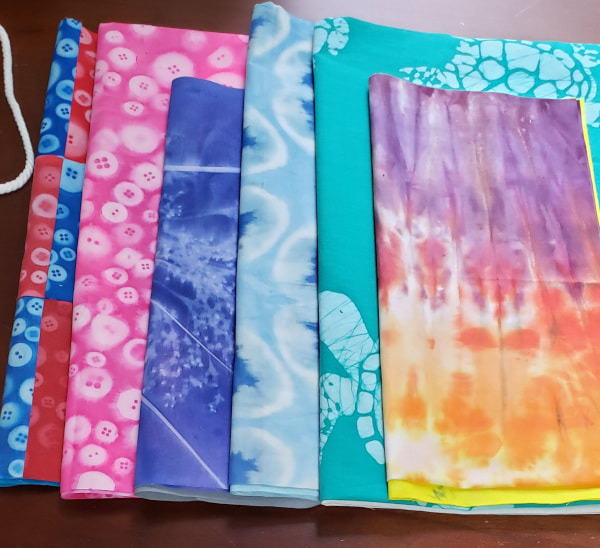 Because I've already cut all of these fabrics to make into bags in the coming days. Some of these are earmarked for gifts but most are for me.
99% of you will already know how to make these but if there are any new sewists reading I have created a tutorial. I've read through the tutorial 3 times and I think I've corrected all of my errors but if you see something let me know, I can easily fix it. 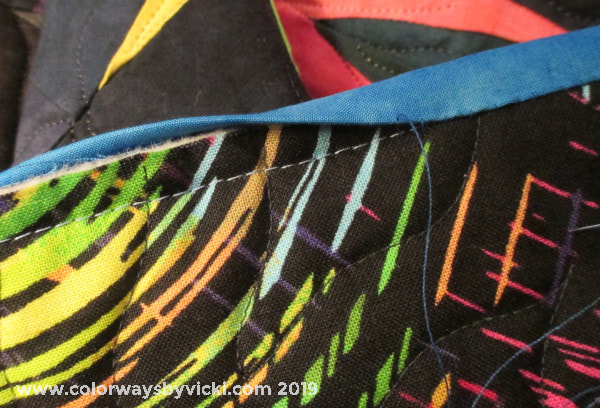 My main task this week is to get the 4th of July quilt bound. I haven't liked the 4th of July name because my color palette just doesn't fit the theme. I've had a lot of time to think about it while binding and I think I'll call it Fireworks. Anyhoo.....while binding I thought about something that I discovered a couple of years ago that saves me a lot of time and pin sticks. I used to pin my binding as I stitched and I know a lot of people use those little clips but I discovered that you don't need pins at all! That's right, I don't use 1 pin when I hand stitch my binding. 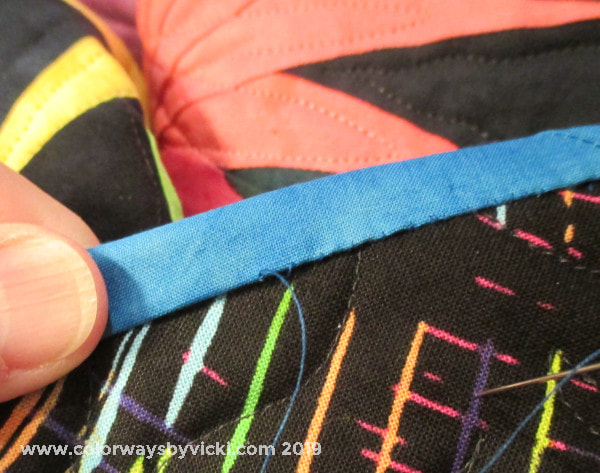 What I realized was that even after I took a pin out that I'd readjust the section I was getting ready to stitch so what good was the pin doing me? I really only care about the 1/2 inch ahead of the needle. I just roll the binding over as I go. 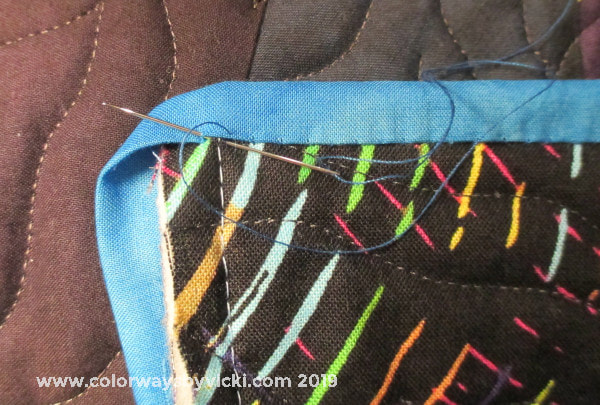 I adjust - stitch - adjust - stitch all the way to the corner. I don't use pins in the corners either. I stitch to the point where the 2 edges will miter together. 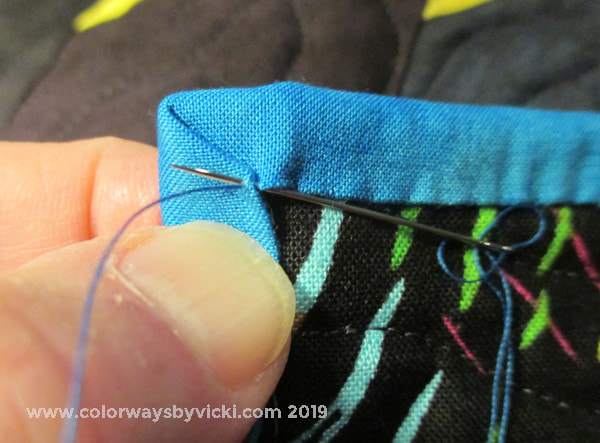 I fold in the side, adjust the miter and then take one stitch on the corner to tack the miter in place. 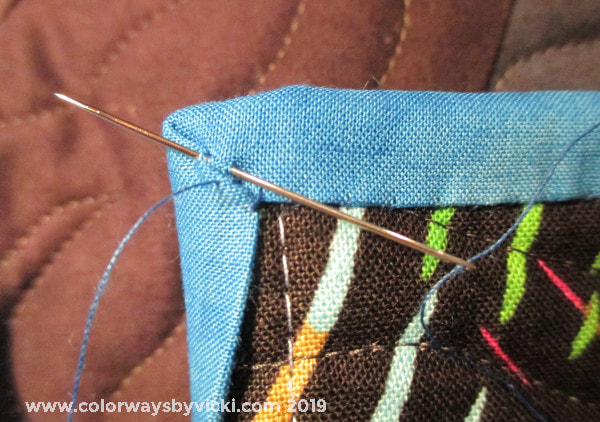 Then I stitch the miter on the back. 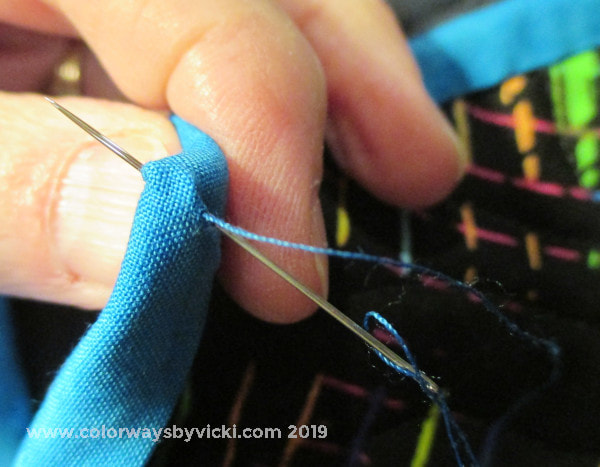 At the tip stick the needle through to the front and have it come out in the fold of the front miter. 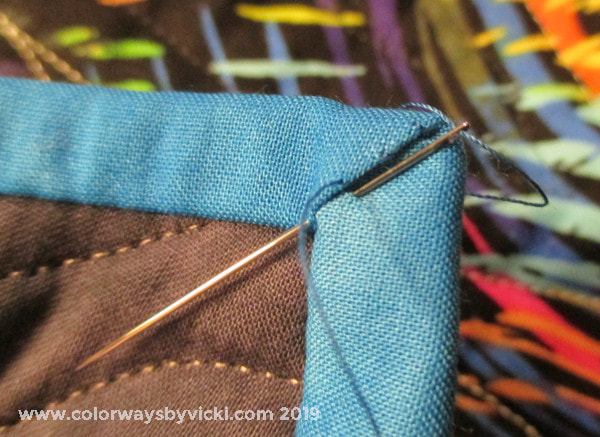 Stitch the miter down the front coming out at the base of the miter. 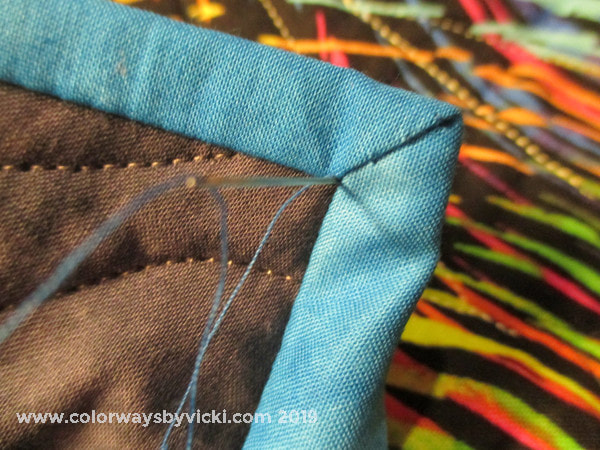 Stick the needle back through all of the layer and come out at the base of the miter on the back. 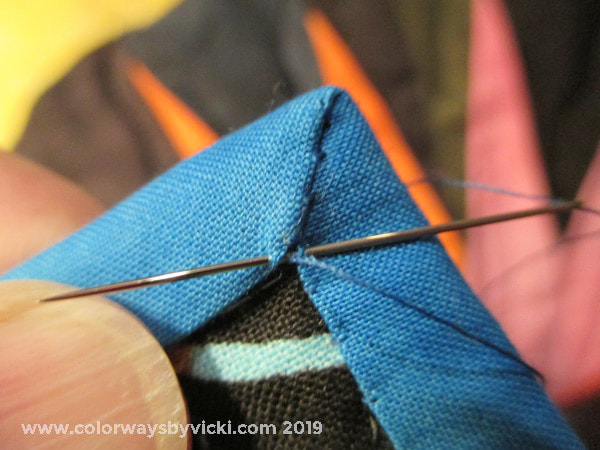 One more stitch in the corner to make sure the miter is secure. 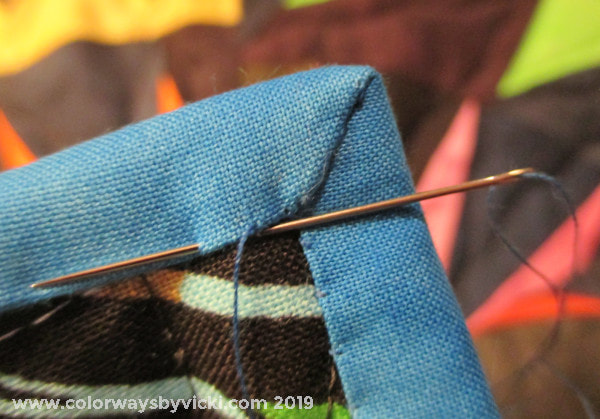 And then head down the next side. The whole binding is stitched without the extra time to pin.
This quilt will be ready to show tomorrow! Once a year or so I like to post a reminder about my Bleeding Quilt article. Almost weekly I get an email from someone telling me about a quilt that was saved. The most recent one was so sweet that I wanted to share it. 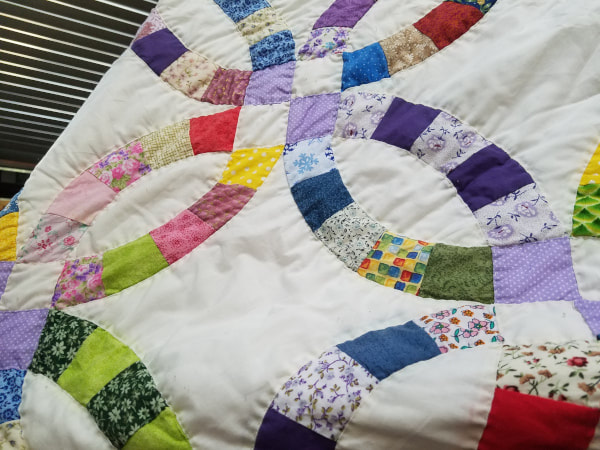 The message was from Laurie B.: Your article about the bleeding quilt saved my mom this afternoon. My mom is 81 years old and she has been working feverishly since October on her first ever quilt for my daughter who is getting married in 2 weeks. she had to spot clean a few little finger sticks of blood and when doing so we noticed that the red was bleeding and also a little blue. She was exhausted and I said "mom lets just google this" we found your article and it kind of was backwards from what we thought as we always heard set the colors with cold water and salt. We trusted you and you were a life savor. A huge project for an older women to take on for a first time. And its a king sized quilt. Can you imagine someone piecing a KING size Double Wedding Ring as her first quilt? I bow to her guts and perseverance! The wedding was this past weekend and I hope the Granddaughter appreciates what a feat this was and what a treasure this quilt is! Just goes to show that you can start any hobby at any age.  Hopefully you will never need this information but if you do the instructions are always here. If you want to share this information on your blog or website you are welcome to download this button and can link it to: https://www.colorwaysbyvicki.com/save-my-bleeding-quilt.html#/
My weekend plans changed! I was going to do lots of mosaic, load my next quilt, make some postcards and start a new quilt. I made a little progress on a couple of those things but mostly I spent a few days with my foot elevated because I sprained my ankle WALKING UPSTAIRS! What a klutz! I was lucky though because I had been in the basement to cut glass for a frame. When I fell I dropped the glass and it shattered in dozens of pieces and I didn't get one cut. That's a miracle that makes the sprain no big deal except that it interfered with the great exercise routine that I had going. 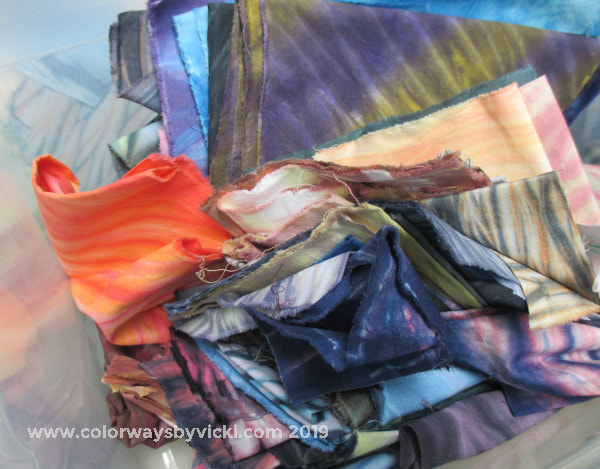 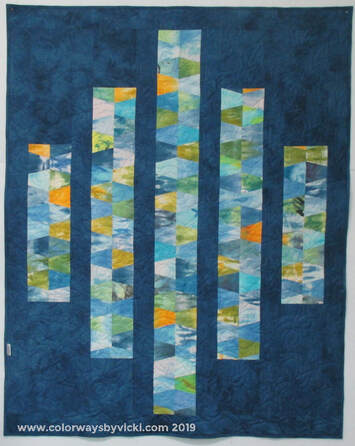 The sprain wasn't bad and by yesterday I was up doing some things. I pulled out my shibori scraps that were left over from Loony Moony and I'm starting to play around with some postcard ideas.
But mostly I played around on the computer. I researched and planned a couple of vacations and I got the tutorial written for this quilt. I'm calling it Bars and Stripes and the instructions are basically cutting instructions because the piecing is so easy to figure out. Click on the quilt image to go to the instructions. I even included instructions for a Quilt of Valor version. |
FeedsTo subscribe click the RSS Feed button and copy the URL of that page into your blog reader.
In Bloglovin you need to search "Colorways By Vicki Welsh" to find the blog. About Vicki
I'm Vicki Welsh and I've been making things as long as I can remember. I used to be a garment maker but transitioned to quilts about 20 years ago. Currently I'm into fabric dyeing, quilting, Zentangle, fabric postcards, fused glass and mosaic. I document my adventures here. Categories
All
Archives
July 2024
|

 RSS Feed