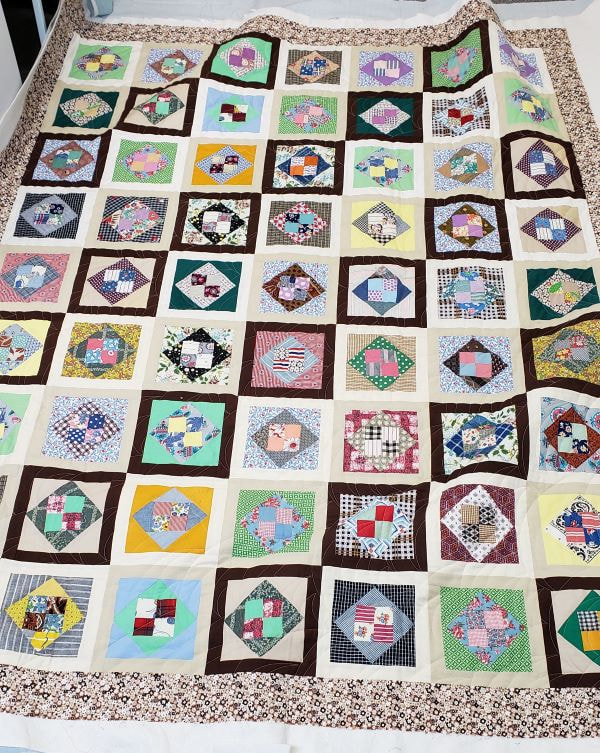
 I hope you had a great weekend because I sure did. The weather was beautiful here and I think Spring is in sight! Some yard work will need to commence soon. But not yet. I'm still 100% focused on quilting and sewing. My weekend started off by quilting this quilt for Mom. It doesn't have a specific home yet but will be a donation quilt. 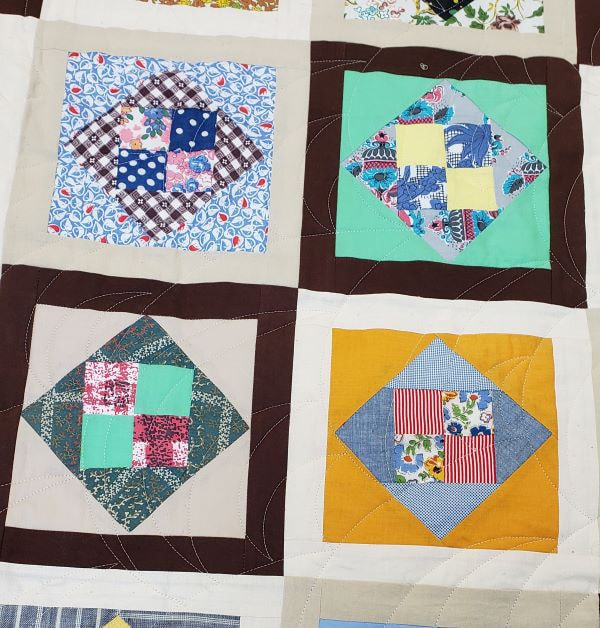 Mom added the tan and brown frames on some vintage feedsack blocks that were donated to our quilt club. She had enough for this 60 x 80 quilt and for a 48 x 60 veterans quilt. I actually have some of the feedsack fabrics that are represented in this quilt in my own collection. 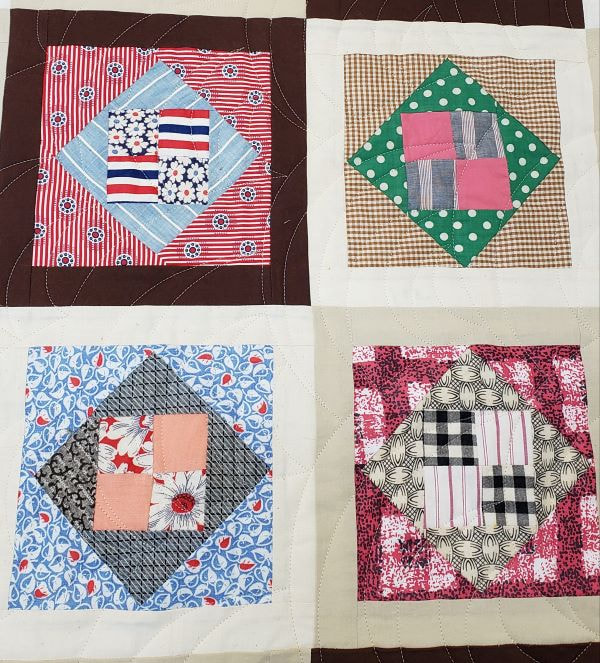 I know that I have the blue print in the lower left block and I think I have the red plaid in the lower right block. 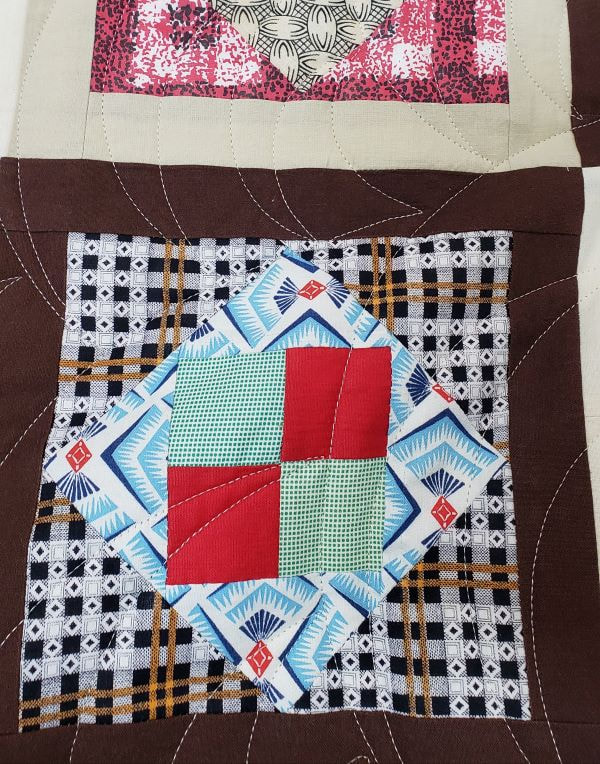 I knew that the quilting wasn't going to show on this one so I used my spiky free-motion Baptist fan - at least that's what I call it. It's fast and easy and makes great texture. 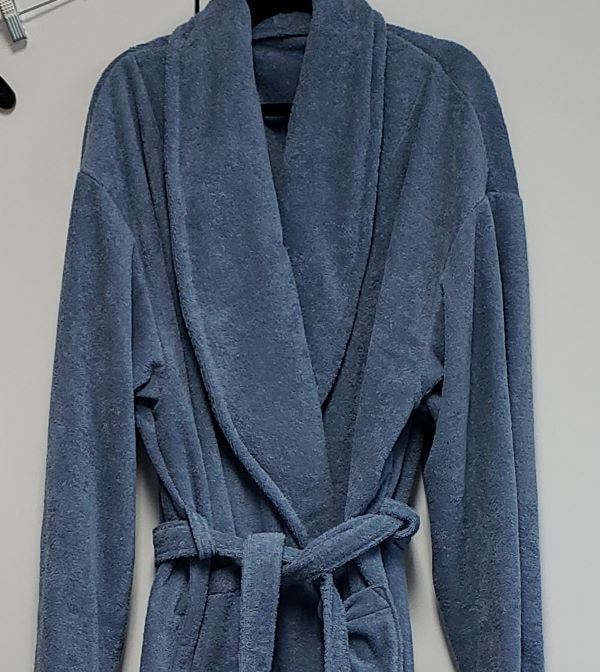 We had to make a trip to Joann to get another yard of the terrycloth so I could make Chris' robe. You can get all the pattern and fabric info in this post. The pattern really does underestimate the amount of fabric needed. For the XL size I needed an extra yard. It makes a HUGE mess but it was worth it. These are luxurious robes. 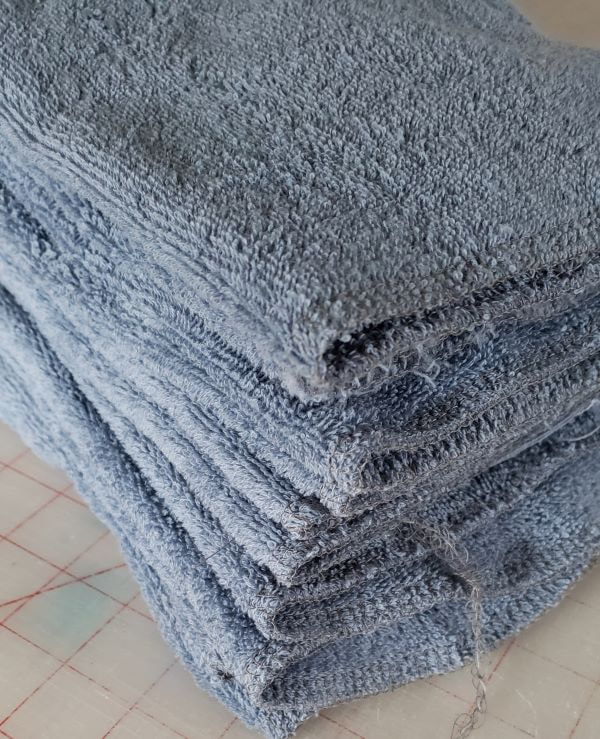 I even serged all the leftover chunks to make shop rags for my brother, if he wants them. This is not the kind of fabric that you want hanging around in the stash. It's way too messy.
This week I need to start planning another Antelope Canyon quilt for a May wedding gift. I also want to start making some plans for a couple of baskets of scraps. I might get out the go cutter and cut it all up in various shapes. I also need to make the other set of strippy placemats. Lots of potential! 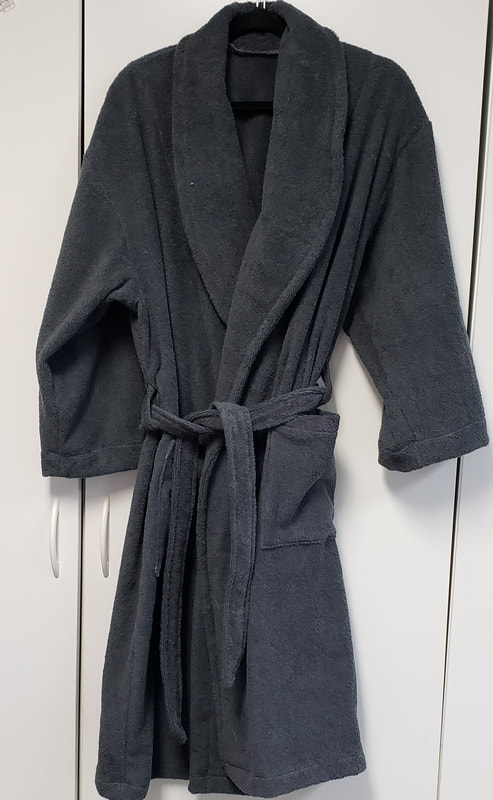 Yes I did. I made a bathrobe! I wanted one and I bought one from Target and I hate it. I really wanted cotton and all they had was poly. I shopped online for a cotton one but the ones with good reviews are very expensive so I decided to just make one. Yes, I picked gray. I almost bought white but I found myself thinking of all the ways that I could dye it. I know that dyeing toweling is a PITA so I changed my mind and bought an undyeable color. Plus, I like gray a lot in my wearables. 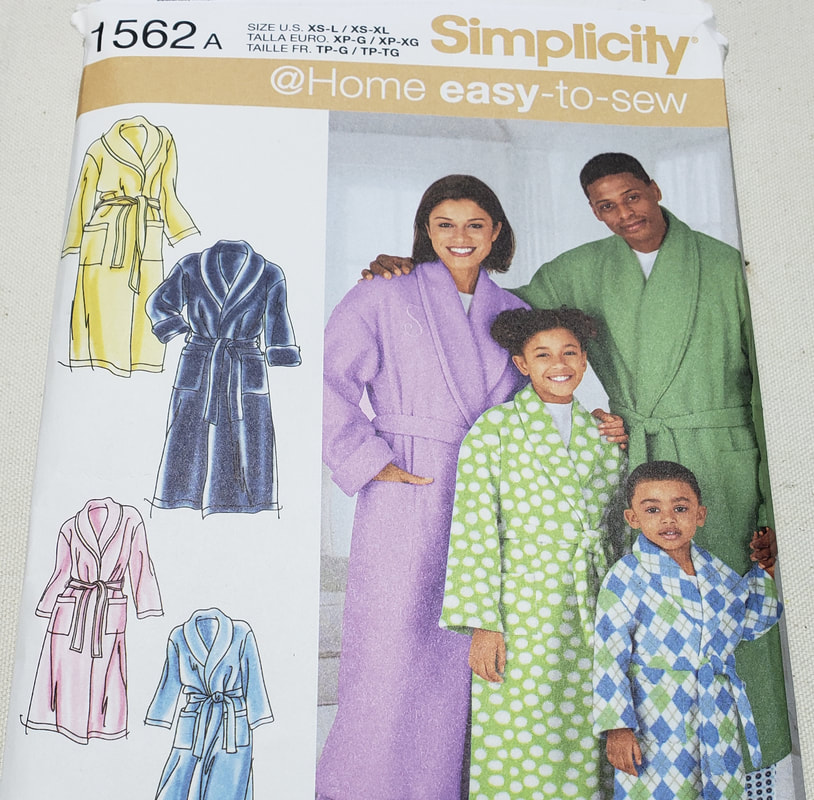 I used this pattern and I can tell you that the yardage on the directions is not enough! I had enough for my robe because I shortened it by 5".  I got this fabric from Joann and I have to tell you that it's really good quality. But I have to go back today and buy another yard so that Chris will get two sleeves in his robe. With coupons, these robes cost about $40 each but they are really luxurious. 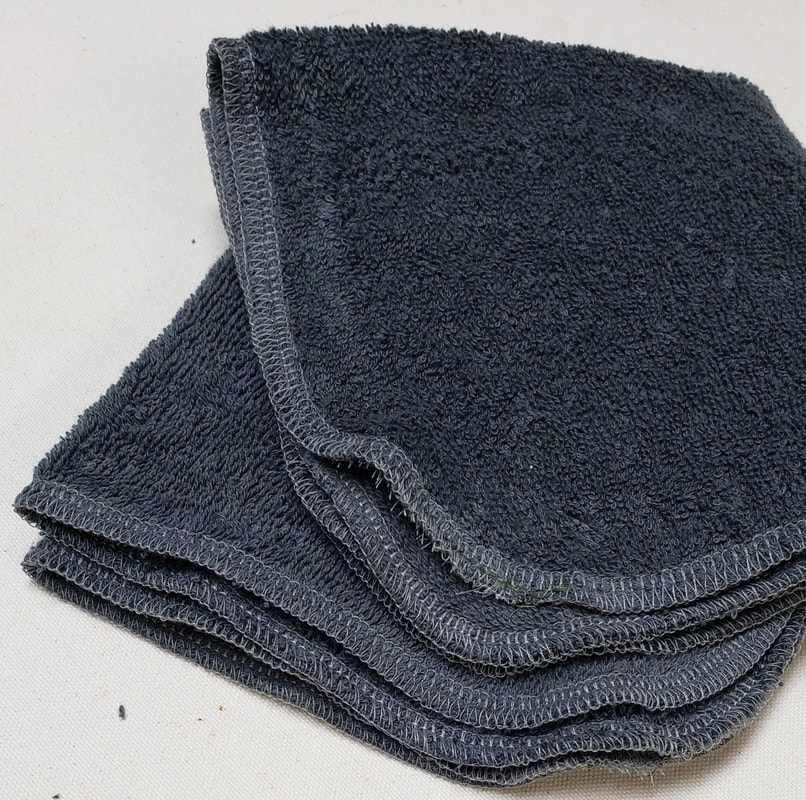 I had just enough leftover to serge two new washcloths. See that gray speck? I have those all over my sewing room! I need to get Chris' robe done before the cleaning lady comes on Wednesday so she can clean up all the stuff that I miss. I have vacuumed once already but these bits seem to be everywhere. 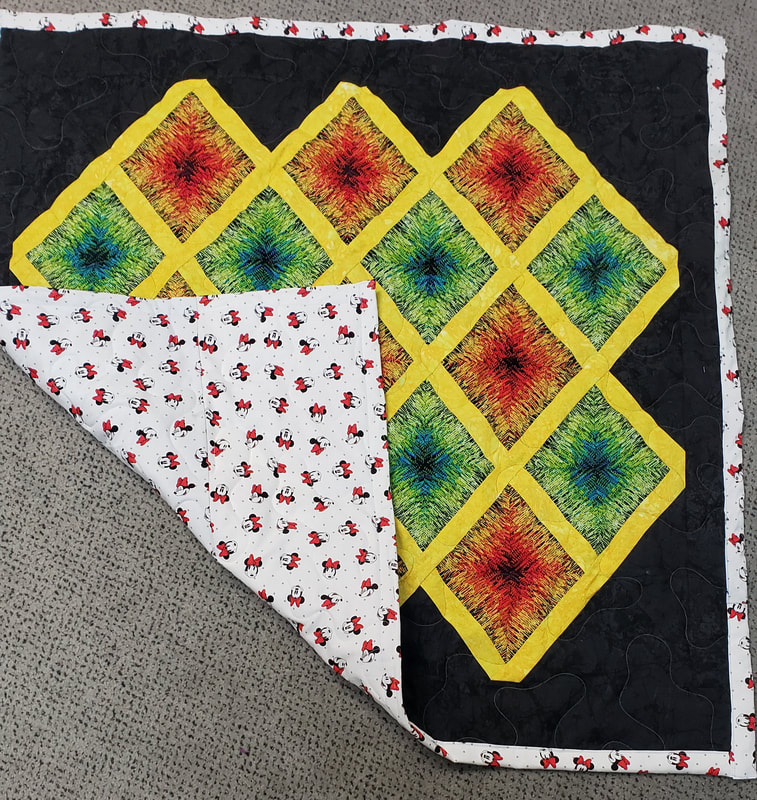 Another quickie project that I finished this week is this pet blanket that I will donate. The top is a reject sample that I made for Paula Nadelstern. I rejected it, she never saw it. I made another version for her with a different background that looked a lot better. Since then I've been moving this top around from stack to stack in my sewing room. When I cleaned some shelves it surfaced again and I decided to finally do something with it. The trash can was one idea but then I decided on a pet blanket. The backing is a fabric that I bought to make a doll dress for Ella and it got permanently stained when I prewashed it. I reordered the fabric for her dress but didn't throw the ruined piece away. It was fine for the back. I loaded it on the longarm, used a remnant of poly batting and stipple quilted it. I trimmed the batting to the edge of the top and then used the backing to fold to the front and topstitch. The whole thing took about 2 hours. I'm glad to have the top and the ruined fabric out of my stash.  Last night before sitting down to crochet I got this quilt loaded. Mom made it to donate. These blocks are made from feedsacks and were donated (dropped on) our quilt club. Mom took them and made them into a "sofa size" quilt. With the leftovers she's making a veterans quilt top. I'll get this quilted for her this weekend and, hopefully, get Chris' robe made. Those seem like sufficient goals to accomplish before the Super Bowl.
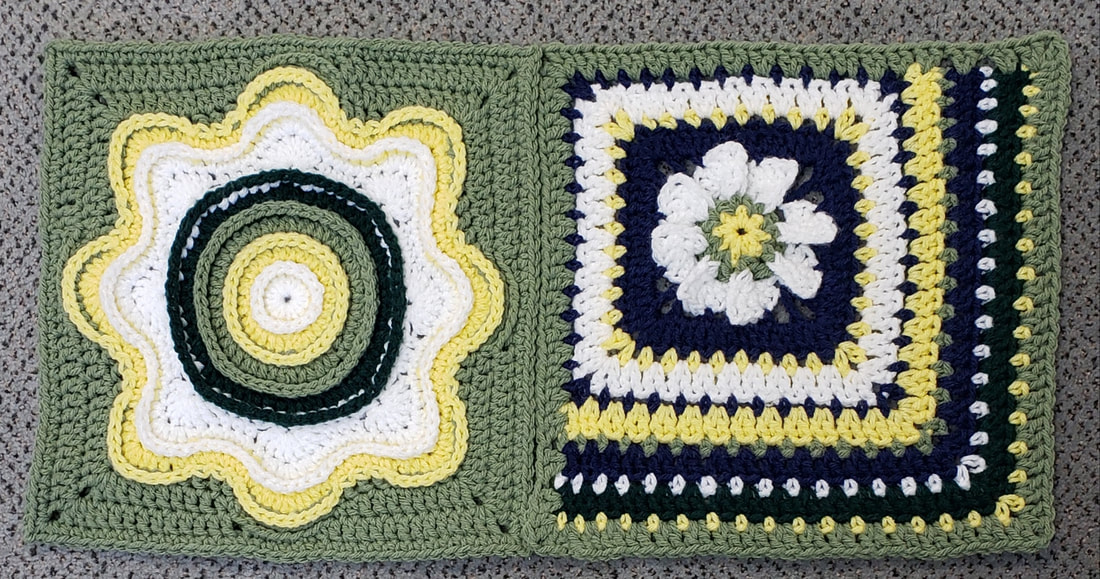 This week I've been catching up on the Moogly CAL. You might remember that I decided to do BOTH the 2022 and the 2021 CALs because I'm not insane enough. I'm doing that because I have so much of this yarn and I want to use it up. It works out to one block a week and I don't care if I get behind and don't finish this until 2023. The block on the right is block #2 from 2022. It was a challenge, a good one. The 2021 block #2 didn't work for me. I started it 3 times and just couldn't get it so I went to the 2020 archives and picked the #1 block. I'm glad I did because I love this block and I learned a couple of new stitches. I'm working on the 3rd blocks from each year now. 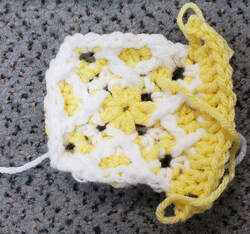 Here's one of the failed attempts at 2021 block #2. It has a lot of cross over front post double crochets but there weren't enough photos with the tutorials to really show the stitch placement for the first few rounds. I never could end up with the right number of stitches.  Here are the first 4 blocks together. 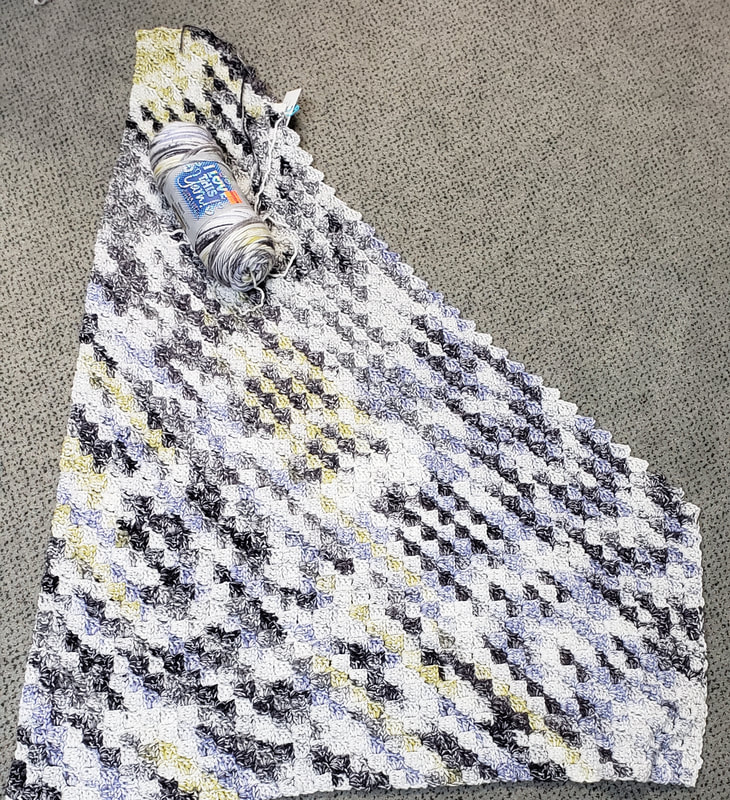 I'm also working on the wheelchair blanket. I just started the third skein and I've turned both side corners and my rows are getting shorter. This one will be wrapped up in the next week for sure. I had the opportunity to deliver some shawls and blankets on Saturday so this one will start a new donation stack in the closet. 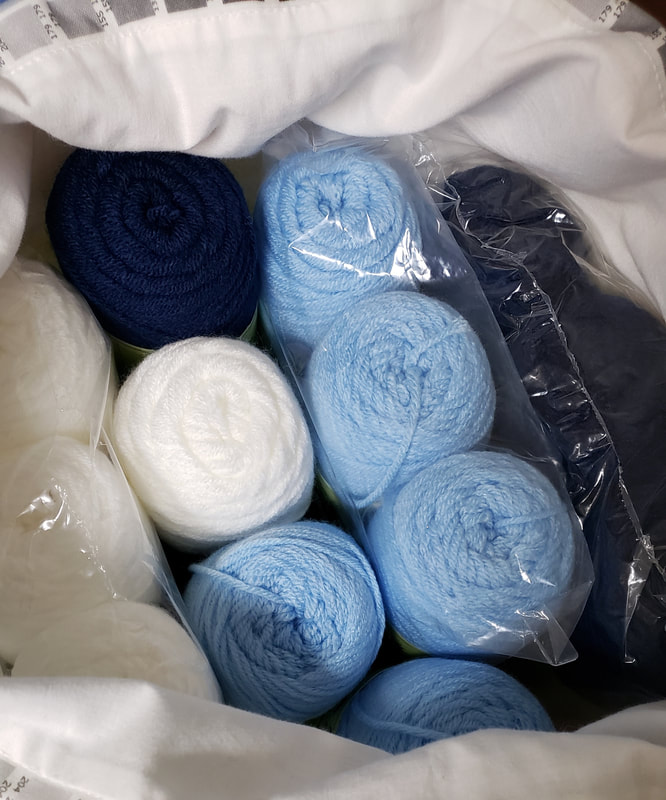 The baby blanket yarn that I ordered arrived yesterday and I will get started on it as soon as I finish the wheelchair blanket. I'm excited to make another gingham blanket next week.
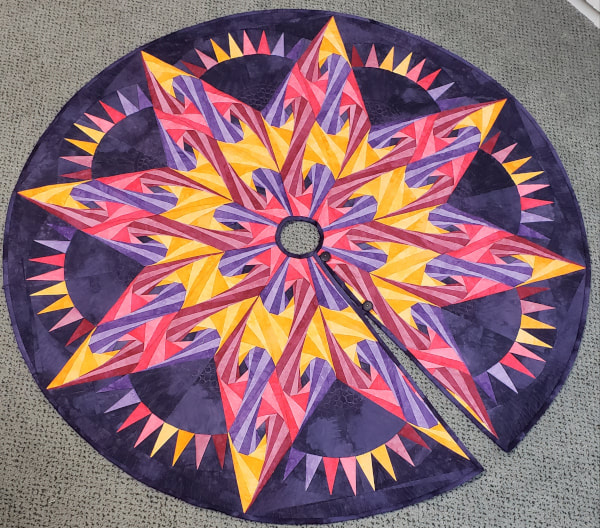 Summer Sunset Tree Skirt I am very happy to have my first quilt project of 2022 done! I'm so glad I decided to turn that wall hanging into a tree skirt. I think it's going to look great under my Christmas tree with my collection of blown glass ornaments. It finished to 40.5" in diameter. I sliced the quilt through a star point so that the center front of the skirt will be a star point. I am not going to mention the pattern because, frankly, I'm not happy with it. There's so much bulk in the seams that it's really difficult to quilt. But, in the end, it worked out great. 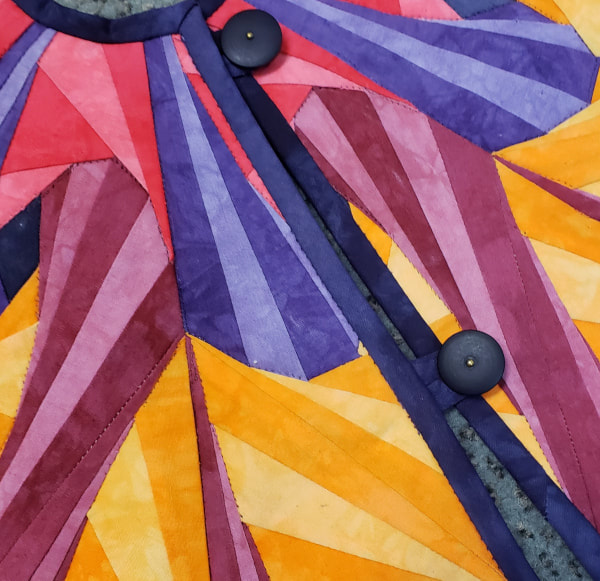 I used 2 buttons for a closure. 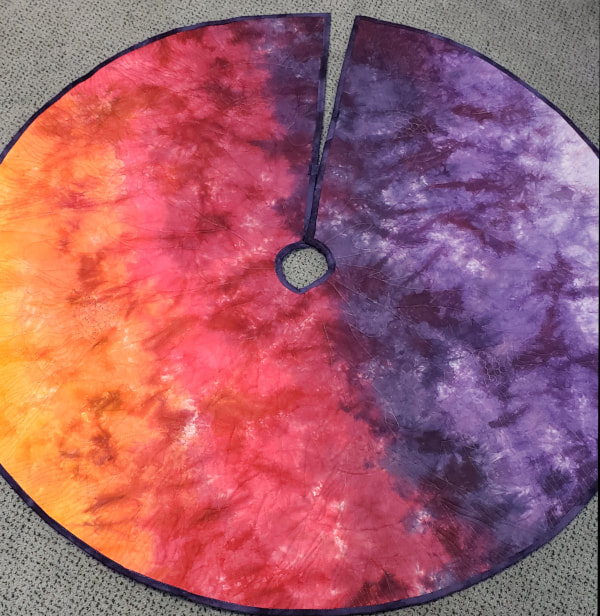 The backing is a piece of the Summer Sunset gradient that was the source of the palette for this quilt (and the matching large bed quilt that's next up to be quilted.)  The star part is quilted stitch-in-the-ditch around the color sections (not ever single piece). The background sections are quilted with pebbles and solar flare effects. I used Superior Highlights and Bottom Line for the quilting. 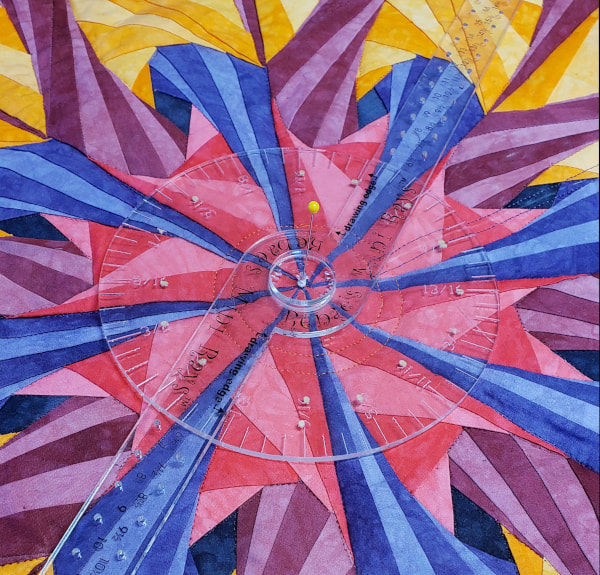 I love Renee's Amazing Rays for drawing giant circles. 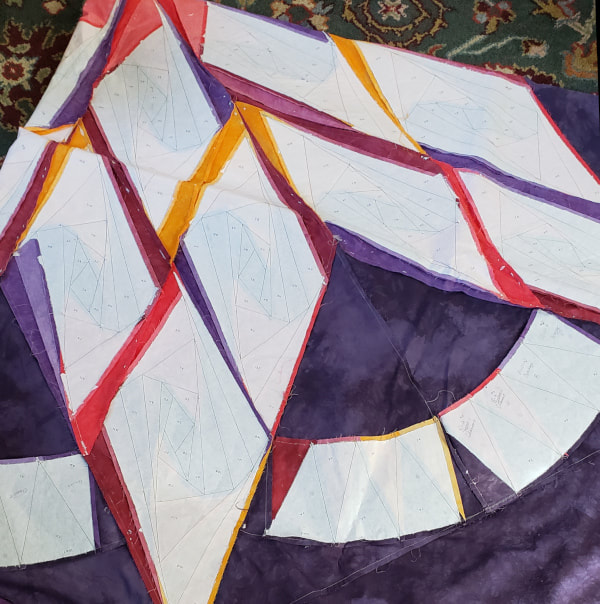 Next up is the queen size Star. This one will be for my bed. The foundation fabric is intended to be left in but since the quilt is already so bulky I've decided to remove the papers. That will take a week or so but meanwhile I have the back ready. 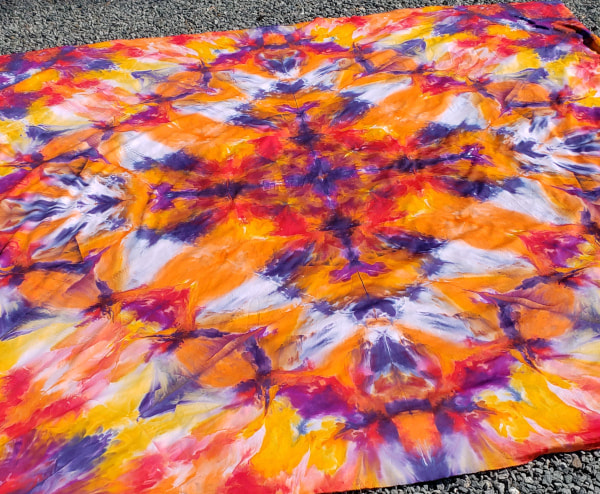 I ice dyed this last week for the backing of the quilt. It's cotton sateen so it has a beautiful sheen to it. I intend for this quilt to be reversible.
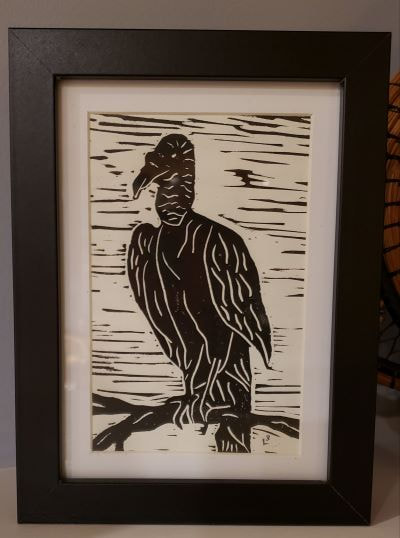
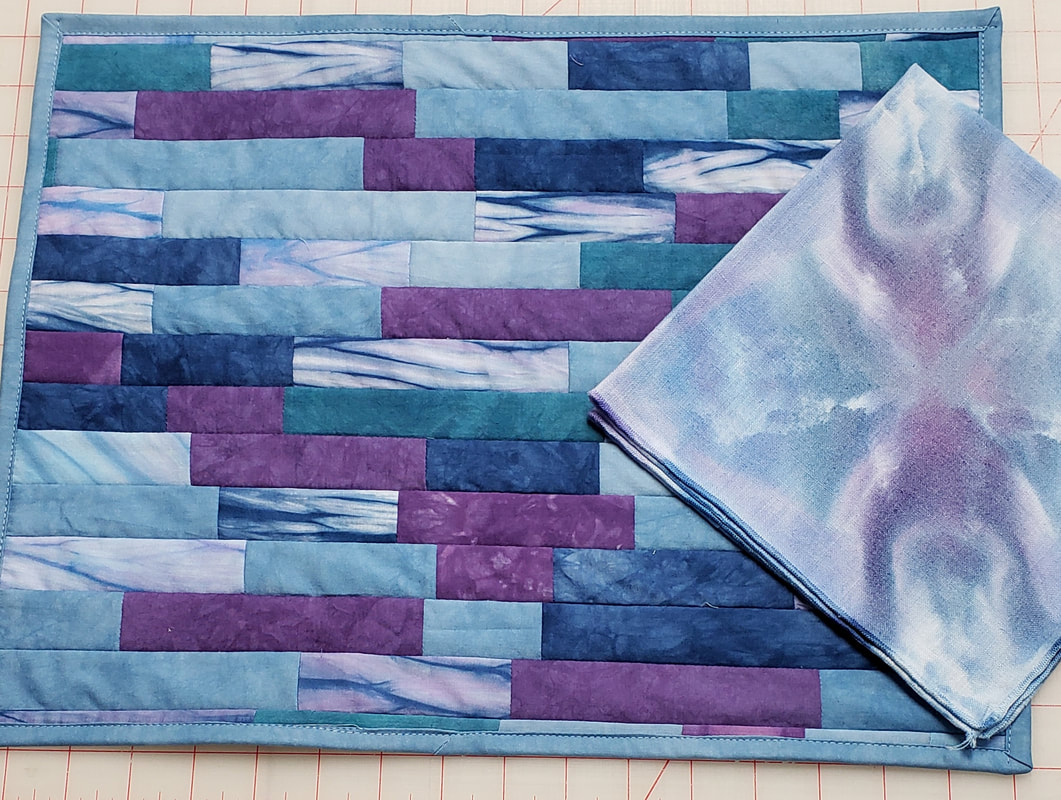 I had a really productive weekend and it started with finishing these placemats and I love them! 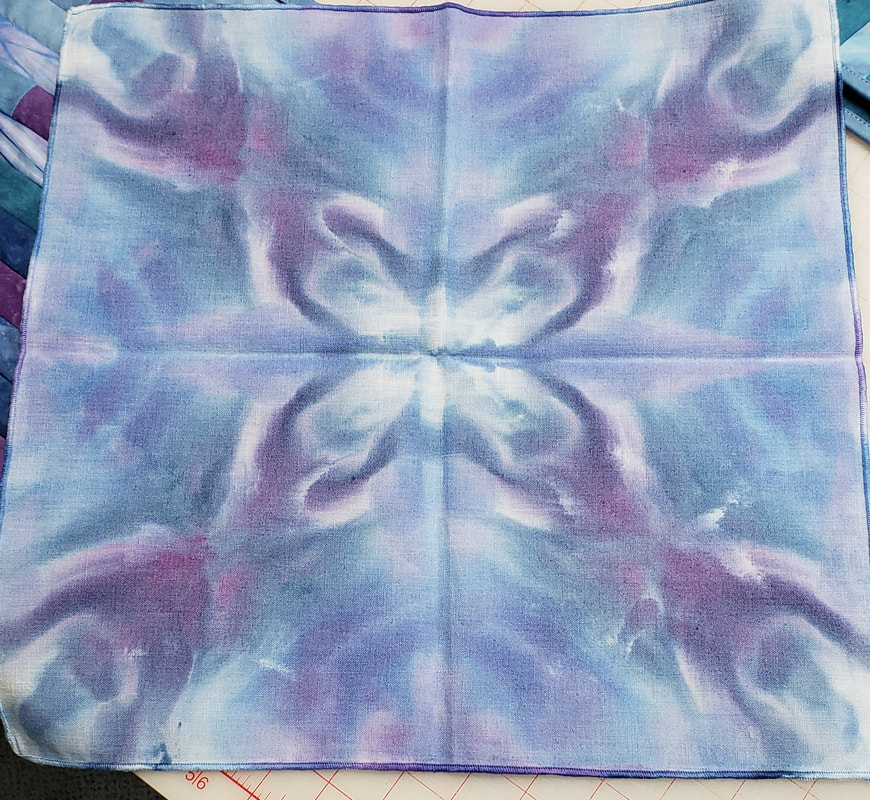 This started with 4 ice dyed placemats. I have 4 more in a slightly different colorway and I'll make another set to go with them next. 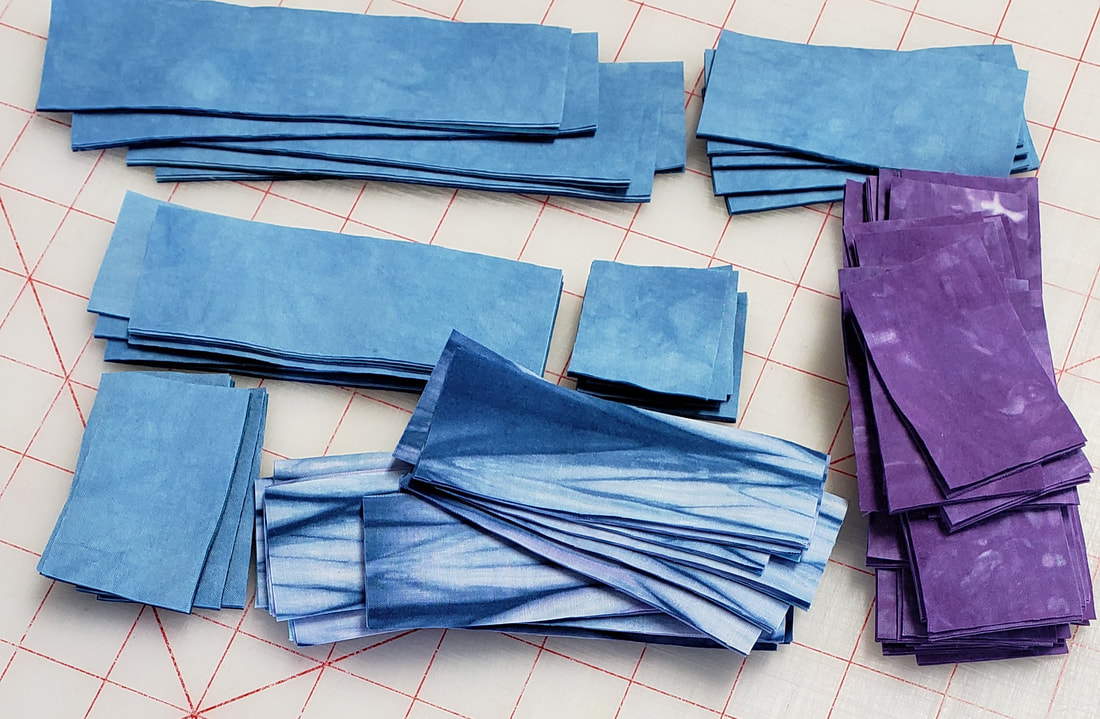 I'm wanting to make a strip pieced wall hanging for my nephew and I want to do it on the longarm so I decided to use this project to practice longarm piecing. I started with a bunch of fabrics that "matched" the napkin and cut then into 1.5" strips and sub-cut into bits. 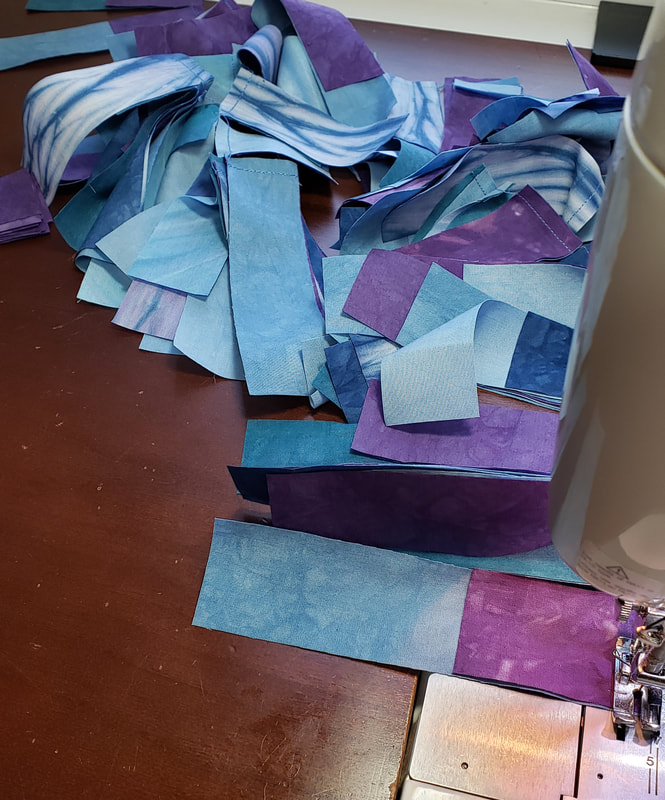 Then I spent an afternoon piecing all the bits into strips. 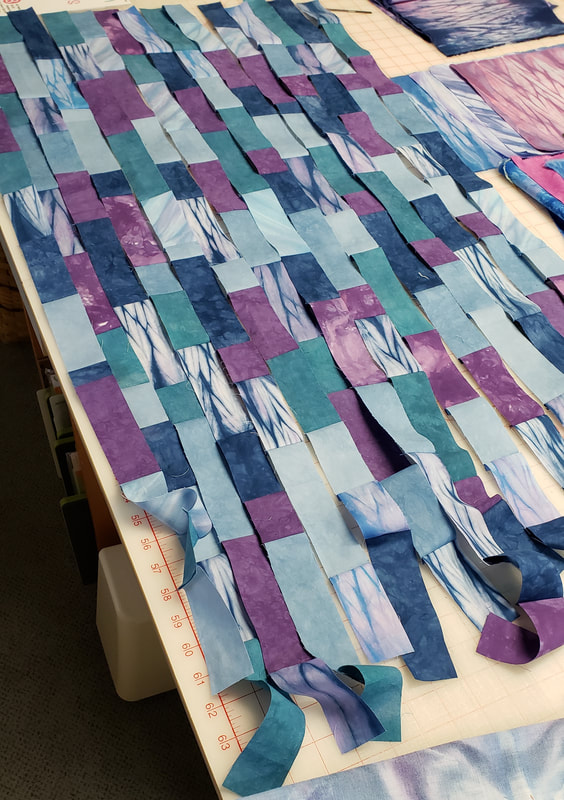 I made the strips about 40" so I could get 2 placemats out of 2 sets of strips. That's also about how long the strips for the wall hanging will be so this was a good practice length. 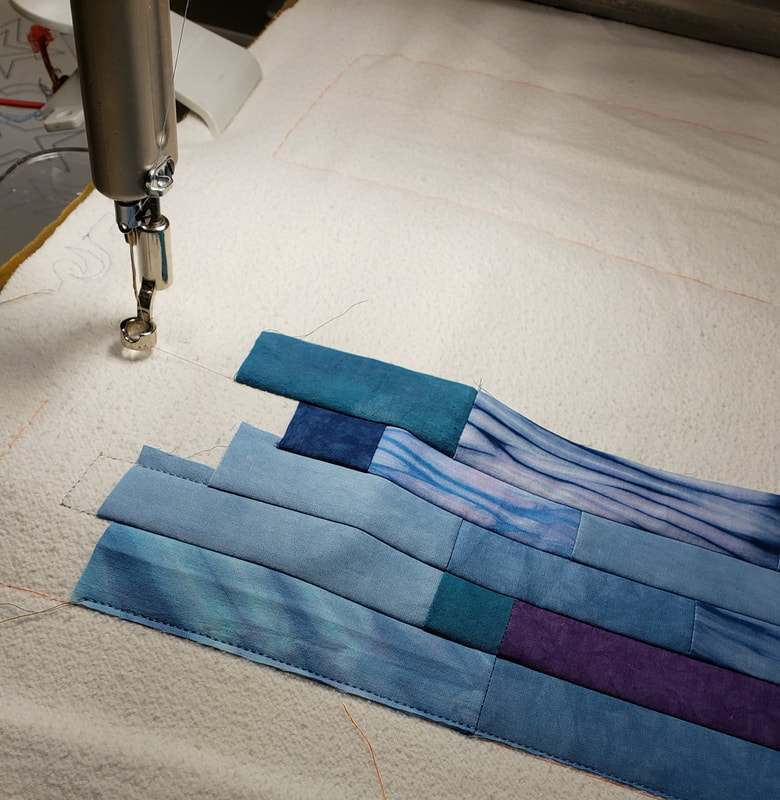 I loaded my backing and batting and used the channel locks and basted rows about 5" apart so I could keep an eye on my progress and make sure that I stayed straight. I used the channel locks to stitch the rows and it was surprisingly easy! 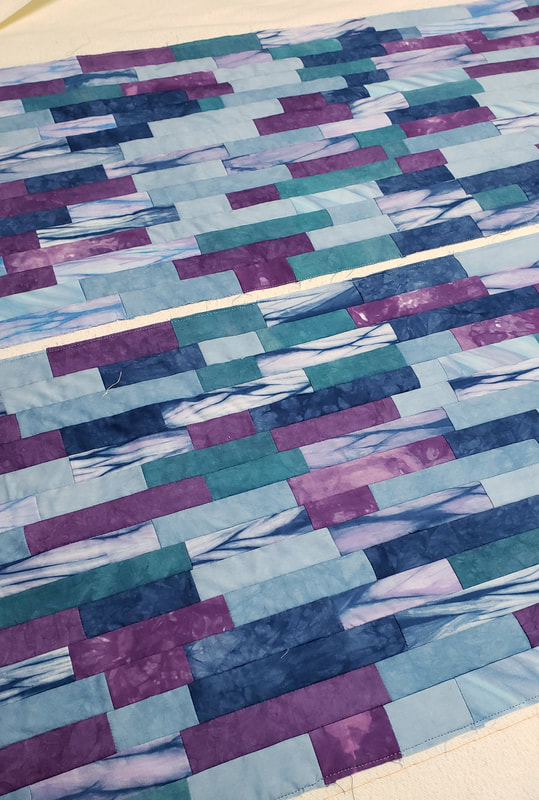 I got the two panels quilted in just a couple of hours! 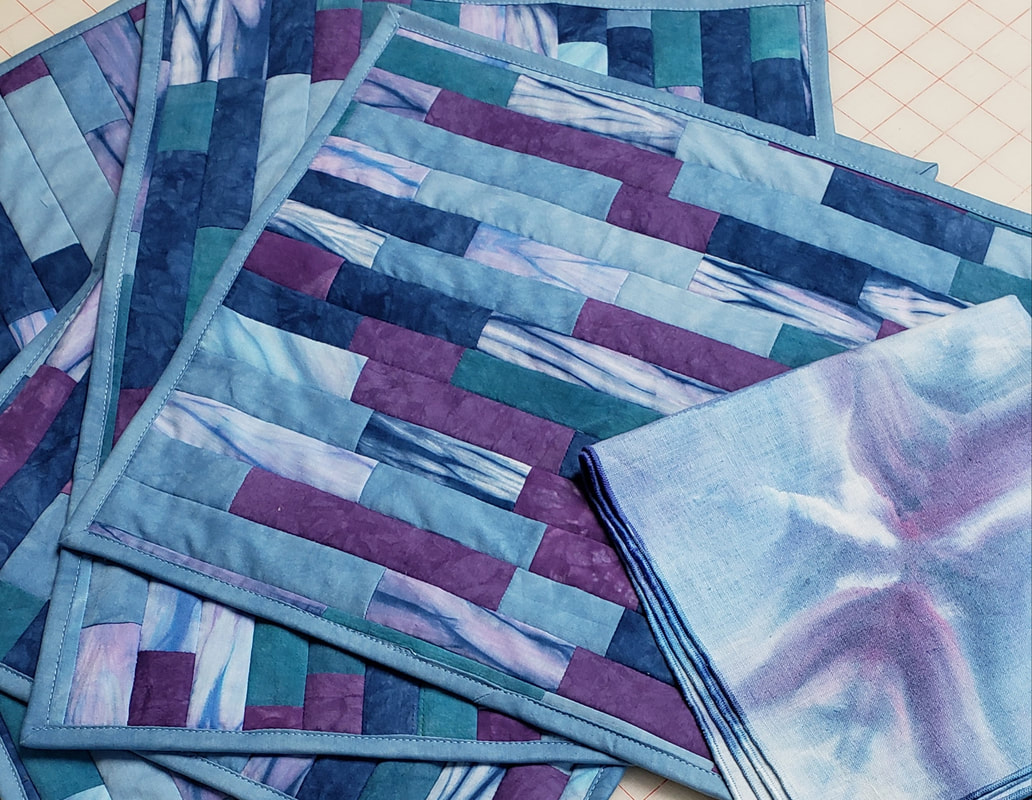 Then I cut out and bound the placemats and the project was all done! I'm keeping this set. When I make the next set I'll probably put those in the gift closet. 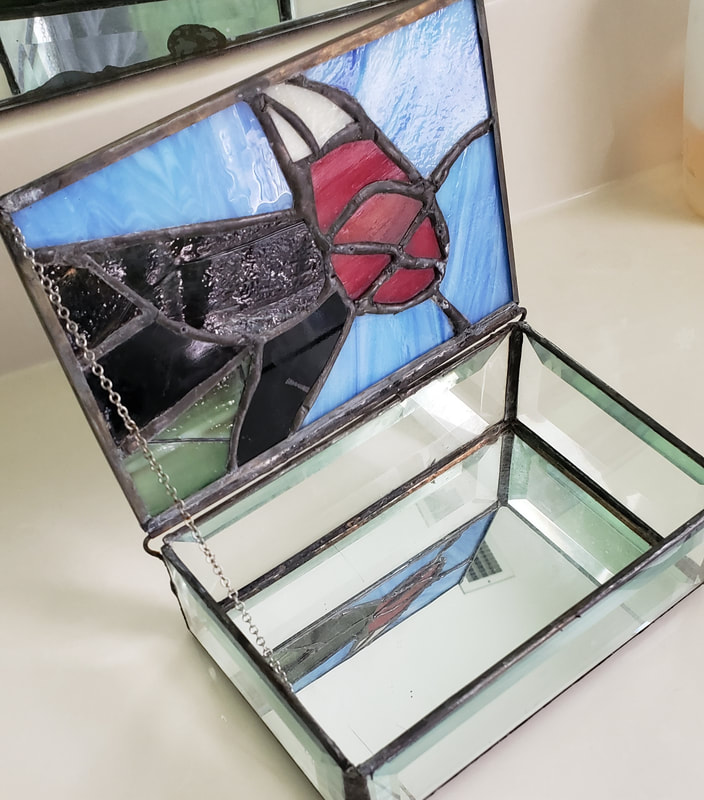 I also found another vulture! I was cleaning the guest bathroom because we were having company last night and I saw that I missed one of my vulture pieces. My friend, Lora made this one for me.
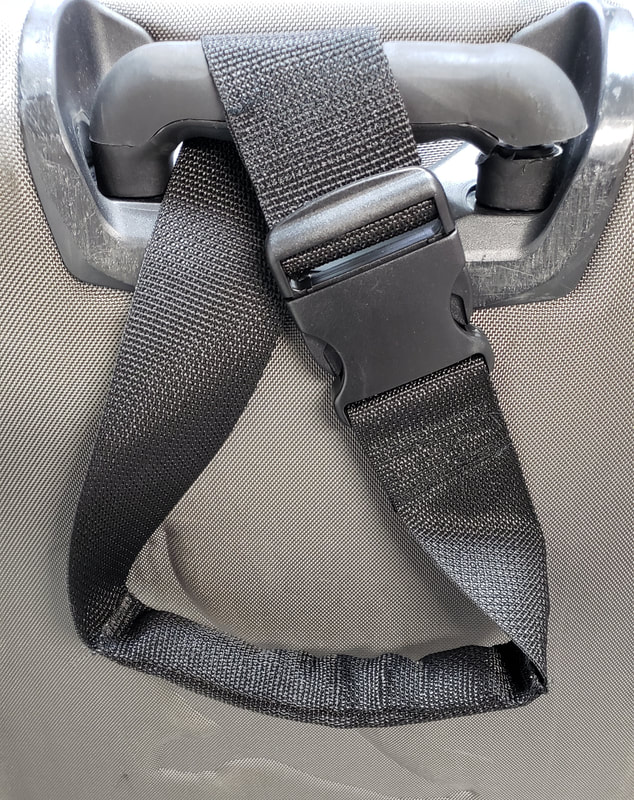
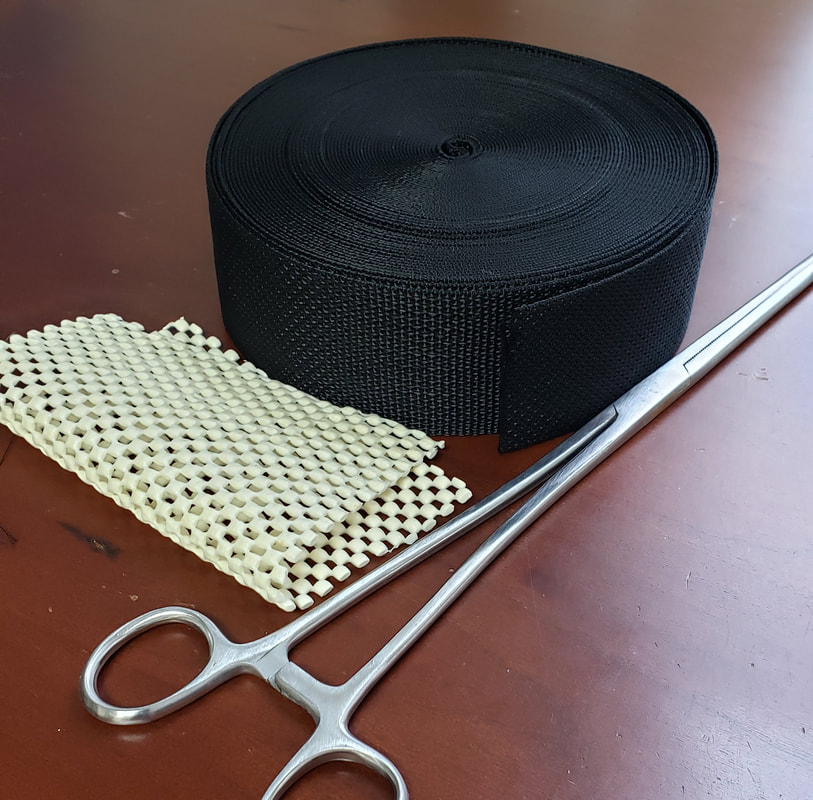
The reason we had company is that he and Chris headed out this morning for a ski trip. He brought out his luggage and asked if I could create a handle for him because the airlines broke the handle on his bag. This is why our sewing/craft rooms are packed with CRAP (Creative Resources and Projects). Because we never know when we might need something. I cut that latch off a trashed tote/carrier and the hemostat that I use in dyeing helped me stuff the padded handle. He was impressed. I'm not placing any bets on whether this thing actually makes it home. He's the traveler that always leaves at least one thing behind.
Late last night I also finished the tree skirt but I'll share that later. I just didn't want to edit any more photos today. I also got a bee in my bonnet to make us new bathrobes so I'll work on that this week along with the other set of placemats. I don't think this week will be quite as productive but it should still be good! 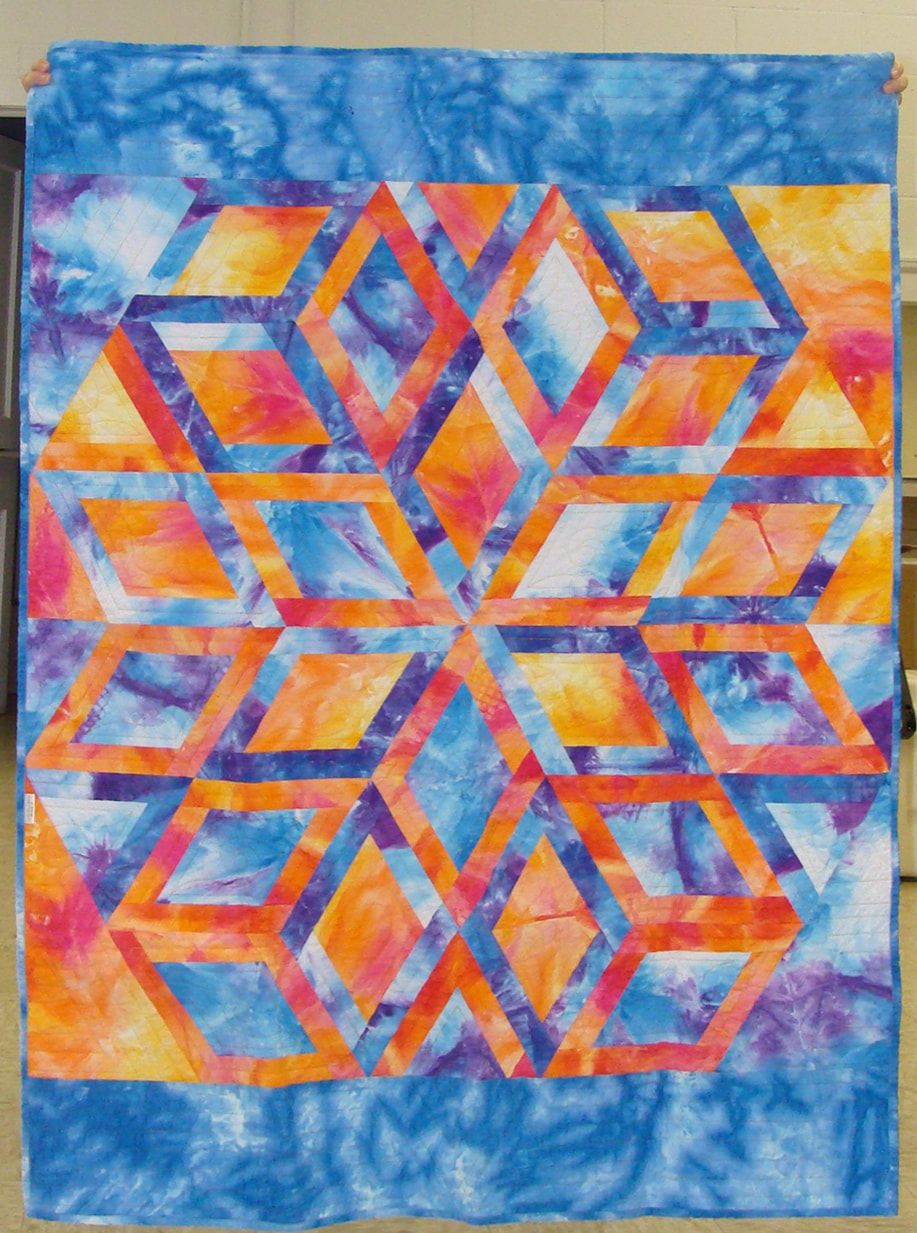 Veterans Quilt by Margaret Griffiths, 48 x 60 Margaret Griffiths is an amazing artist and I'm fortunate to know her as a friend. With this quilt she tells me that we were talking about how to use the Crystal fabrics and I said "just cut into them". So she did and created this sparkling gemstone. She added a piece of a Galaxy fabric to make the quilt he right size for out local veterans quilt project.
For sharing, Margaret received a 20% coupon for the shop that's good for 3 months! If you have made anything with my hand dyed fabric I hope you will consider sharing it in the Customer Gallery. The only rule is that projects have to be complete. It doesn't have to be made totally from hand dyed fabric, just include a recognizable amount. 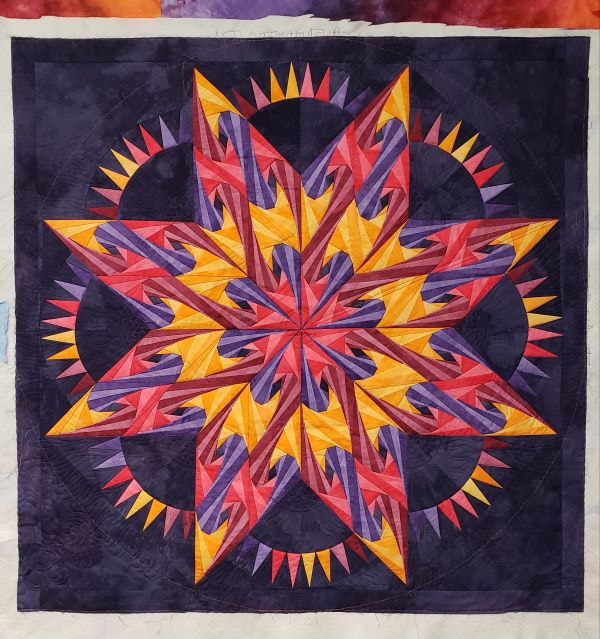 I did my best to make this a complicated and long project but successfully talked myself off that ledge every time. The quilting is done so it's time to cut it into a tree skirt. The binding fabric is being dyed as I write this so I might get this finished next week. 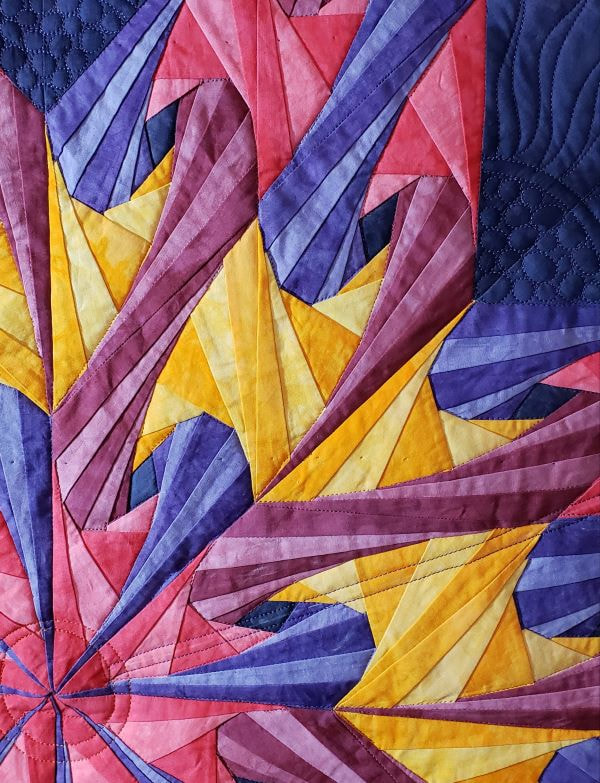 My first going-to-far ledge was a plan to stitch in the ditch EVERY seam in the pieced blocks. If I did that I'd still be quilting this at Christmas. I talked myself into just quilting around each color group and that, frankly, was just right. It would be nice if this think kept some amount of drape to it and stitching ever seam would make it stiff as a board. You can see where I stitched for the opening. I'm cutting it open in the middle of a star point because I want a star point as the center front of the tree skirt. 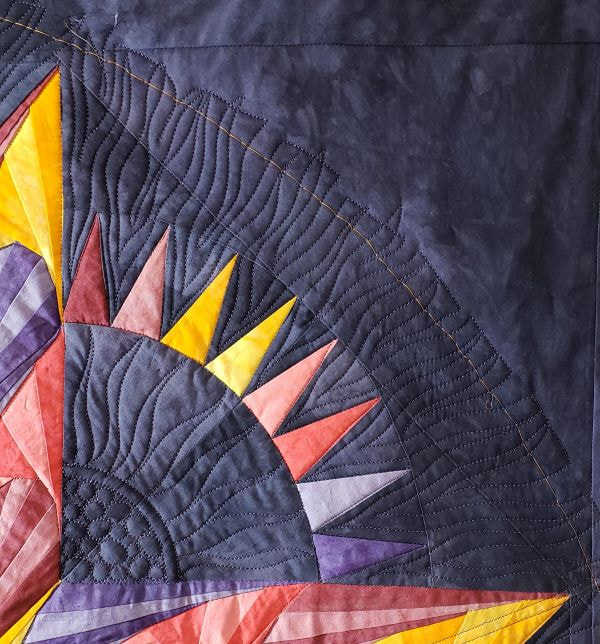 I practiced a bunch of feather motifs for the background until I realized that feathers don't go with this quilt at all. Simple (and fast) sunburst effects was the ticket to get this one wrapped up in an afternoon.
Next I'll prepare a back for the test flip and sew placemats and I'll get started on those. 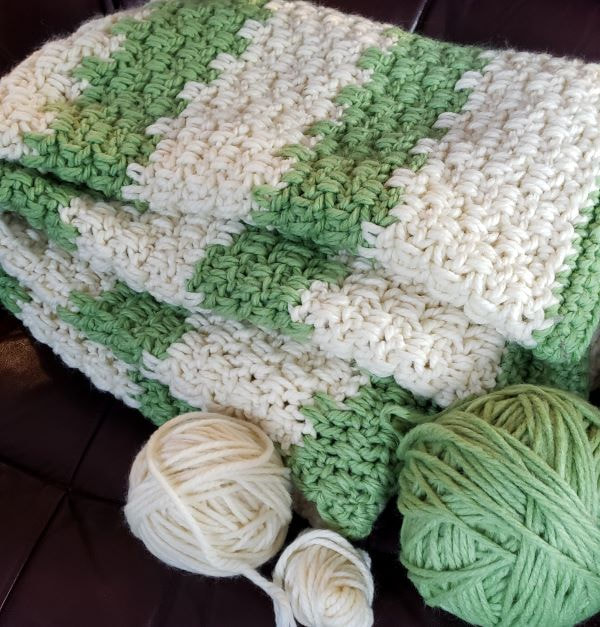 This is one heavy blanket! It's been a great one to work on because once it got big enough it was a nice blanket to use while I added rows to the end. Let's start with the details: Pattern is from BagODay Crochet on YouTube and it is very easy and the blanket is 112 stitches wide. The multiple is 8 stitches plus 3. Yarn is Herrschner's Chunky Plush and I used 4 skeins of Aran and 3 of Tropical Green Hook size 9mm (M/N) Finished blanket is 50' x 64' Yarn review: I liked this yarn a lot better than I anticipated when I first received it. It crochets up easy and fast. It's rated a bulky 5 but it has to be a 6 and it makes a very heavy blanket, weighing in at 60 ounces. In the end it was quite stressful on my hands so I'd probably avoid using a super bulky yarn in the future. 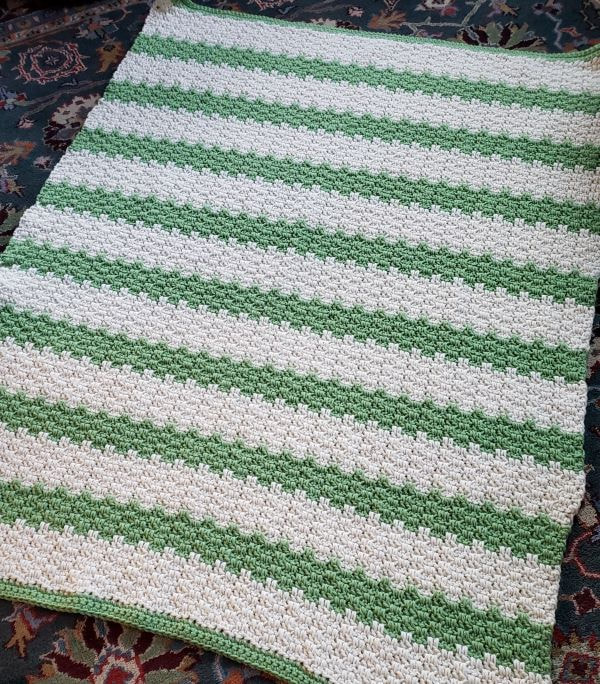 The story behind this one is that I bought a kit from Herrschner's that was deeply discounted. I think I paid $19 for 7 balls of yarn. I figured that if I didn't like it that I could donate it to From The Heart and some of their dozens of volunteers would make something with it. When I first got the yarn I was not impressed. It felt very rough so it was slated for donation. But before I gave up I decided to make a swatch and see how it handled and I was surprised to find that I didn't mind the yarn at all. I knew that I didn't want to make the pattern in the kit. It was a shell type stitch that I felt was way to bulky for a yarn that was already way too bulky. About that time Crystal at BagODay posted the tutorial that I linked above. I liked the effect of the drop down double crochet stitches and thought it would make for an interesting stripe effect. Because I had 4 balls of the tan and 3 balls of the green I decided on doing 8 rows of tan to 6 rows of green. Size wise, that worked out close to perfect.  After I finished I decided that I didn't want the edges to be the light color because they would show wear and dirt faster. I added 3 rows of single crochet to each end and that also added some stability to the edges. I don't know what I'm going to do with this one. I think it's way too heavy and bulky to be a chemo or dialysis blanket. For now it will go in the gift closet. I'm sure there will be a need somewhere where this one will find a perfect home. I'm contemplating starting another big blanket so that I'll have something to keep me toasty through February. But I also have a baby blanket to make.  In other crochet news, I'm working on a wheelchair blanket while I wait for the delivery of the baby blanket yarn. This will finish about 32 x 44 and I think I have enough of this clearance yarn to make 2. This will be a nice manly one. The corner to corner goes so fast and this is a great mindless project to do while Chris and I finally watch the Ozark series. So far we are enjoying it. The humor, quirky characters and brutality reminds me of Justified, one of my favorite series of all time.  I officially put away the duster for a while and started swatching for a sleeveless summer top. This is the Lion Brand Coboo yarn after going through and hot wash and dryer. It's awesome! As soon as Lion Brand has any sort of sale I'll be ordering yarn for the summer top. It will be an easy first garment to make.
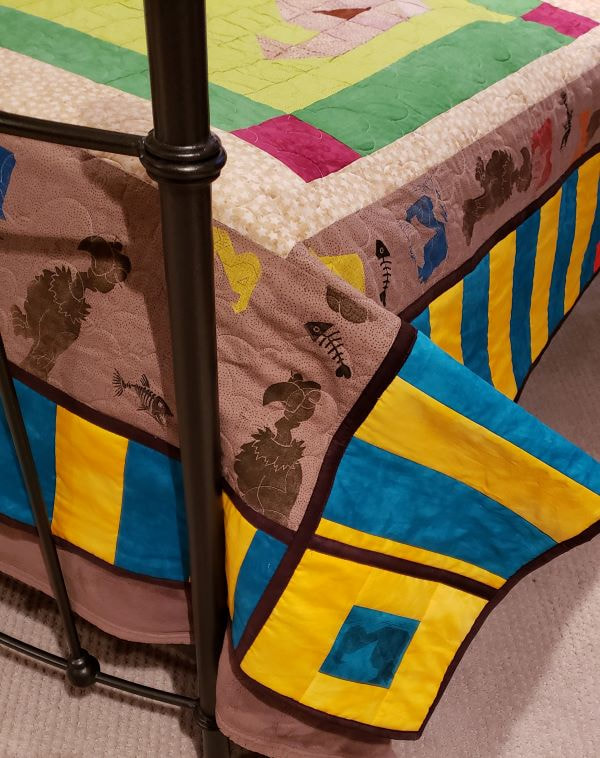
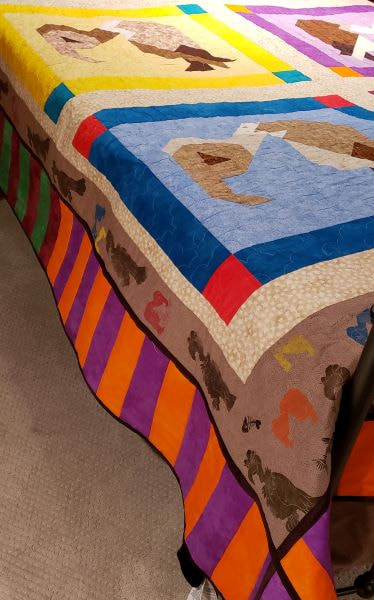
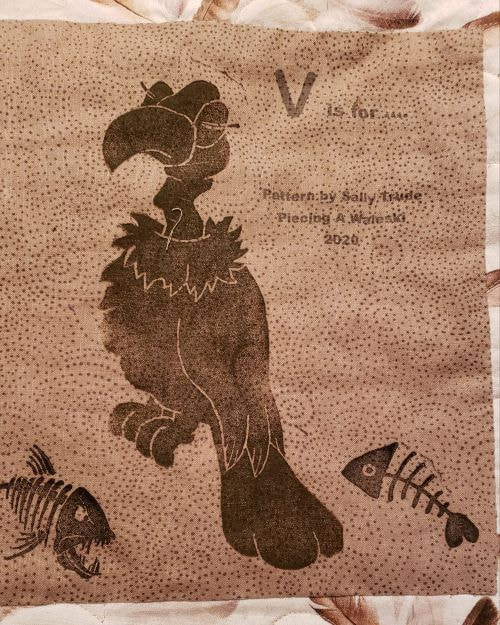
Today is a big day in the blog. I'm going to share the finished vulture quilt and all of my vulture art! I will also explain how I came to love vultures. Let's start with the quilt. 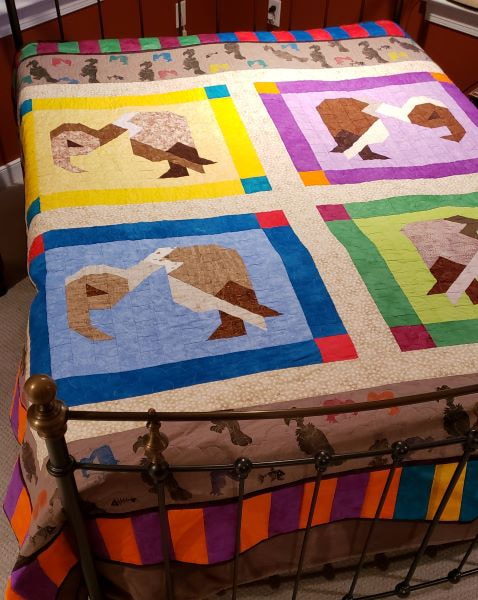 I sooo love this quilt! Anne made this for me for my 60th birthday. The original quilt ended at the tan stamped border. I needed it a little bigger for our bed so I asked her if I could add another border and that's what I did. It took me much too long but now this quilt is on our bed and we are sleeping under the protective eyes of vultures. The quilt is now about 92" square. Anne got the pattern for the vulture blocks from Sally Trude's blog. Sally makes so many great pieced animal blocks and is a very prolific quilter when her feline owners allow. I decided to use a reversible technique to add the borders. Mom and I took a class from Sharon Pederson many years ago and I use the techniques that she teaches in her book. I bet my Mom has made at least 2 dozen quilts using the reversible technique. I stopped once I got the longarm but it was the way to go for this project. If you notice, each large vulture block has a 2-tone frame. Those frames are made with my Color Wheel fabrics so I knew that I could match those elements of the quilt perfectly and I decided to reference those frames in the border. Each corner of the border uses the 2 colors from the frame in the opposite corner. She had given me all of her stamping leftover bits and there were 4 that were perfect to use in the corners. By the way, she carved all the stamps and printed the tan border fabric. At her local quilt shop we were able to find more of the backing fabric that she used. I dyed a dark brown for the reversible sashing strips. All in all, I'm pleased with the added border. Now, before I share all of my vulture art I'll explain how I developed my love, or maybe just strong appreciation, for vultures. When we first moved to Montpelier, VA in 1998 I had not lived in a rural setting for a very long time. So here I was on 10 acres feeling like I was out in the middle of nowhere. I just wasn't accustomed to so much nature. Of course, now I feel like I want to be in the middle of 100 acres! But 24 years ago, nature intimidated me. One day we saw that a huge, probably pregnant, beaver had died on the edge of the pond. It completely freaked me out and I kept bugging Chris to "do something about it". He's a nature guy, so he ignored me. Well 2 days later I look out the window and there's a wake of vultures feeding on the beaver. For the first day it kind of creeped me out but by day 3 I realized that I had just witnessed the miracle of nature's vacuum cleaner. There wasn't one tiny bit of that beaver left to pollute our pond. I was grateful and impressed! There have been many times over the years that the vultures have come around to clean up one mess or another. After that I officially declared the vulture as my favorite bird.
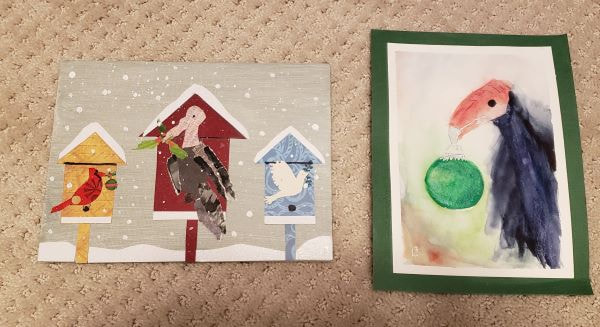
I didn't take my vulture fascination anywhere until I was on Facebook one day and saw a needle felting artist making this. I lost my mind over the detail that she put into each feather. I messaged her immediately and bought it before she even finished it. I immediately took it the a framer and it hangs in our downstairs hallway keeping a watchful eye on anyone going to the bathroom. 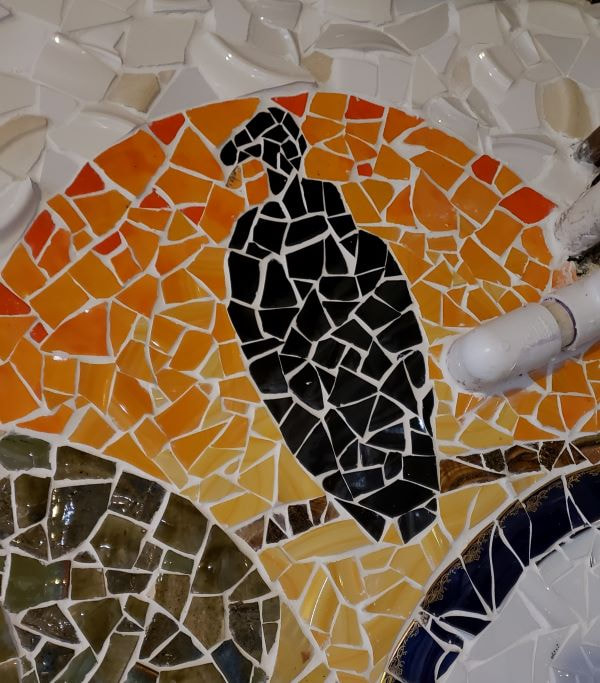 Then I added a vulture block to my mosaic wall to watch over me while I'm quilting. Then my friends got wind of my vulture obsession and things started getting out of control. 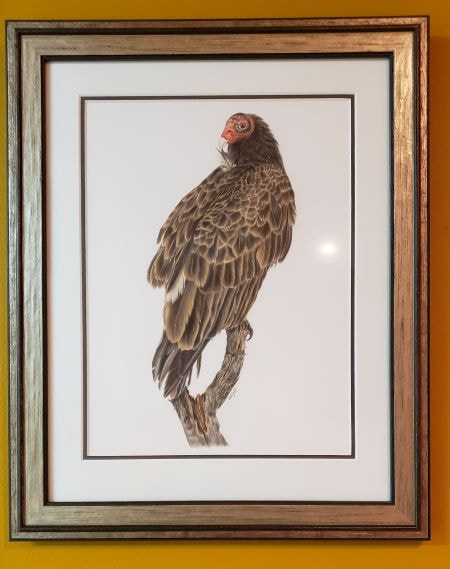 For my 60th birthday Anne made the quilt for me and our friends from England commissioned this piece from a local artist that they know. Her instagram page is worth checking out. Anne has also give me these festive gifts. What's Christmas without a vulture ornament? It's very sparkly! The vulture puzzle is really cool. My friend, Lora, is a collage artist and painter and she's made me several vulture themed pieces of art. Two are Christmas paintings. The collage vulture is hanging in the upstairs hallway and the stamped piece (that she carved) is on the mantle with the vulture puzzle.
I know. It's a little "out there" but the good news is that I'll never be inundated with themed vulture art because there just isn't a lot of it around. Imagine what my house would look like if I said I loved frogs or pigs? It's better this way. |
FeedsTo subscribe click the RSS Feed button and copy the URL of that page into your blog reader.
In Bloglovin you need to search "Colorways By Vicki Welsh" to find the blog. About Vicki
I'm Vicki Welsh and I've been making things as long as I can remember. I used to be a garment maker but transitioned to quilts about 20 years ago. Currently I'm into fabric dyeing, quilting, Zentangle, fabric postcards, fused glass and mosaic. I document my adventures here. Categories
All
Archives
July 2024
|


 RSS Feed